

Although JavaScript is not a class-based language, it is possible to simulate classes using its prototypal structure. Ext JS 4 introduces an entirely new way of defining classes, compared with Ext JS 3. Consequently, when developing with Ext JS 4 your JavaScript's structure will be more closely in line with that of other object oriented languages.
This recipe will explain how to define classes using the new system, and give some detail about the features it has to offer. We will do this by creating a custom class to model a vehicle, with a method that will alert some details about it.
The Ext.define method is used to define new classes. It uses a string-based definition, leaving the framework to take care of the namespacing and concrete defining of the class:
Call the
Ext.definemethod with our class name and configuration object.// Define new class 'Vehicle' under the 'Cookbook' namespace Ext.define('Cookbook.Vehicle', { // class configuration goes here });Add properties and methods to the configuration object:
Ext.define('Cookbook.Vehicle', {
    Manufacturer: 'Aston Martin',
    Model: 'Vanquish',

    getDetails: function(){
        alert('I am an ' + this.Manufacturer + ' ' + this.Model);
    }
});
Tip
Downloading the example code
You can download the example code files for all Packt books you have purchased from your account at http://www.packtpub.com. If you purchased this book elsewhere, you can visit http://www.packtpub.com/support and register to have the files e-mailed directly to you.
We now add the
Ext.definemethod's optional third parameter, which is a function that is executed after the class has been defined, within the scope of the newly created class:Ext.define('Cookbook.Vehicle', { Manufacturer: 'Aston Martin', Model: 'Vanquish', getDetails: function(){ alert('I am an ' + this.Manufacturer + ' ' + this.Model); } }, function(){ Console.log('Cookbook.Vehicle class defined!'); });Finally, we create an instance of the new class and call its
getDetailsmethod:var myVehicle = Ext.create('Cookbook.Vehicle'); alert(myVehicle.Manufacturer); // alerts 'Aston Martin' myVehicle.getDetails(); // alerts 'I am an Aston Martin Vanquish'
The
Ext.definemethod handles the creation and construction of your class, including resolving the namespaces within your class name.Note
Namespaces allow us to organize classes into logical packages to keep code organized and prevents the global scope from becoming polluted. In our example, Ext JS will create a package (essentially just an object) called
Cookbook, which contains ourVehicleclass as a property. Your namespaces can be infinitely deep (that is, as many dots as you wish) and are automatically created by the framework.The first parameter of this method identifies the class name as a string. Class names are always given as strings (when defined and when instantiated) so they can be dynamically loaded when needed, meaning you can start to instantiate a class before it has been loaded.
The second parameter of this method accepts a standard JavaScript object that defines all of the properties and methods of your class. These can be accessed, as you would expect, from an instance of the class.
The third parameter of
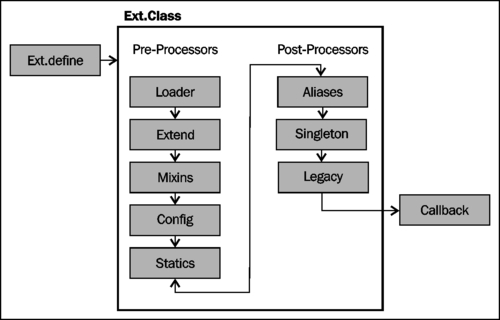
Ext.define's is an optional callback function that gets executed once the class has been fully defined and is ready to be instantiated.Internally every class that is defined is turned into an instance of the
Ext.Classclass by theExt.ClassManager. During this process, the manager runs through a series of pre and post processing steps. These processors each take care of initializing one part of the class and are called in the following order:Loader: Loads any other required classes if they don't already exist, recursing through this process for each class loaded
Extend: Now that all the required classes have been loaded, we can extend from them as required by our
extendconfig optionMixins: Any Mixins that have been defined are now handled and merged into our class
Config: Any properties in the
configconfiguration option are processed and their get/set/apply/reset methods are createdStatics: If the class has any static properties or methods these are handled at this stage
Once all of these pre-processors have completed their work our new class is ready to be instantiated. However, it will continue to work through its post-processors that perform the following actions:
At this point our class is fully created, and all that is left to do is to execute the callback function (defined as the third parameter to Ext.define) to signal the class definition being complete. The full process can be seen in the following diagram:
This model is extremely flexible and allows you to include your own pre or post processor at any stage in the sequence by using the registerPreProcessor
and registerPostProcessor
methods.
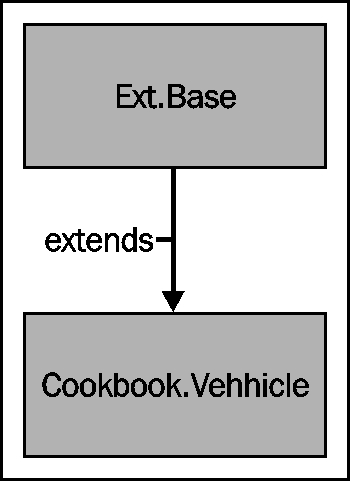
All Ext JS 4 classes inherit from a common base class, named Ext.Base. This class contains several methods that provide basic functionality to all created subclasses, for example override and callParent. When we define a new class using the Ext.define method, and don't specify an explicit base class, then the framework will automatically use Ext.Base as its base inside the Extend preprocessor. If we do specify a base class then that class will, at the root of its inheritance tree, extend Ext.Base. The following diagram shows how our custom class fits into this structure:
The new Ext JS class system also takes care of a lot of the heavy lifting for you when it comes to defining your properties, configuration options, and their associated getter and setter methods.
If you define these configuration options within a config object, the class system (inside its Config pre-processor) will automatically generate get, set, reset, and apply methods. This reduces the amount of code that needs to be maintained and downloaded.
The following code sample utilizes this config option and takes advantage of the free code that the framework will create. This code is initialized by calling the initConfig method within the constructor, which is executed when your class is instantiated.
Note
Constructors
are special methods that are executed when a class is instantiated (either using the Ext.create(..) or new syntax) and are used to prepare the object in any way needed. For example, it could be used to set up default property values.
Ext.define('Cookbook.Vehicle', {
    config: {
        Manufacturer: 'Aston Martin',
        Model: 'Vanquish'
    },

    constructor: function(config){
        // initialise our config object
        this.initConfig(config);
    },

    getDetails: function(){
        alert('I am an ' + this.Manufacturer + ' ' + this.Model);
    }
});

// create a new instance of Vehicle class
var vehicle = Ext.create('Cookbook.Vehicle');

// display its details
vehicle.getDetails();

// update Vehicle details
vehicle.setManufacturer('Volkswagen');
vehicle.setModel('Golf');

// display its new details
vehicle.getDetails();
By using this approach it is the equivalent of defining your class with the explicit methods shown as follows:
Ext.define('Cookbook.Vehicle', {
    Manufacturer: 'Aston Martin',
    Model: 'Vanquish',

    getManufacturer: function(){
        return this.Manufacturer;
    },
    setManufacturer: function(value){
        this.Manufacturer = value;
    },
    resetManufacturer: function(){
        this.setManufacturer('Aston Martin');
    },
    applyManufacturer: function(manufacturer){
        // perform some action to apply the value (e.g. update a DOM element)
        return manufacturer;
    },

    getModel: function(){
        return this.Model;
    },
    setModel: function(value){
        this.Model = value;
    },
    resetModel: function(){
        this.setModel('Vanquish');
    },
    applyModel: function(model){
        // perform some action to apply the value (e.g. update a DOM element)
        return model;
    },

    getDetails: function(){
        alert('I am an ' + this.Manufacturer + ' ' + this.Model);
    }
});
Note
Notice that we return the property's value within our apply methods. This is important as this method is called by the property's set method, so the new value is applied appropriately, and its return value is stored as the property's value.
Sometimes we will want to perform some extra actions when calling these generated methods. We can do this by explicitly defining our own version of the method that will override the generated one. In our example, when calling the apply method, we want to update a DOM element that contains the Vehicle's name, so the change is reflected on the screen. First we add some markup to hold our Vehicle's data:
<span id="manufacturer"></span>
<span id="model"></span>
Now we override the applyManufacturer and applyModel methods to perform an update of each DOM element when the properties are changed:
Ext.define('Cookbook.Vehicle', {
    config: {
        Manufacturer: 'Aston Martin',
        Model: 'Vanquish'
    },

    constructor: function(config){
        // initialise our config object
        this.initConfig(config);
    },

    getDetails: function(){
        alert('I am an ' + this.getManufacturer() + ' ' + this.getModel());
    },

    applyManufacturer: function(manufacturer){
        Ext.get('manufacturer').update(manufacturer);
        return manufacturer;
    },
    applyModel: function(model){
        Ext.get('model').update(model);
        return model;
    }
});
// create a Vehicle and set its Manufacturer and Model
var vehicle = Ext.create('Cookbook.Vehicle');
vehicle.setManufacturer('Volkswagen');
vehicle.setModel('Golf');
The next recipe explaining how to include inheritance in your classes.
The Adding mixins to your class recipe, which describes what Mixins are and how they can be added to your classes.
Dynamically Loading ExtJS Classes which explains how to use the dynamic dependency loading system that the framework provides.