There are a number of dialogs available for you to use in the Titanium API, but for the purposes of this recipe we will be concentrating on the two main ones—the AlertDialog and the OptionDialog. These two simple components perform two similar roles, but with a key difference. The AlertDialog is normally only used to show the user a message, while the OptionDialog shows the user a message plus requires a response from them from a number of buttons. Generally, an AlertDialog only allows two standard responses from the user, OK or Cancel, whereas the OptionDialog can contain many more.
There are also key differences in the layout of these two dialog components which will become obvious in the recipe below.
The complete source code for this recipe can be found in the /Chapter 1/Recipe 9 folder.
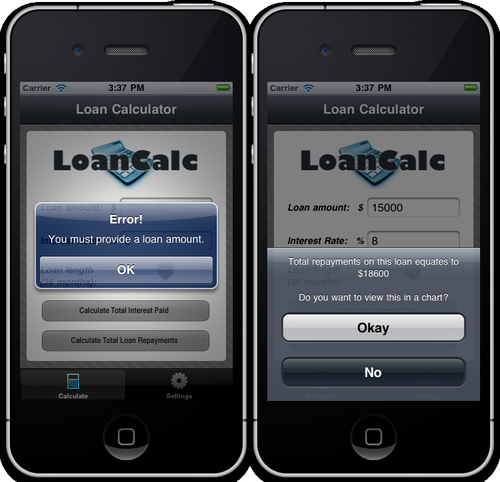
First, we'll create an AlertDialog that simply notifies the user of an action that cannot be completed due to missing information—in our case, they have not provided a value for the loan amount in the tfAmount TextField:
if (tfAmount.value == '' || tfAmount.value == null)
{
    var errorDialog = Titanium.UI.createAlertDialog({
      title: 'Error!',
      message: 'You must provide a loan amount.'
    });
    errorDialog.show();
}
}
Now let's add the OptionDialog. The OptionDialog is going to display the result from our calculation and then give the user the choice to view the results as a Pie Chart (in a new window) or alternatively to cancel and remain on the same screen:
//check our win2 autoShowChart boolean value first (coming //from the switch on window2.js)
if (win2.autoShowChart == true)
{
   openChartWindow();
 }
 else
 {
	var resultOptionDialog = Titanium.UI.createOptionDialog({
				title: optionsMessage + '\n\nDo you want to
                  view this in a chart?',
				options: ['Okay', 'No'],
				cancel: 1
	});

  //add the click event listener to the option dialog
  resultOptionDialog.addEventListener('click', function(e){
		Ti.API.info('Button index tapped was: ' + e.index);
		if (e.index == 0)
      {
		   openChartWindow();
		}
  });

  resultOptionDialog.show();

} //end ifThe AlertDialog is a very simple component that simply presents the user with a message as a modal and only has one possible response which closes the alert. Note that you should be careful not to call an AlertDialog more than once while a pending alert is still visible, for example, if you're calling that alert from within a loop.
The OptionDialog is a much larger modal component that presents a series of buttons with a message from the bottom of the screen and is generally used to allow the user to pick from a selection of more than one item. In our code, the resultOptionDialog presents the user with a choice of two options—"Okay" or "No". One interesting property on this dialog is cancel, which dismisses the dialog without firing the click event and also styles the button at the requested index in a manner that differentiates it from the rest of the group of buttons.
Just like the Window object, both of these dialogs are not added to another View but are presented by calling the show() method instead. You should only call the show() method after the dialog has been properly instantiated and any event listeners have been created.
The following screenshots show the difference between the AlertDialog and Option Dialog respectively: