Let's perform one final task for this application and for our first chapter; displaying charts and graphs. Titanium is without a native charting API, however, there are some open source options for implementing charts such as Google Charts. While the Google solution is free, it requires your apps to be online every time you need to generate a chart. This might be okay for some circumstances, but it's not the best solution for any application that is meant to be used offline. Plus, Google Charts returns a generated JPG or PNG file at the requested size and in a rasterized format which is not great for zooming in when viewed on an iPhone or iPad.
A better solution is to use the open source and MIT licensed Raphael library which, luckily for us, has a charting component! Not only is it free, but Raphael is also completely vector based, meaning any charts you create will look great on any resolution, and can be zoomed in without a loss of quality.
Note
Note that this recipe may not work on all Android devices as the current version of Raphael is not supported by non-webkit mobile browsers. However, it will work as described here for the iPhone and iPod Touch.
Download the main Raphael JS library from http://raphaeljs.com (Direct link: http://github.com/DmitryBaranovskiy/raphael/raw/master/raphael-min.js).
Download the main Charting library from http://g.raphaeljs.com (Direct link: http://github.com/DmitryBaranovskiy/g.raphael/blob/master/g.raphael-min.js?raw=true) and any other charting libraries you wish to use.
For this example, we are implementing the Pie Chart, which is here: http://github.com/DmitryBaranovskiy/g.raphael/blob/master/g.pie-min.js?raw=true.
Create a new project in Titanium Studio (or alternatively, if you're following along with the LoanCalc example app, then open your project directory), and put your downloaded files into a new folder called charts under your Resources directory. You could put them into the root folder if you wish, but bear in mind, you'd need to ensure your references in the following steps are correct.
The next step is to rename your
raphael-min.jsfile toraphael-min.lib. The main reason is that if your file is a known JavaScript file (as in it ends in '.js'), the JSLint validator in Titanium will try to validate the Raphael JS library and fail, causing Titanium to lock up. This means you won't be able to run your app and will need to restart Titanium Studio!Create a WebView in your app, referencing a variable holding the HTML code to display a Raphael chart, which we will call chartHTML. A WebView is a UI component that allows you to display web pages or HTML in your application. It does not include any features of a fully-fledged browser such as navigation controls or an address bar. Type in the following code at the top of your
chartwin.jsfile, just after you have included the charting library and created titles for the chart view:var chartWin = Titanium.UI.currentWindow; //include the chart library Titanium.include('charts/chart.js'); //create the chart title using the variables we passed in from //app.js (our first window) var chartTitleInterest = 'Total Interest: $' + chartWin.totalInterest; var chartTitleRepayments = 'Total Repayments: $' + chartWin.totalRepayments; //create the chart using the sample html from the //raphaeljs.com website var chartHTML = '<html><head> <title>RaphaelJS Chart</title><meta name="viewport" content="width=device-width, initial-scale=1.0"/> <script src="charts/raphael.js.lib" type="text/javascript" charset="utf-8"></script> <script src="charts/g.raphael-min.lib" type="text/javascript" charset="utf-8"></script> <script src="charts/g.pie-min.lib" type="text/javascript" charset="utf-8"></script> <script type="text/javascript" charset="utf-8"> window.onload = function () { var r = Raphael("chartDiv"); r.g.txtattr.font = "12px Verdana, Tahoma, sans-serif"; r.g.text(150, 10, "'; chartHTML = chartHTML + chartTitleInterest + '").attr({"font-size": 14}); r.g.text(150, 30, "' + chartTitleRepayments + '").attr({"font-size": 14});'; chartHTML = chartHTML + ' r.g.piechart(150, 180, 130, [' + Math.round(chartWin.totalInterest) + ',' + Math.round(chartWin.principalRepayments) + ']); }; </script> </head><body> <div id="chartDiv" style="width:320px; height: 320px; margin: 0"></div> </body></html>'; //add a webview to contain our chart var webview = Titanium.UI.createWebView({ width: 320, height: 367, top: 0, html: chartHTML }); chartWin.add(webview);Now back in your
app.jsfile, create a new function calledopenChartWindow()which will be executed when the user chooses "Okay" from the previous recipe's option dialog. This function will create a new Window object based on thechartwin.jsfile and pass to it the values needed to show the chart://we'll call this function if the user opts to view the loan //chart function openChartWindow(totalInterest, total) { //Interest (I) = Principal (P) times Rate Per Period (r) //times Number of Periods (n) / 12 var totalInterest = (tfAmount.value * (interestRate / 100) * numberMonths) / 12; var totalRepayments = Math.round(tfAmount.value) + totalInterest; var chartWindow = Titanium.UI.createWindow({ url: 'chartwin.js', title: 'Loan Pie Chart', barImage: 'navbar.png', barColor: '#000', numberMonths: numberMonths, interestRate: interestRate, totalInterest: totalInterest, totalRepayments: totalRepayments, principalRepayments: (totalRepayments - totalInterest) }); tab1.open(chartWindow); }
Essentially what we are doing here is wrapping the Raphael library, something that originally was built for the desktop browser, into a format that can be consumed and displayed using the iPhone's WebKit browser. Raphael was originally created to simplify vector graphics generation on the web and was extended later on as gRaphael in order to render both static and interactive charts.
There is a series of documentation on Raphael at http://raphaeljs.com and http://g.raphaeljs.com on how it renders charts via its JavaScript library. We will not be explaining this in detail but rather the implementation of the library to work with Titanium.
Our implementation consists firstly of including the charts.js library from Raphael into our Titanium project. This is the main source file used by the library. From there, we are creating a new type of component, a WebView, which will (in this case) hold the HTML data that we constructed in the variable chartHTML. This HTML data contains all of the includes necessary to render the charts, which are listed in item #2 of the Getting Ready section of this recipe. If you had a chart with static data, you could also reference the HTML from a file using the url property of the WebView object instead of passing in all of the HTML as a string. The chart itself is created using some simple JavaScript embedded in HTML data string, r.g.piechart(150, 180, 130, n1, n2), where n1 and n2 are the two values we wish to display as slices in the Pie Chart. The other values define the center point of the chart from the top and left respectively, followed by the chart radius.
All of this is wrapped up in a new Window defined by the chartwin.js file, which accesses properties passed in from the first tab's Window in our LoanCalc app. This data is passed using exactly the same mechanism as explained in the previous "Passing Custom Variables Between Windows" recipe.
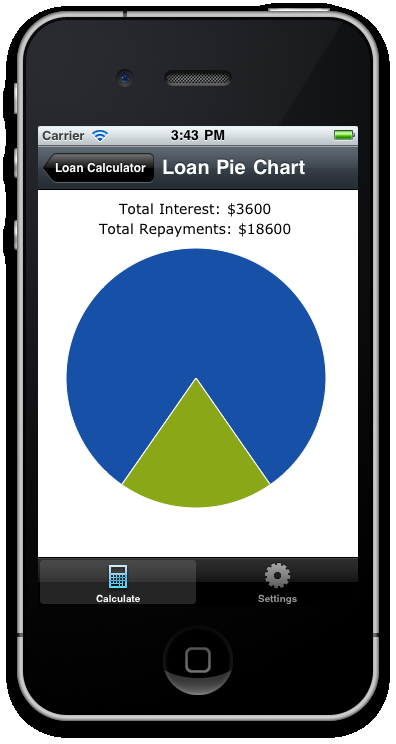
The following screenshot shows the Raphael JS Library being used to show a pie chart based on our loan data: