Book Image

Getting Started with Oracle Hyperion Planning 11

By : Enti Sandeep Reddy
Book Image

Getting Started with Oracle Hyperion Planning 11

By: Enti Sandeep Reddy

Overview of this book

<p>Oracle Hyperion Planning is one of the many products in the Oracle Enterprise Performance Management software suite, an industry-leading Business Intelligence software package. The primary focus of the Hyperion Planning product is to provide a planning, budgeting, and forecasting solution that helps you manage and coordinate all your business planning and budgeting needs.</p> <p>This book is a practical guide to implementing a Hyperion Planning solution in your organization, which addresses all your planning, budgeting, and forecasting needs.</p> <p>You will begin with the installation of Hyperion Planning and then design Planning applications as per some example user requirements. You will then learn to create the planning objects. The book moves on to explaining important concepts within Hyperion Planning such as data forms, task lists, business rules, validation rules, and workflows, with the help of many real-world examples to maximize your learning. Towards the end of the book, you will cover user provisioning and access rights and budget process management.</p>
Table of Contents (23 chapters)
Getting Started with Oracle Hyperion Planning 11
Credits
About the Author
About the Reviewers
www.PacktPub.com
Preface
Index

Creating a Planning application


In this section, we are going to create our first Planning Application using the same data source of 'PandB', which we created in the earlier section on Data source creation.

As a part of creating an application, we need to first provide the following information:

  • General information

  • Calendar

  • Currency

  • Plan type

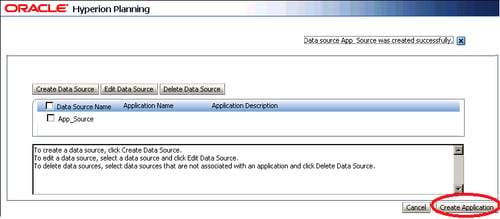
Resuming from where we had left off in the previous section, that is, Classic Planning Administration Wizard, after the PandB source is listed, as shown in the following image, we need to select the source name PandB by clicking on it and then selecting the option of Create Application, which we would see towards the bottom right-hand side.

Note

We need to first select the source name, before we go ahead with application creation.

General information

In the very first tab of Select, we need to provide the following information:

  • Data Source: It's a drop down, where we need to select the Relational data source. In our case, we had already created a data source by...