

Customizing the Editor tab to suit your preferences
In this recipe, we will change settings in the Editor tab to suit your preferences.
Getting ready
Make sure that the VBA Editor is visible.
How to do it…
In order to proceed with executing this recipe, you need to go through the following steps:
- With the VBA Editor active, choose Tools | Options from the menu bar. The Options dialog box will appear as shown here:

Figure 2.23 – The Options dialog box
- In the Options dialog box, click on the Editor tab, if it is not already selected.
There are two sections: Code Settings and Window Settings. In each of these sections, you will find several boxes, some with tick marks and others empty.
- Click in any of these tick boxes to select or deselect the option, as described to the right of the tick box:

Figure 2.24 – The Editor tab
- Click on the Editor Format tab to activate it. With this tab, you can customize the way the Editor looks.
Here, you will find three sections: Code Colors, Font, and Sample.
The options under Code Colors can be customized by selecting a different color under Foreground, Background, and Indicator for each of the code elements.
The font and size can be changed by selecting either Font or Size, while a sample will display the effect of your choices in the Sample section, as shown:

Figure 2.25 – The Editor Format tab
- Click on the General tab to activate it. This is where the less dedicated settings can be made.
In this area, you will find four sections: Form Grid Settings, Edit and Continue, Error Trapping, and Compile.
Once again, changes can be made by either selecting or unselecting tick boxes, as shown:

Figure 2.26 – The General tab
- Click on the Docking tab to activate it. The only purpose of this tab is to set the behavior of the different windows in the VBA Editor.
There is only one section with a list of tick boxes, each with a description:
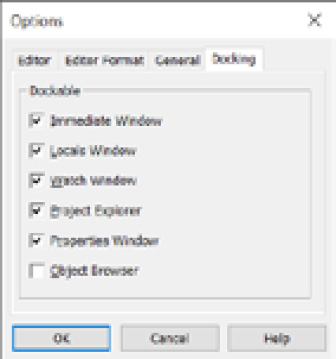
Figure 2.27 – The Docking tab
How it works…
We will now have a quick look at what customizing these tabs entails.
The Editor tab
The default settings are default for good reasons and speak for themselves, in most cases. There are two possible changes I would suggest, which are as follows:
- The Auto Syntax Check: For novice users, this option is indispensable, so keep it as it is. For people with more experience, the pop-up dialog box that appears when it discovers a syntax error in the code can be irritating. You choose what you prefer.
- Default to Full Module View: Many coders prefer to see a maximized code window. However, if you know that you're going to work in multiple modules, it is sometimes nice to have the code window in restore down mode so that you can easily select and move between them.
The Editor Format tab
With this tab, you can customize the way the Editor looks. Once again, these settings are the default because they've been tried and tested.
So, unless you are working for a multi-national company where the project managers have developed their own color settings, I would strongly advise that you stick to the factory settings.
The General tab
In almost every case, the default setting will be best. There is, however, one setting that must be mentioned, and that is Error Trapping. The default setting is Break On Unhandled Errors. If you switch this off, your error handling code will not work. More on this will be covered later in the book.
The Docking tab
As said, these settings determine window behavior in the VBA Editor. When a window is docked, it is fixed in place in the VBA program window, meaning that your environment is fixed and familiar.
If you turn off all docking, windows in the VBA Editor can potentially become a confusing mess of floating screens. In this case, I would strongly advise against undocking windows.