

Cost allocation in Azure for FinOps
The goal of the FinOps team is to create visibility into cloud spending and enable granular cost allocation to create shared accountability of cloud spending. Proper cost allocation will help teams to see their cloud spending and the impact their action or inaction has on the bill. Spending data must be properly mapped to the organizational hierarchy by cost center, applications, and business units by using the account hierarchy and resource tagging.
Cost allocation using the account, management group, and subscriptions hierarchy
The billing account, department, and account hierarchy for an Enterprise Agreement offer type allows you to organize and allocate your costs at the highest level. In the following example, the organization has created two departments (Marketing and HR) under Billing Account. Invoices are generated at the Billing Account level. The Department part groups the accounts (that contain subscriptions) to organize costs into a logical grouping. The EA admin can configure the spending quota for each department. This is an excellent place to implement a budget. The enterprise administrator and the department administrator will receive notifications once the quota has reached 50%, 75%, 90%, and 100%.
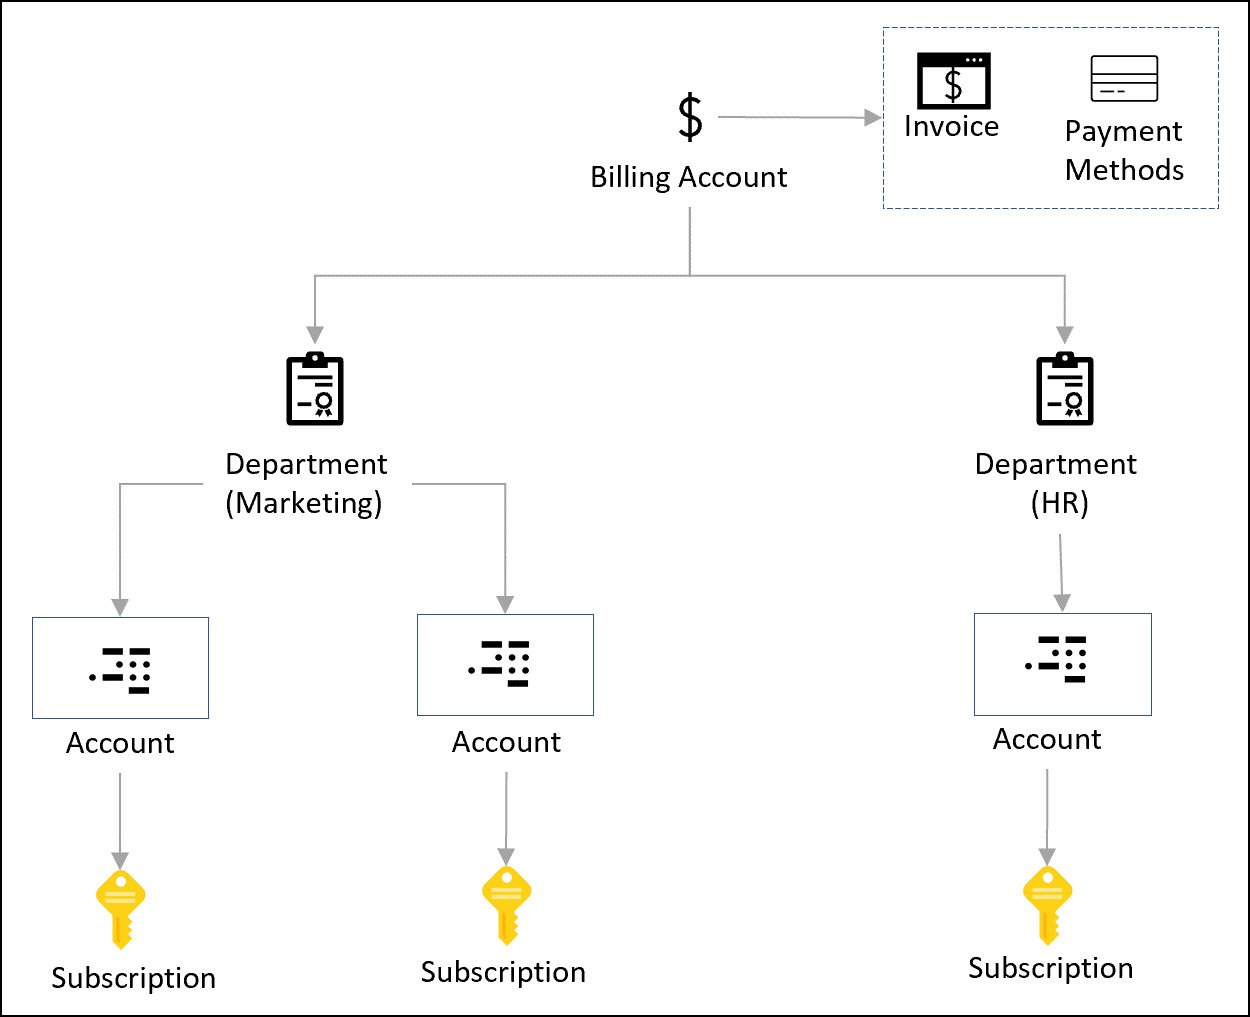
Figure 1.9 – Azure Enterprise Agreement’s department hierarchy
While you can use Enterprise Agreement’s Department hierarchy for cost allocation, in practice, it does not provide the granularity that the FinOps team is looking for.
Note
To learn more about the Microsoft Customer Agreement (MCA) billing hierarchy, please refer to the Microsoft documentation at https://docs.microsoft.com/en-us/azure/cost-management-billing/manage/view-all-accounts.
Here, management groups come into the picture. As you can see in Figure 1.10, we are starting from the top and moving down toward a bit more granularity. Management groups allow efficient access, policy, and compliance for hundreds of subscriptions. While they are not directly related to helping with cost allocation, the latest cost analysis scope object now includes filtering by using management groups. So, now, you can group the cost of all resources under a single management group and report it back to the business. The following is an example of a management group hierarchy that helps with cost allocation:
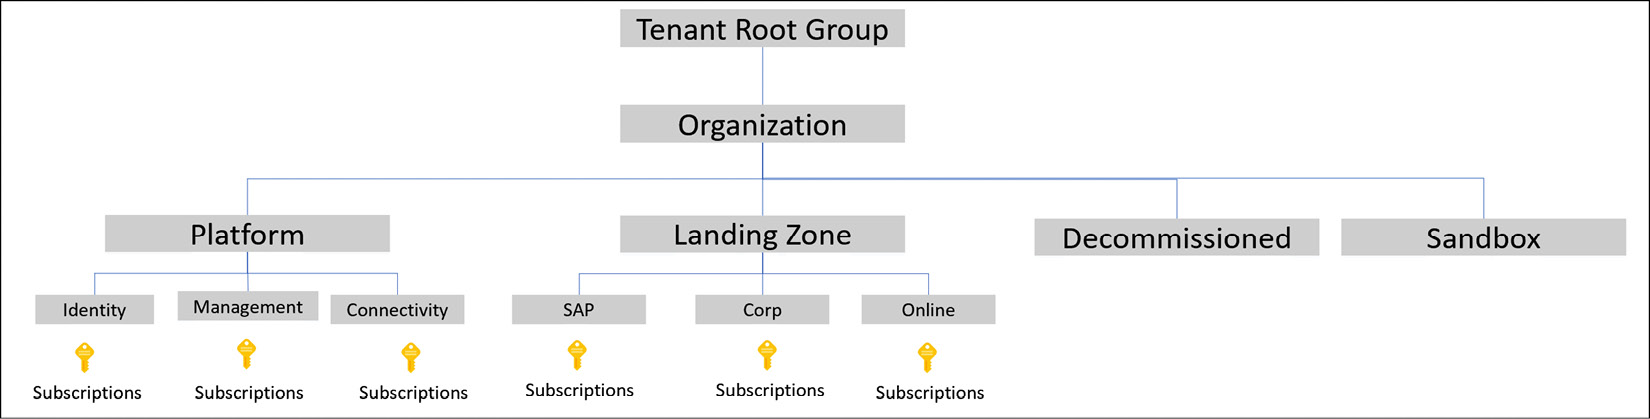
Figure 1.10 – Organizing subscriptions under management groups
In the preceding example, the first level of management group is called the Root management group. Management groups can be six levels deep. Under Root, we have Organization, and under Organization, we have Platform, Landing Zone, Decommissioned, and Sandbox management groups. Under the Platform management group, we have Identity, Management, and Connectivity. Each has a corresponding Subscriptions group.
Using this management group structure, the FinOps team can easily group the cost by a given management group. For example, to know how much the SAP workload costs, you can go to the Cost Analysis dashboard and select the scope of the SAP management group. That will include all the subscriptions under SAP and provide the total cost.
Subscriptions in Azure support tags. To allocate cost at the subscription level, you can assign tags to the subscription and group the cost by the given tag. For example, by using tags on subscriptions, you can easily allocate and get the total cost incurred by a given tag on a subscription.
Cost allocation using resources tags
Tags are essentially metadata that you can apply to Azure resources in the form of key/value pairs. For example, if you want to distinguish the cost of the development environment from the production environment for the marketing application, you can assign the Environment = Development or Environment = Production tag to all the resources in Azure.
It is important to note that each resource, resource group, and subscription can have a maximum of 50 tags. If you need more than 50 tags, you can use a JSON string in the tag value. Also, note that Azure Automation, Azure Content Delivery Network (CDN), and Azure DNS (zone and A records) only support a maximum of 15 tags.
Note
Not all resource types in Azure support tags; these resources are called untaggable. To find out whether a resource supports tags or not, refer to the Microsoft documentation at https://docs.microsoft.com/en-us/azure/azure-resource-manager/management/tag-support. Please see the case study for the strategy to allocate costs for untagged or untaggable resources.
Depending on the FinOps team’s maturity level, the following are the minimum tags that should be applied to the resources. To enforce tag coverage, you can create an Azure policy to audit or deny the resource creation if the required tags are not provided:
|
Tag Name |
Description |
|
|
|
|
|
This represents the application environment, as in the following examples:
|
|
|
This represents the department that owns the application for billing purposes, as in the following example:
|
|
|
This represents the IT owner of the application, as in the following example: |
|
|
This represents the business owner of the application, as in the following example: |
|
|
This represents the organization’s cost center code for this application, as in the following example:
|
There are various ways you can apply these tags to Azure resources. The most common and effective way is to embed tags in your infrastructure as code (IaC) solution (Bicep or Terraform). Alternatively, you can use the Azure portal or Azure CLI commands to list, add, update, or delete tags.
To add tags to a Terraform template for a resource group, use the following code:
resource "azurerm_resource_group" "rg-dev" {
  name     = "rg-marketing-website-dev"
  location = "eastus"
  tags = {
    appid = "141788"
    env = "dev"
    department = "marketing"
    costcenter = "10101"
    itowner = "[email protected]"
    businessowner = "[email protected]"
  }
}
To manage tags with PowerShell and Azure CLI commands, please check out the Microsoft documentation at https://docs.microsoft.com/en-us/azure/azure-resource-manager/management/tag-resources.
In the next section, we will look at how to view the allocated cost by tag using Azure’s cost analysis tool.