
Installing Linux – the basics
This section serves as a quick guide for the basic installation of an arbitrary Linux distribution. For hands-on examples and specific guidelines, we use Ubuntu and CentOS. We also take a brief look at different environments hosting a Linux installation. There is an emerging trend of hybrid cloud infrastructures, with a mix of on-premises data center and public cloud deployments, where a Linux host can either be a bare-metal system, a hypervisor, a VM, or a Docker container.
In most of these cases, the same principles apply when performing a Linux installation. For Docker containerized Linux deployments, we reserve a separate chapter.
How to install Linux
Here are the essential steps usually required for a Linux installation.
Step 1 – download
We start by downloading our Linux distribution of choice. Most distributions are typically available in ISO format on the distribution's website. For example, we can download Ubuntu Desktop at https://ubuntu.com/download/desktop, or CentOS at https://www.centos.org/download/.
Using the ISO image, we can create the bootable media required for the Linux installation. We can also use the ISO image to install Linux in a VM (see the Linux in a VM section).
Step 2 – create a bootable media
If we install Linux on a PC desktop or workstation (bare-metal) system, the bootable Linux media is generally a CD/DVD or a USB device. With a DVD writeable optical drive at hand, we can simply burn a DVD with our Linux distribution ISO. But, as modern-day computers, especially laptops, rarely come equipped with a CD or a DVD unit of any kind, the more common choice for a bootable media is a USB drive.
There's also a third possibility of using a so-called PXE boot server. PXE (pronounced pixie) stands for Preboot eXecution Environment, which is a client-server environment where a PXE-enabled client (PC/BIOS) loads and boots a software package over a local or wide area network from a PXE-enabled server. PXE eliminates the need for physical boot devices (CD/DVD, USB) and reduces the installation overhead, especially for a large number of clients and operating systems. Probing the depths of PXE internals is beyond the scope of this chapter. A good starting point to learn more about PXE is https://en.wikipedia.org/wiki/Preboot_Execution_Environment.
A relatively straightforward way to produce a bootable USB drive with a Linux distribution of our choice is to use the open source tool UNetbootin (https://unetbootin.github.io). UNetbootin is a cross-platform utility, running on Windows, Linux, and macOS:
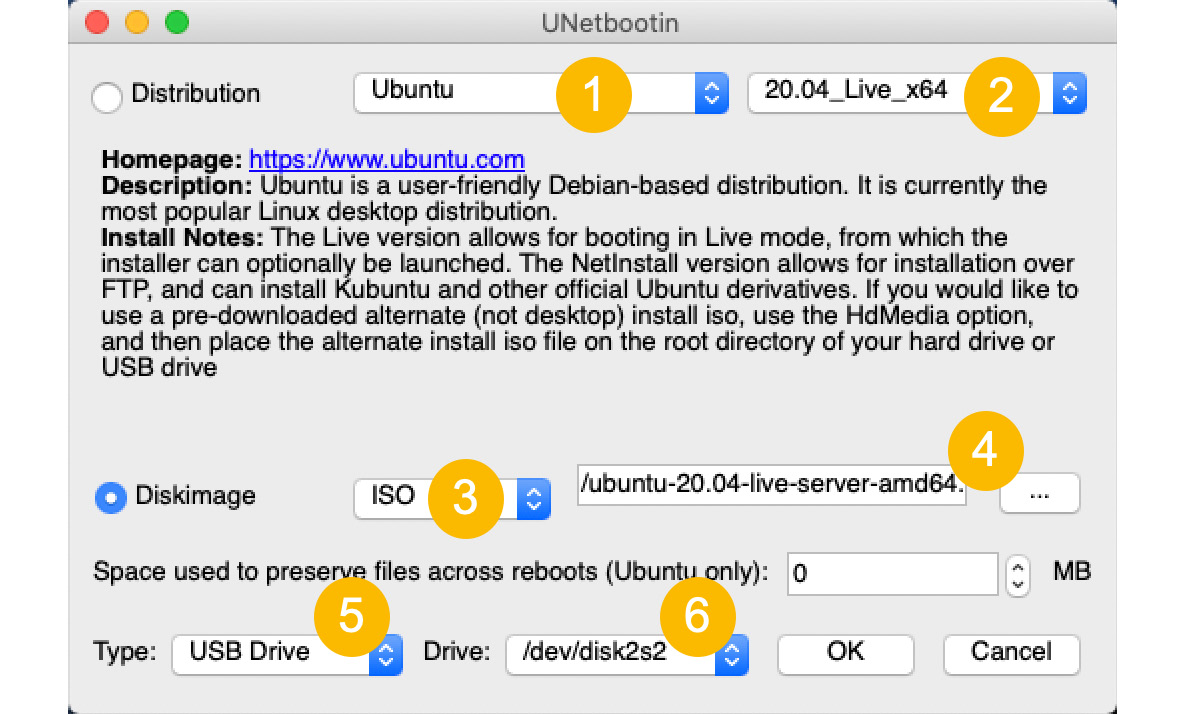
Figure 1.2 – Creating a bootable USB drive with UNetbootin
Here are the steps for creating a bootable USB drive with Ubuntu Desktop using UNetbootin. We assume the Ubuntu Desktop ISO image has been downloaded and UNetbootin is installed (in our case on macOS):
- Choose our Linux distribution (
Ubuntu). - Specify the version of our Linux distribution (
20.04). - Select the disk image type that matches our download (
ISO). - Browse to the location of our downloaded ISO image (
ubuntu-20.04-live-server-amd64.iso). - Specify the media format of our bootable drive (
USB). - Choose the filesystem mount of our USB drive (
/dev/disk2s2)
Now, let's look at how we can take the bootable media for a spin.
Step 3 – try it out in live mode
This step is optional.
Most Linux distributions have their ISO image available for download as live media. Once we have the bootable media created with our Linux distribution of choice, we can run a live environment of our Linux platform without actually installing it. In other words, we can evaluate and test the Linux distribution before deciding whether we want to install it. The live Linux operating system is loaded in the system memory (RAM) of our PC, without using any disk storage. We should make sure the PC has enough RAM to accommodate the minimum required memory of our Linux distribution.
We can run Linux in live mode in either of the following ways:
- Booting a PC/Mac workstation from our bootable media
- Launching a VM created with our Linux distribution ISO
When booting the PC from a bootable media, we need to make sure the boot order in the BIOS is set to read our drive with the highest priority. On a Mac, we need to press the Option key immediately after the reboot start up chime and select our USB drive to boot from.
Upon reboot, the first splash screen of our Linux distribution should provide the option of running in live mode, as seen in the following illustration for Ubuntu Desktop (Try Ubuntu):
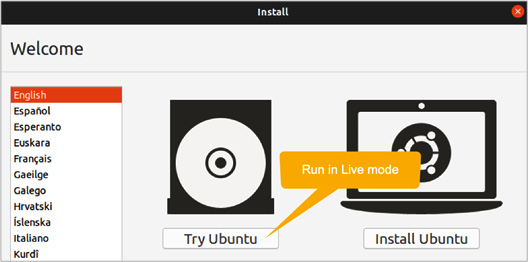
Figure 1.3 – Choosing live mode for Ubuntu
Next, let's take a look at the installation procedure of our Linux distro, using the bootable media.
Step 4 – perform the installation
We start the installation of our Linux distribution by booting the PC from the bootable media previously created. To ensure the system can boot from our drive (DVD or USB), we are sometimes required to change the boot order in the BIOS, especially if we boot from a USB drive. Most of the time, entering a system BIOS on a PC or laptop computer is done by pressing a Function key (or even the Delete key) immediately after powering on or restarting the machine. This key is usually mentioned at the bottom of the initial bootup screen.
In the following sections, we showcase the installation process of Ubuntu and CentOS using their ISO images. We choose the Desktop and Server versions for Ubuntu and highlight the main differences. CentOS comes in a single flavor, in essence, a server platform with an optional graphical user interface.
Linux in a VM
In each of the Linux installation sections, we also provide a brief guide on how to prepare a VM environment for the related Linux platform.
A VM is an isolated software abstraction of a physical machine. VMs are deployed on top of a hypervisor. A hypervisor provides the runtime provisioning and resource management of VMs. For the simple illustration of Linux VM installations, in this section, we limit ourselves to a couple of general-purpose hypervisors:
- Oracle VM VirtualBox (https://www.virtualbox.org)
- VMware Workstation (https://www.vmware.com/products/workstation-pro.html)
Both these hypervisors are cross-platform virtualization applications, and they run on Intel or AMD processor architectures on Windows, Linux, and macOS.
The difference between installing Linux on a VM compared to a physical machine is minor. The notable distinction is related to the VM sizing and configuration steps, making sure that the minimum system requirements of the Linux distribution are met.
Installing Ubuntu
In this section, we briefly illustrate the installation of Ubuntu Server LTS. If we plan to install Ubuntu in a VM, there are some preliminary steps required for provisioning the VM environment. Otherwise, we proceed directly to the Installation section.
VM provisioning
In the following steps, we will create a VM based on Ubuntu Server—using VMware Workstation on macOS:
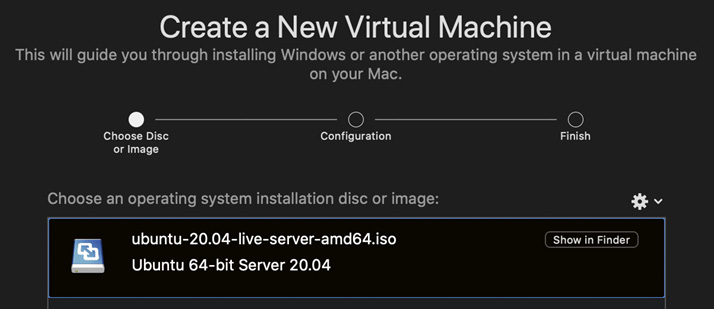
Figure 1.4 – Creating a new VM based on the Ubuntu ISO image
Let's look at the steps:
- We start by creating a new VM based on the Ubuntu Server ISO. For illustration purposes, we use VMware Workstation. Figure 1.4 shows the initial screen of creating a new VM for an Ubuntu Server instance.
- Following the VM deployment wizard, we get to the final step summarizing the VM provisioning information (Figure 1.5):

Figure 1.5 – Customizing the VM settings
- Sometimes the default VM sizing may have to be changed to accommodate the minimum system requirements of our Linux distribution. In our case, Ubuntu Server requires a minimum hard disk capacity of 25 GB. We can further customize the VM settings and increase the disk capacity, for example, to 30 GB (Figure 1.6):
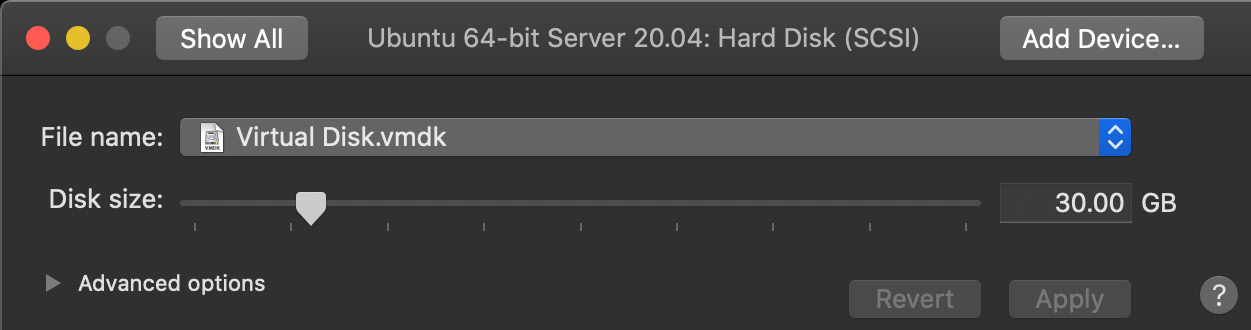
Figure 1.6 – Customizing the VM disk size
The remaining part of the Linux VM installation is identical to standard physical machine installation, shown in the following sections.
Installation
Here's the normal installation process for Ubuntu Server LTS, following the initial boot into setup mode:
- Make sure we choose Install Ubuntu in the initial setup screen (we assume that live mode has already been visited, according to Figure 1.3):
- The initial welcome screen prompts for the language of our choice (English), followed by the keyboard layout (English (US)):
- Next, we need to set up the server profile, which requires a display name (
Packt), a server name (neptune), a username (packt), and the password (Figure 1.7):
Figure 1.7 – Setting up the server profile
- The next screen is asking for the OpenSSH server package installation (Figure 1.8). OpenSSH enables secure remote access to our server. We choose to check (using [X]) the option for Install OpenSSH server. Optionally, we can import our existing SSH keys for passwordless authentication:

Figure 1.8 – Enabling the OpenSSH server
- An additional screen presents us with popular software packages (Snaps) that we may want to install (Figure 1.9). Among them, there are a few we'll be covering in later chapters (
microk8s,docker, andaws-cli):
Figure 1.9 – Enabling additional software packages
- If everything goes well, a few minutes later, we get the Installation complete! screen, prompting us to reboot.
After the system reboot, the login screen appears. We have completed the Ubuntu Server installation.
Next, let's take a look at a similar installation procedure, this time with the CentOS Linux distribution.
Installing CentOS
In this section, we briefly illustrate the installation of CentOS. If we plan to install CentOS in a VM, there are some preliminary steps required for provisioning the VM environment. Otherwise, we proceed directly with the Installation section.
VM provisioning
In the following steps, we show the setup of a CentOS VM using Oracle VM VirtualBox on macOS. The choice of VirtualBox over VMware Workstation (used in the previous section with Ubuntu Server) is simply for showcasing the use of an alternative hypervisor:
- The VirtualBox setup wizard guides us through the following configuration steps of our VM (we specify our choices as shown):
a) Hostname and operating system (jupiter, CentOS Red Hat, 64-bit)
b) Memory size (4 GB)
c) Hard disk size (30 GB)
d) Hard disk file type (VDI VirtualBox Disk Image)
e) Storage on the physical hard disk (dynamically allocated)
f) File location and size (path to .vdi file, 30 GB)
- After a few steps, we end up with a VirtualBox configuration window of our VM, similar to the following (Figure 1.10):

Figure 1.10 – VirtualBox VM configuration
- We can do further customization by choosing Settings in the VirtualBox Manager window of our VM. Next, we should point the IDE controller of our VM to the CentOS ISO image we want to install. We choose Settings | Storage | Optical Drive | IDE Secondary Master and click the disk icon. Here, we browse to the location of our CentOS image file. We want the VM to use the IDE Secondary Master ISO file, to boot from and install our operating system (Figure 1.11):
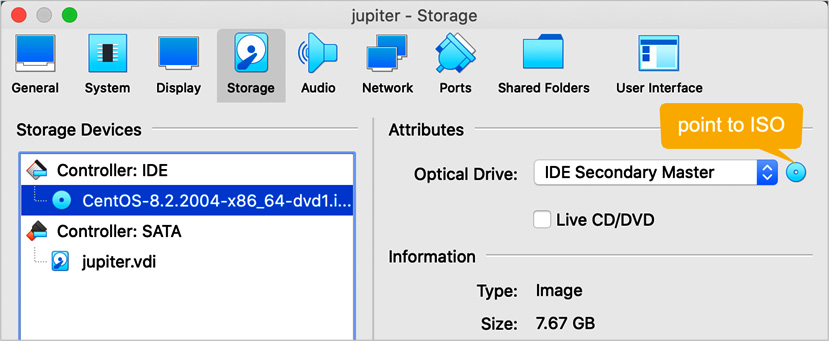
Figure 1.11 – Virtual Box VM storage settings
At this stage, starting the VM initiates the CentOS installation.
Installation
Here's the normal installation process for CentOS, following the initial boot into setup mode:
- First, we get the welcome screen with the choice of either installing or testing (in live mode) the CentOS Linux platform (Figure 1.12):

Figure 1.12 – The CentOS welcome screen
- In the next few steps of the installation process, we get to choose our options for the following:
a) Language support and localization (English, US)
b) Software selection (Server with GUI)
c) Device selection and storage configuration (Local media)
The following screenshot summarizes all this. The settings mostly reflect default values (Figure 1.13):

Figure 1.13 – The CentOS installation summary
- The final step of the CentOS installation is about configuring the local user accounts on our Linux platform (Figure 1.14):

Figure 1.14 – The CentOS user settings
- The user configuration screen prompts for a root password and a new user account. In our case, we create a user account (packt) with administrator privileges. This account has full administrative privileges over the system, yet it doesn't have root access. In later chapters, we'll show how to give superuser (sudo) privileges to our administrator account (Figure 1.15):

Figure 1.15 – Rebooting CentOS after installation
- Upon finishing the user configuration, we reboot the system, and this takes us to the CentOS login screen. We have completed the CentOS installation. We may have to remove the installation media or unmount the IDE interface on the VM before the reboot, to avoid circling back into setup mode again.
So far, we have learned how to perform a basic installation for two of the most common Linux distributions, Ubuntu and CentOS. Along the way, we created a bootable USB flash drive for our installation media, most commonly used for Linux PC platform installations. For both Linux distros, we briefly covered VM-specific Linux environments using the VMware Workstation and Oracle VM VirtualBox hypervisors.
In the following section, we'll learn how to install and run a Linux distribution on a Windows platform without the use of a standalone hypervisor.