The MongoDB NoSQL database system is described in Chapter 10, NoSQL Databases.
Download the MongoDB installation file from https://www.mongodb.com/download-center#community (or just search MongoDB download to find that web page). Then, follow these steps (for macOS X):
Open a Terminal window.
Execute these shell commands (the
$indicates the prompt):$ cd ~/Downloads $ ls mongo* $ tar xzf mongodb-osx-ssl-x86_64-3.4.7.tar $ sudo mkdir –p /usr/local/mongodb $ sudo mv mongodb-osx-x86_64-3.4.7 /usr/local/mongodb
These will decompress the file that you downloaded, create the folder
/usr/local/mongodb, and then move the specified decompressed file to that folder. You may be asked for your computer password. Thelscommand will list the files that match the patternmongo*.tar. Use that to get the right filename. (The one shown here was correct in August, 2017.)Execute these commands next:
$ sudo mkdir -p /data/db
$ sudo chown johnrhubbard /data/db
Use your own username with the
chowncommand. This creates the directory/data/dband gives you ownership of it.Execute these commands next:
$ cd ~
$ touch .bash_profile
$ vim .bash_profile
This starts the vim editor, editing your
.bash_profilefile. All the commands that you save in that file will be executed automatically whenever you start a shell session.In the
vimeditor, do this:Type
ito shift into the insert mode.Add these three lines to the file:
export MONGO_PATH=/usr/local/mongodb/mongodb-osx-x86_64-3.4.7
export PATH=$PATH:$MONGO_PATH/bin
PS1="\w $ "
Make sure you get the
mongodbfile name right.Press the Esc key to exit the insert mode.
Then type ZZ to save the file and exit vim.
The first line defines the
MONGO_PATHvariable. Note that the first line is shown here on two lines. The second line adds that path to yourPATHvariable. The third line simply sets yourPS1prompt (this was discussed at the beginning of this chapter.) It's optional and you can set it to anything you want.Execute this command next:
$ source .bash_profileThe
sourcecommand executes the specified file. If you reset yourPS1prompt, you will see the result.Finally, to check that Mongo is installed, execute this command:
$ mongo -version
The response should confirm the installation by reporting on the version installed.
Now that the system has installed, you are ready to start it. Do this in a new shell window (just type Ctrl+N to get a new window.) Execute this command to start the MongoDB database system:
$ mongod
This will produce many rows of output.
It may ask whether you want the application mongod to accept incoming network connections. Unless you have security concerns, click the Allow button.
Set that window aside. You can hide it, but don't close it.
Now to start a MongoDB shell, where you can execute MongoDB commands, open another Terminal window, and execute this command:
$ mongo
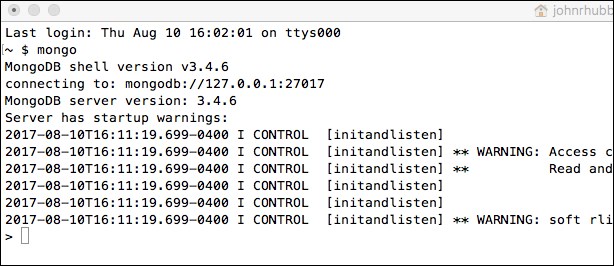
After about 10 lines of output, you should finally see the Mongo shell prompt:

Figure A-39. The Mongo shell prompt
At this point, you can continue with the content in Chapter 10, NoSQL Databases.


