Book Image

Hands-On Exploratory Data Analysis with Python

By : Suresh Kumar Mukhiya, Usman Ahmed
Book Image

Hands-On Exploratory Data Analysis with Python

By: Suresh Kumar Mukhiya, Usman Ahmed

Overview of this book

Exploratory Data Analysis (EDA) is an approach to data analysis that involves the application of diverse techniques to gain insights into a dataset. This book will help you gain practical knowledge of the main pillars of EDA - data cleaning, data preparation, data exploration, and data visualization. You’ll start by performing EDA using open source datasets and perform simple to advanced analyses to turn data into meaningful insights. You’ll then learn various descriptive statistical techniques to describe the basic characteristics of data and progress to performing EDA on time-series data. As you advance, you’ll learn how to implement EDA techniques for model development and evaluation and build predictive models to visualize results. Using Python for data analysis, you’ll work with real-world datasets, understand data, summarize its characteristics, and visualize it for business intelligence. By the end of this EDA book, you’ll have developed the skills required to carry out a preliminary investigation on any dataset, yield insights into data, present your results with visual aids, and build a model that correctly predicts future outcomes.
Table of Contents (17 chapters)
1
Section 1: The Fundamentals of EDA
6
Section 2: Descriptive Statistics
11
Section 3: Model Development and Evaluation

Getting started with EDA

As mentioned earlier, we are going to use Python as the main tool for data analysis. Yay! Well, if you ask me why, Python has been consistently ranked among the top 10 programming languages and is widely adopted for data analysis and data mining by data science experts. In this book, we assume you have a working knowledge of Python. If you are not familiar with Python, it's probably too early to get started with data analysis. I assume you are familiar with the following Python tools and packages:

Python programming

Fundamental concepts of variables, string, and data types

Conditionals and functions

Sequences, collections, and iterations

Working with files

Object-oriented programming

NumPy

Create arrays with NumPy, copy arrays, and divide arrays

Perform different operations on NumPy arrays

Understand array selections, advanced indexing, and expanding

Working with multi-dimensional arrays

Linear algebraic functions and built-in NumPy functions

pandas

Understand and create DataFrame objects

Subsetting data and indexing data

Arithmetic functions, and mapping with pandas

Managing index

Building style for visual analysis

Matplotlib

Loading linear datasets

Adjusting axes, grids, labels, titles, and legends

Saving plots

SciPy

Importing the package

Using statistical packages from SciPy

Performing descriptive statistics

Inference and data analysis

Before diving into details about analysis, we need to make sure we are on the same page. Let's go through the checklist and verify that you meet all of the prerequisites to get the best out of this book:

Setting up a virtual environment

> pip install virtualenv
> virtualenv Local_Version_Directory -p Python_System_Directory

Reading/writing to files

filename = "datamining.txt" 
file = open(filename, mode="r", encoding='utf-8')
for line in file:
lines = file.readlines()
print(lines)
file.close()

Error handling

try:
Value = int(input("Type a number between 47 and 100:"))
except ValueError:
print("You must type a number between 47 and 100!")
else:
if (Value > 47) and (Value <= 100):
print("You typed: ", Value)
else:
print("The value you typed is incorrect!")

Object-oriented concept

class Disease:
def __init__(self, disease = 'Depression'):
self.type = disease

def getName(self):
print("Mental Health Diseases: {0}".format(self.type))

d1 = Disease('Social Anxiety Disorder')
d1.getName()

Next, let's look at the basic operations of EDA using the NumPy library.

NumPy

In this section, we are going to revise the basic operations of EDA using the NumPy library. If you are familiar with these operations, feel free to jump to the next section. It might feel obvious when going through the code, but it is essential to make sure you understand these concepts before digging into EDA operations. When I started learning data science approaches, I followed a lot of blogs where they just reshaped an array or matrix. When I ran their code, it worked fine, but I never understood how I was able to add two matrices of different dimensions. In this section, I have tried to explicitly point out some of the basic numpy operations:

  • For importing numpy, we will use the following code:
import numpy as np
  • For creating different types of numpy arrays, we will use the following code:
# importing numpy
import numpy as np

# Defining 1D array
my1DArray = np.array([1, 8, 27, 64])
print(my1DArray)

# Defining and printing 2D array
my2DArray = np.array([[1, 2, 3, 4], [2, 4, 9, 16], [4, 8, 18, 32]])
print(my2DArray)

#Defining and printing 3D array
my3Darray = np.array([[[ 1, 2 , 3 , 4],[ 5 , 6 , 7 ,8]], [[ 1, 2, 3, 4],[ 9, 10, 11, 12]]])
print(my3Darray)
  • For displaying basic information, such as the data type, shape, size, and strides of a NumPy array, we will use the following code:
# Print out memory address
print(my2DArray.data)

# Print the shape of array
print(my2DArray.shape)

# Print out the data type of the array
print(my2DArray.dtype)

# Print the stride of the array.
print(my2DArray.strides)
  • For creating an array using built-in NumPy functions, we will use the following code:
# Array of ones
ones = np.ones((3,4))
print(ones)

# Array of zeros
zeros = np.zeros((2,3,4),dtype=np.int16)
print(zeros)

# Array with random values
np.random.random((2,2))

# Empty array
emptyArray = np.empty((3,2))
print(emptyArray)

# Full array
fullArray = np.full((2,2),7)
print(fullArray)

# Array of evenly-spaced values
evenSpacedArray = np.arange(10,25,5)
print(evenSpacedArray)

# Array of evenly-spaced values
evenSpacedArray2 = np.linspace(0,2,9)
print(evenSpacedArray2)
  • For NumPy arrays and file operations, we will use the following code:
# Save a numpy array into file
x = np.arange(0.0,50.0,1.0)
np.savetxt('data.out', x, delimiter=',')

# Loading numpy array from text
z = np.loadtxt('data.out', unpack=True)
print(z)

# Loading numpy array using genfromtxt method
my_array2 = np.genfromtxt('data.out',
skip_header=1,
filling_values=-999)
print(my_array2)
  • For inspecting NumPy arrays, we will use the following code:
# Print the number of `my2DArray`'s dimensions
print(my2DArray.ndim)

# Print the number of `my2DArray`'s elements
print(my2DArray.size)

# Print information about `my2DArray`'s memory layout
print(my2DArray.flags)

# Print the length of one array element in bytes
print(my2DArray.itemsize)

# Print the total consumed bytes by `my2DArray`'s elements
print(my2DArray.nbytes)
  • Broadcasting is a mechanism that permits NumPy to operate with arrays of different shapes when performing arithmetic operations:
# Rule 1: Two dimensions are operatable if they are equal
# Create an array of two dimension
A =np.ones((6, 8))

# Shape of A
print(A.shape)

# Create another array
B = np.random.random((6,8))

# Shape of B
print(B.shape)

# Sum of A and B, here the shape of both the matrix is same.
print(A + B)

Secondly, two dimensions are also compatible when one of the dimensions of the array is 1. Check the example given here:

# Rule 2: Two dimensions are also compatible when one of them is 1
# Initialize `x`
x = np.ones((3,4))
print(x)

# Check shape of `x`
print(x.shape)

# Initialize `y`
y = np.arange(4)
print(y)

# Check shape of `y`
print(y.shape)

# Subtract `x` and `y`
print(x - y)

Lastly, there is a third rule that says two arrays can be broadcast together if they are compatible in all of the dimensions. Check the example given here:

# Rule 3: Arrays can be broadcast together if they are compatible in all dimensions
x = np.ones((6,8))
y = np.random.random((10, 1, 8))
print(x + y)

The dimensions of x(6,8) and y(10,1,8) are different. However, it is possible to add them. Why is that? Also, change y(10,2,8) or y(10,1,4) and it will give ValueError. Can you find out why? (Hint: check rule 1).

  • For seeing NumPy mathematics at work, we will use the following example:
# Basic operations (+, -, *, /, %)
x = np.array([[1, 2, 3], [2, 3, 4]])
y = np.array([[1, 4, 9], [2, 3, -2]])

# Add two array
add = np.add(x, y)
print(add)

# Subtract two array
sub = np.subtract(x, y)
print(sub)

# Multiply two array
mul = np.multiply(x, y)
print(mul)

# Divide x, y
div = np.divide(x,y)
print(div)

# Calculated the remainder of x and y
rem = np.remainder(x, y)
print(rem)
  • Let's now see how we can create a subset and slice an array using an index:
x = np.array([10, 20, 30, 40, 50])

# Select items at index 0 and 1
print(x[0:2])

# Select item at row 0 and 1 and column 1 from 2D array
y = np.array([[ 1, 2, 3, 4], [ 9, 10, 11 ,12]])
print(y[0:2, 1])

# Specifying conditions
biggerThan2 = (y >= 2)
print(y[biggerThan2])

Next, we will use the pandas library to gain insights from data.

Pandas

Wes McKinney open sourced the pandas library (https://github.com/wesm) that has been widely used in data science. We will be utilizing this library to get meaningful insight from the data. Before delving in detail into this section, we are going to revisit some of the most fundamental techniques in pandas that you should be familiar with so as to be able to follow upcoming chapters. If these things are new to you, feel free to check one of the further reading sections for additional resources. Perform the following steps:

  1. Use the following to set default parameters:
import numpy as np
import pandas as pd
print("Pandas Version:", pd.__version__)

pd.set_option('display.max_columns', 500)
pd.set_option('display.max_rows', 500)
  1. In pandas, we can create data structures in two ways: series and dataframes. Check the following snippet to understand how we can create a dataframe from series, dictionary, and n-dimensional arrays.

The following code snippet shows how we can create a dataframe from a series:

series = pd.Series([2, 3, 7, 11, 13, 17, 19, 23])
print(series)

# Creating dataframe from Series
series_df = pd.DataFrame({
'A': range(1, 5),
'B': pd.Timestamp('20190526'),
'C': pd.Series(5, index=list(range(4)), dtype='float64'),
'D': np.array([3] * 4, dtype='int64'),
'E': pd.Categorical(["Depression", "Social Anxiety", "Bipolar Disorder", "Eating Disorder"]),
'F': 'Mental health',
'G': 'is challenging'
})
print(series_df)

The following code snippet shows how to create a dataframe for a dictionary:

# Creating dataframe from Dictionary
dict_df = [{'A': 'Apple', 'B': 'Ball'},{'A': 'Aeroplane', 'B': 'Bat', 'C': 'Cat'}]
dict_df = pd.DataFrame(dict_df)
print(dict_df)

The following code snippet shows how to create a dataframe from n-dimensional arrays:

# Creating a dataframe from ndarrays
sdf = {
'County':['Østfold', 'Hordaland', 'Oslo', 'Hedmark', 'Oppland', 'Buskerud'],
'ISO-Code':[1,2,3,4,5,6],
'Area': [4180.69, 4917.94, 454.07, 27397.76, 25192.10, 14910.94],
'Administrative centre': ["Sarpsborg", "Oslo", "City of Oslo", "Hamar", "Lillehammer", "Drammen"]
}
sdf = pd.DataFrame(sdf)
print(sdf)
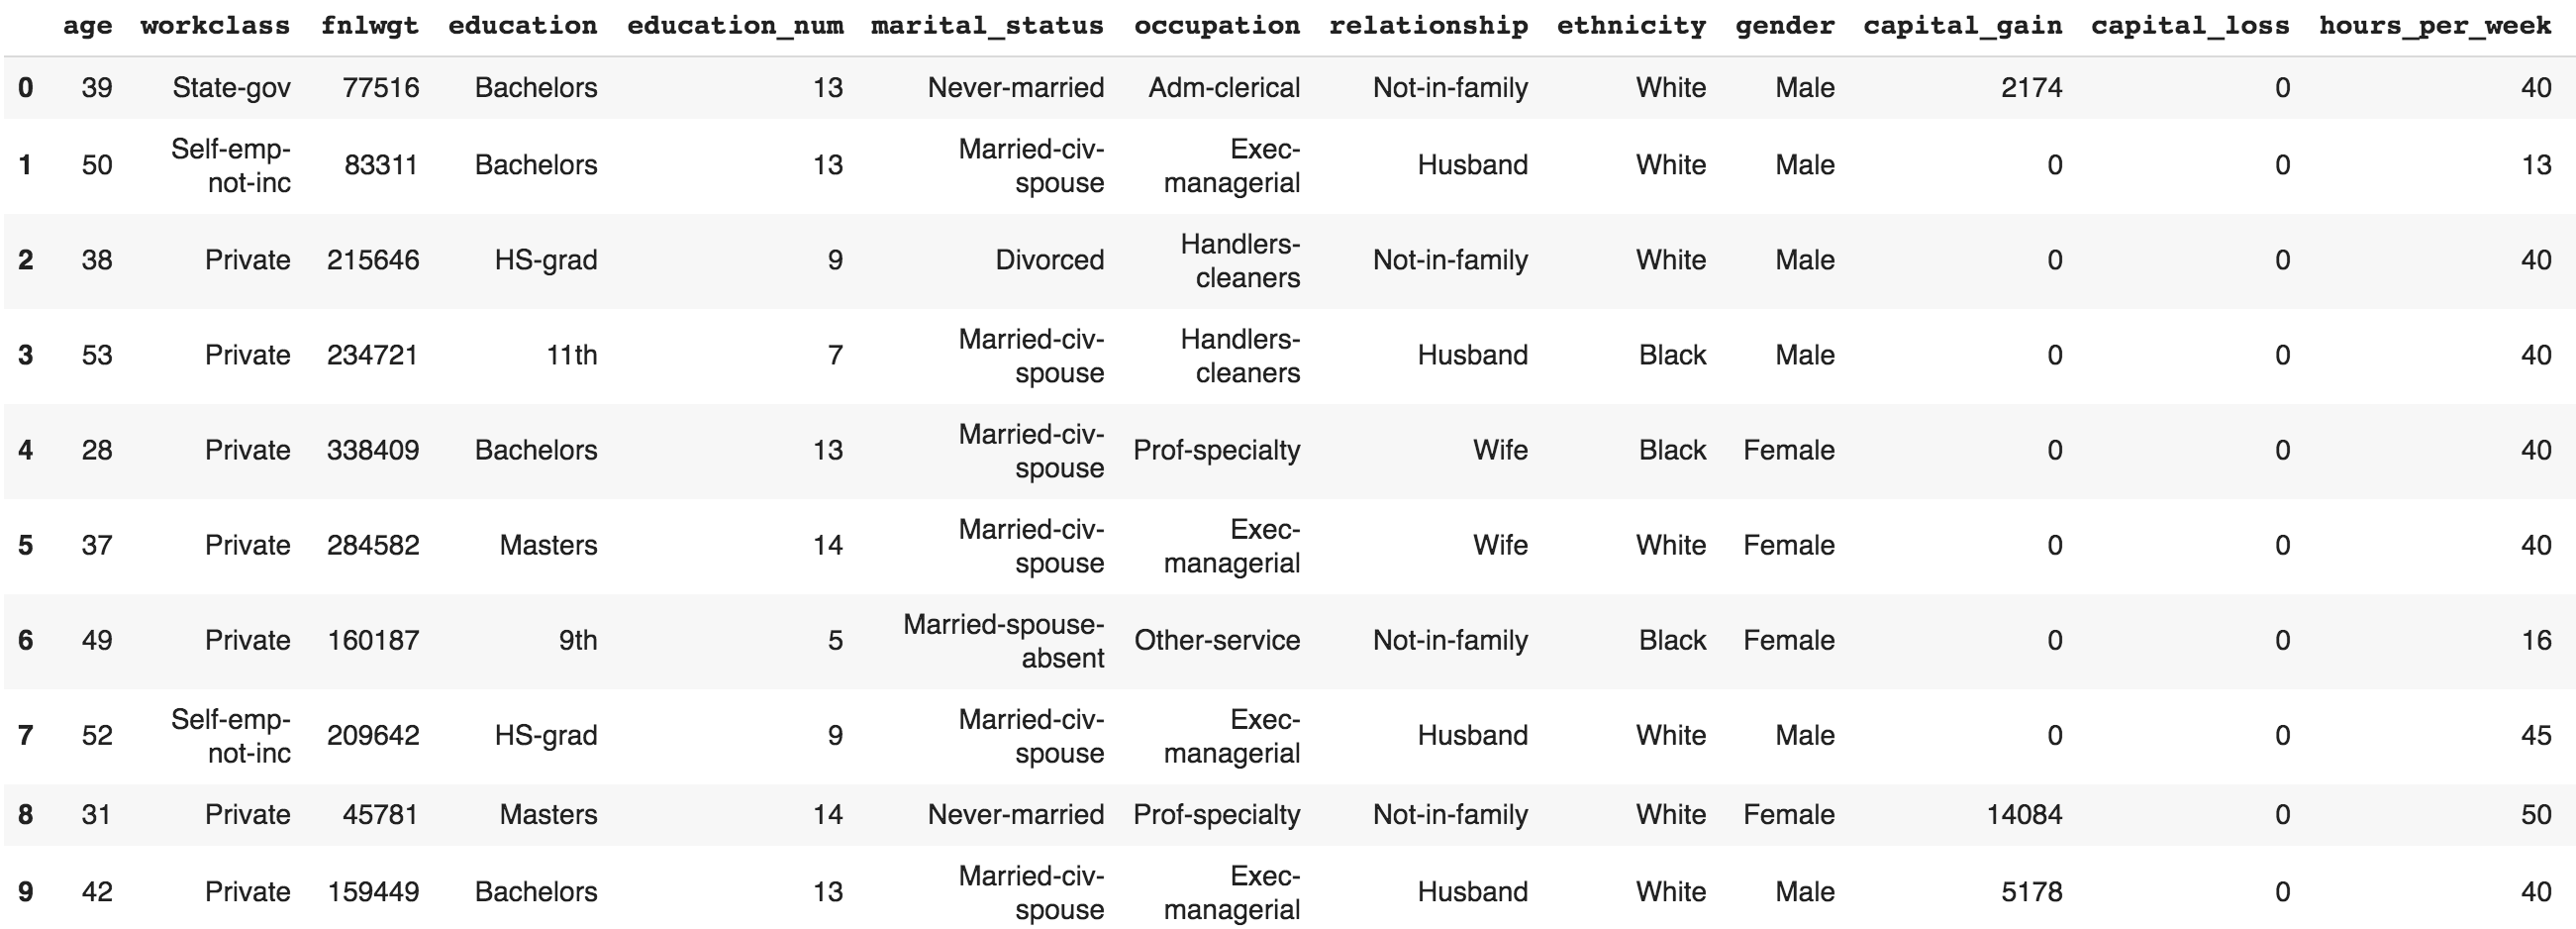
  1. Now, let's load a dataset from an external source into a pandas DataFrame. After that, let's see the first 10 entries:

columns = ['age', 'workclass', 'fnlwgt', 'education', 'education_num',
'marital_status', 'occupation', 'relationship', 'ethnicity', 'gender','capital_gain','capital_loss','hours_per_week','country_of_origin','income']
df = pd.read_csv('http://archive.ics.uci.edu/ml/machine-learning-databases/adult/adult.data',names=columns)
df.head(10)

If you run the preceding cell, you should get an output similar to the following screenshot:

  1. The following code displays the rows, columns, data types, and memory used by the dataframe:
df.info()

The output of the preceding code snippet should be similar to the following:

# Output:
<class 'pandas.core.frame.DataFrame'>
RangeIndex: 32561 entries, 0 to 32560
Data columns (total 15 columns):
age 32561 non-null int64
workclass 32561 non-null object
fnlwgt 32561 non-null int64
education 32561 non-null object
education_num 32561 non-null int64
marital_status 32561 non-null object
occupation 32561 non-null object
relationship 32561 non-null object
ethnicity 32561 non-null object
gender 32561 non-null object
capital_gain 32561 non-null int64
capital_loss 32561 non-null int64
hours_per_week 32561 non-null int64
country_of_origin 32561 non-null object
income 32561 non-null object
dtypes: int64(6), object(9)
memory usage: 3.7+ MB
  1. Let's now see how we can select rows and columns in any dataframe:
# Selects a row
df.iloc[10]

# Selects 10 rows
df.iloc[0:10]

# Selects a range of rows
df.iloc[10:15]

# Selects the last 2 rows
df.iloc[-2:]

# Selects every other row in columns 3-5
df.iloc[::2, 3:5].head()
  1. Let's combine NumPy and pandas to create a dataframe as follows:
import pandas as pd
import numpy as np

np.random.seed(24)
dFrame = pd.DataFrame({'F': np.linspace(1, 10, 10)})
dFrame = pd.concat([df, pd.DataFrame(np.random.randn(10, 5), columns=list('EDCBA'))],
axis=1)
dFrame.iloc[0, 2] = np.nan
dFrame

It should produce a dataframe table similar to the following screenshot:

  1. Let's style this table using a custom rule. If the values are greater than zero, we change the color to black (the default color); if the value is less than zero, we change the color to red; and finally, everything else would be colored green. Let's define a Python function to accomplish that:
# Define a function that should color the values that are less than 0 
def colorNegativeValueToRed(value):
if value < 0:
color = 'red'
elif value > 0:
color = 'black'
else:
color = 'green'

return 'color: %s' % color
  1. Now, let's pass this function to the dataframe. We can do this by using the style method provided by pandas inside the dataframe:
s = df.style.applymap(colorNegativeValueToRed, subset=['A','B','C','D','E'])
s

It should display a colored dataframe as shown in the following screenshot:

It should be noted that the applymap and apply methods are computationally expensive as they apply to each value inside the dataframe. Hence, it will take some time to execute. Have patience and await execution.

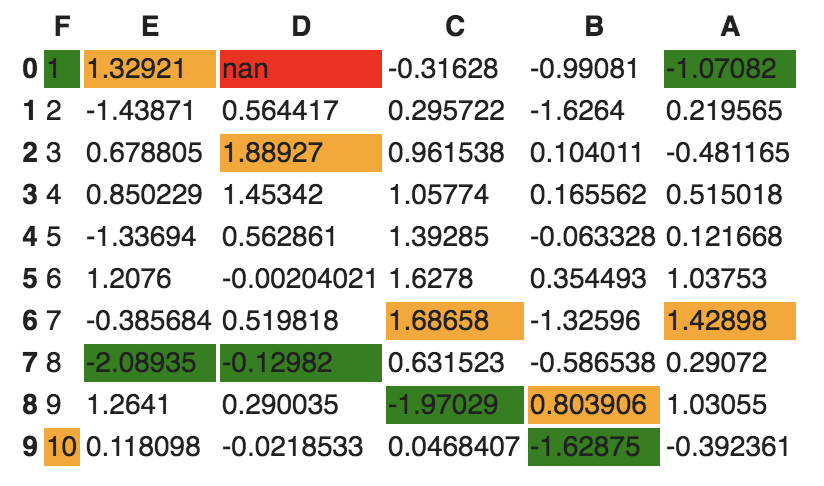
  1. Now, let's go one step deeper. We want to scan each column and highlight the maximum value and the minimum value in that column:
def highlightMax(s):
isMax = s == s.max()
return ['background-color: orange' if v else '' for v in isMax]

def highlightMin(s):
isMin = s == s.min()
return ['background-color: green' if v else '' for v in isMin]

We apply these two functions to the dataframe as follows:

df.style.apply(highlightMax).apply(highlightMin).highlight_null(null_color='red')

The output should be similar to the following screenshot:

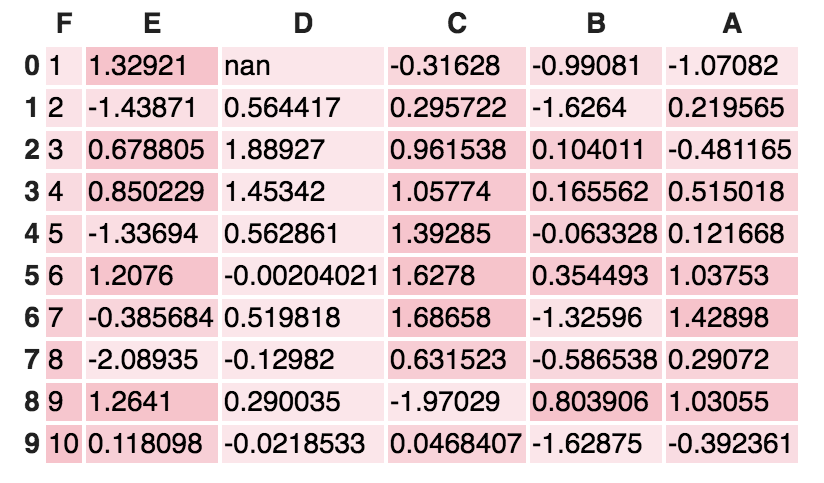
  1. Are you still not happy with your visualization? Let's try to use another Python library called seaborn and provide a gradient to the table:
import seaborn as sns

colorMap = sns.light_palette("pink", as_cmap=True)

styled = df.style.background_gradient(cmap=colorMap)
styled

The dataframe should have an orange gradient applied to it:

There are endless possibilities. How you present your result depends on you. Keep in mind that when you present your results to end stakeholders (your managers, boss, or non-technical persons), no matter how intelligently written your code is, it is worthless to them if they cannot make sense of your program. It is widely accepted that better-visualized results are easy to market.

SciPy

SciPy is a scientific library for Python and is open source. We are going to use this library in the upcoming chapters. This library depends on the NumPy library, which provides an efficient n-dimensional array manipulation function. We are going to learn more about these libraries in the upcoming chapters. My intention here is just to inform you to get prepared to face other libraries apart from NumPy and pandas. If you want to get started early, check for scipy.stats from the SciPy library.

Matplotlib

Matplotlib provides a huge library of customizable plots, along with a comprehensive set of backends. It can be utilized to create professional reporting applications, interactive analytical applications, complex dashboard applications, web/GUI applications, embedded views, and many more. We are going to explore Matplotlib in detail in Chapter 2, Visual Aids for EDA.