Sign In Start Free Trial
Account

Add to playlist

Create a Playlist

Modal Close icon
You need to login to use this feature.
  • Book Overview & Buying Mobile Deep Learning with TensorFlow Lite, ML Kit and Flutter
  • Table Of Contents Toc
Mobile Deep Learning with TensorFlow Lite, ML Kit and Flutter

Mobile Deep Learning with TensorFlow Lite, ML Kit and Flutter

By : Anubhav Singh, Bhadani
1 (1)
close
close
Mobile Deep Learning with TensorFlow Lite, ML Kit and Flutter

Mobile Deep Learning with TensorFlow Lite, ML Kit and Flutter

1 (1)
By: Anubhav Singh, Bhadani

Overview of this book

Deep learning is rapidly becoming the most popular topic in the mobile app industry. This book introduces trending deep learning concepts and their use cases with an industrial and application-focused approach. You will cover a range of projects covering tasks such as mobile vision, facial recognition, smart artificial intelligence assistant, augmented reality, and more. With the help of eight projects, you will learn how to integrate deep learning processes into mobile platforms, iOS, and Android. This will help you to transform deep learning features into robust mobile apps efficiently. You’ll get hands-on experience of selecting the right deep learning architectures and optimizing mobile deep learning models while following an application oriented-approach to deep learning on native mobile apps. We will later cover various pre-trained and custom-built deep learning model-based APIs such as machine learning (ML) Kit through Firebase. Further on, the book will take you through examples of creating custom deep learning models with TensorFlow Lite. Each project will demonstrate how to integrate deep learning libraries into your mobile apps, right from preparing the model through to deployment. By the end of this book, you’ll have mastered the skills to build and deploy deep learning mobile applications on both iOS and Android.
Table of Contents (13 chapters)
close
close

Developing a face detection application using Flutter

With the basic understanding of how a CNN works from Chapter 1Introduction to Deep Learning for Mobile, and how image processing is done at the most basic level, we are ready to proceed with using the pre-trained models from Firebase ML Kit to detect faces from the given images.

We will be using the Firebase ML Kit Face Detection API to detect the faces in an image. The key features of the Firebase Vision Face Detection API are as follows:

  • Recognize and return the coordinates of facial features such as the eyes, ears, cheeks, nose, and mouth of every face detected.
  • Get the contours of detected faces and facial features.
  • Detect facial expressions, such as whether a person is smiling or has one eye closed.
  • Get an identifier for each individual face detected in a video frame. This identifier is consistent across invocations and can be used to perform image manipulation on a particular face in a video stream.

Let's begin with the first step, adding the required dependencies. 

Adding the pub dependencies

We start by adding the pub dependencies. A dependency is an external package that is required for a particular functionality to work. All of the required dependencies for the application are specified in the pubspec.yaml file. For every dependency, the name of the package should be mentioned. This is generally followed by a version number specifying which version of the package we want to use. Additionally, the source of the package, which tells pub how to locate the package, and any description that the source needs to find the package can also be included.

To get information about specific packages, visit https://pub.dartlang.org/packages.

The dependencies that we will be using for this project are as follows:

  • firebase_ml_vision: A Flutter plugin that adds support for the functionalities of Firebase ML Kit
  • image_picker: A Flutter plugin that enables taking pictures with the camera and selecting images from Android or iOS image library

Here's what the dependencies section of the pubspec.yaml file will look like after including the dependencies:

dependencies:
flutter:
sdk: flutter
firebase_ml_vision: ^0.9.2+1
image_picker: ^0.6.1+4

In order to use the dependencies that we have added to the pubspec.yaml file, we need to install them. This can simply be done by running flutter pub get in the Terminal or clicking Get Packages, which is located on the right side of the action ribbon at the top of the pubspec.yaml file. Once we have installed all the dependencies, we can simply import them into our project. Now, let's look at the basic functionality of the application that we will be working on in this chapter.

Building the application

Now we build the application. The application, named Face Detection, will consist of two screens. The first one will have a text title with two buttons, allowing the user to choose an image from the device's picture gallery or take a new image using the camera. After this, the user is directed to the second screen, which shows the image that was selected for face detection highlighting the detected faces. The following screenshot shows the flow of the application:

The widget tree of the application looks like this:

Let's now discuss the creation and implementation of each of the widgets in detail. 

Creating the first screen

Here we are creating the first screen. The user interface of the first screen will contain a text title, Pick Image, and two buttons, Camera and Gallery. This can be thought of as a column containing the text title and a row with two buttons, as shown in the following screenshot:

In the following sections, we will build each of these elements, called widgets, and then bring them together under a scaffold.

In English, scaffold means a structure or a platform that provides some support. In terms of Flutter, a scaffold can be thought of as a primary structure on the device screen upon which all the secondary components, in this case widgets, can be placed together.

In Flutter, every UI component is a widget. They are the central class hierarchy in the Flutter framework. If you have worked previously with Android Studio, a widget can be thought of as a TextView or Button or any other view component.

Building the row title

Then is building the row title. We start by creating a stateful widget, FaceDetectionHome, inside the face_detection_home.dart fileFaceDetectionHomeState will contain all the methods required to build the first screen of the application.

Let's define a method called buildRowTitle() to create the text header:

Widget buildRowTitle(BuildContext context, String title) {
return Center(
child: Padding(
padding: EdgeInsets.symmetric(horizontal: 8.0, vertical: 16.0),
child: Text(
title,
style: Theme.of(context).textTheme.headline,
), //Text
) //Padding
); //Center
}

The method is used to create a widget with a title using the value that is passed in the title string as an argument. The text is aligned to the center horizontally by using Center() and is provided a padding of 8.0 horizontally and 16.0 vertically using EdgeInsets.symmetric(horizontal: 8.0, vertical: 16.0). It contains a child, which is used to create the Text with the title. The typographical style of the text is modified to textTheme.headline to change the default size, weight, and spacing of the text.

Flutter uses the logical pixel as a unit of measure, which is the same as device-independent pixel (dp). Further, the number of device pixels in each logical pixel can be expressed in terms of devicePixelRatio. For the sake of simplicity, we will just use numeric terms to talk about width, height, and other measurable properties.

Building the row with button widgets

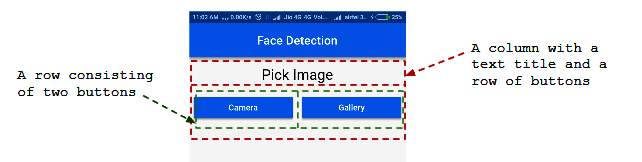
Next is building the row with button widgets. After placing our text title, we will now create a row of two buttons that will enable the user to pick an image either from the gallery or take a new image from the camera. Let's do this in the following steps:

  1. We start by defining createButton() to create buttons with all the required properties:
Widget createButton(String imgSource) {
return Expanded(
child: Padding(
padding: EdgeInsets.symmetric(horizontal: 8.0),
child: RaisedButton(
color: Colors.blue,
textColor: Colors.white,
splashColor: Colors.blueGrey,
onPressed: () {
onPickImageSelected(imgSource);
},
child: new Text(imgSource)
),
)
);
}

The method returns a widget, that is, RaisedButton, after providing a horizontal padding of 8.0. The color of the button is set to blue and the color of the button text is set to white. splashColor is set to blueGrey to indicate that the button is clicked by producing a rippling effect.

The code snippet inside onPressed is executed when the button is pressed. Here, we make a call to onPickImageSelected(), which is defined in a later section of the chapter. The text that is displayed inside the button is set to imgSource, which, here, can be the gallery or the camera. Additionally, the whole code snippet is wrapped inside Expanded() to make sure that the created button completely occupies all the available space.

  1. Now we use the buildSelectImageRowWidget() method to build a row with two buttons to list the two image sources:
Widget buildSelectImageRowWidget(BuildContext context) {
return Row(
children: <Widget>[
createButton('Camera'),
createButton('Gallery')
],
);
}

In the preceding code snippet, we call the previously defined createButton() method to add Camera and Gallery as image source buttons and add them to the children widget list for the row.

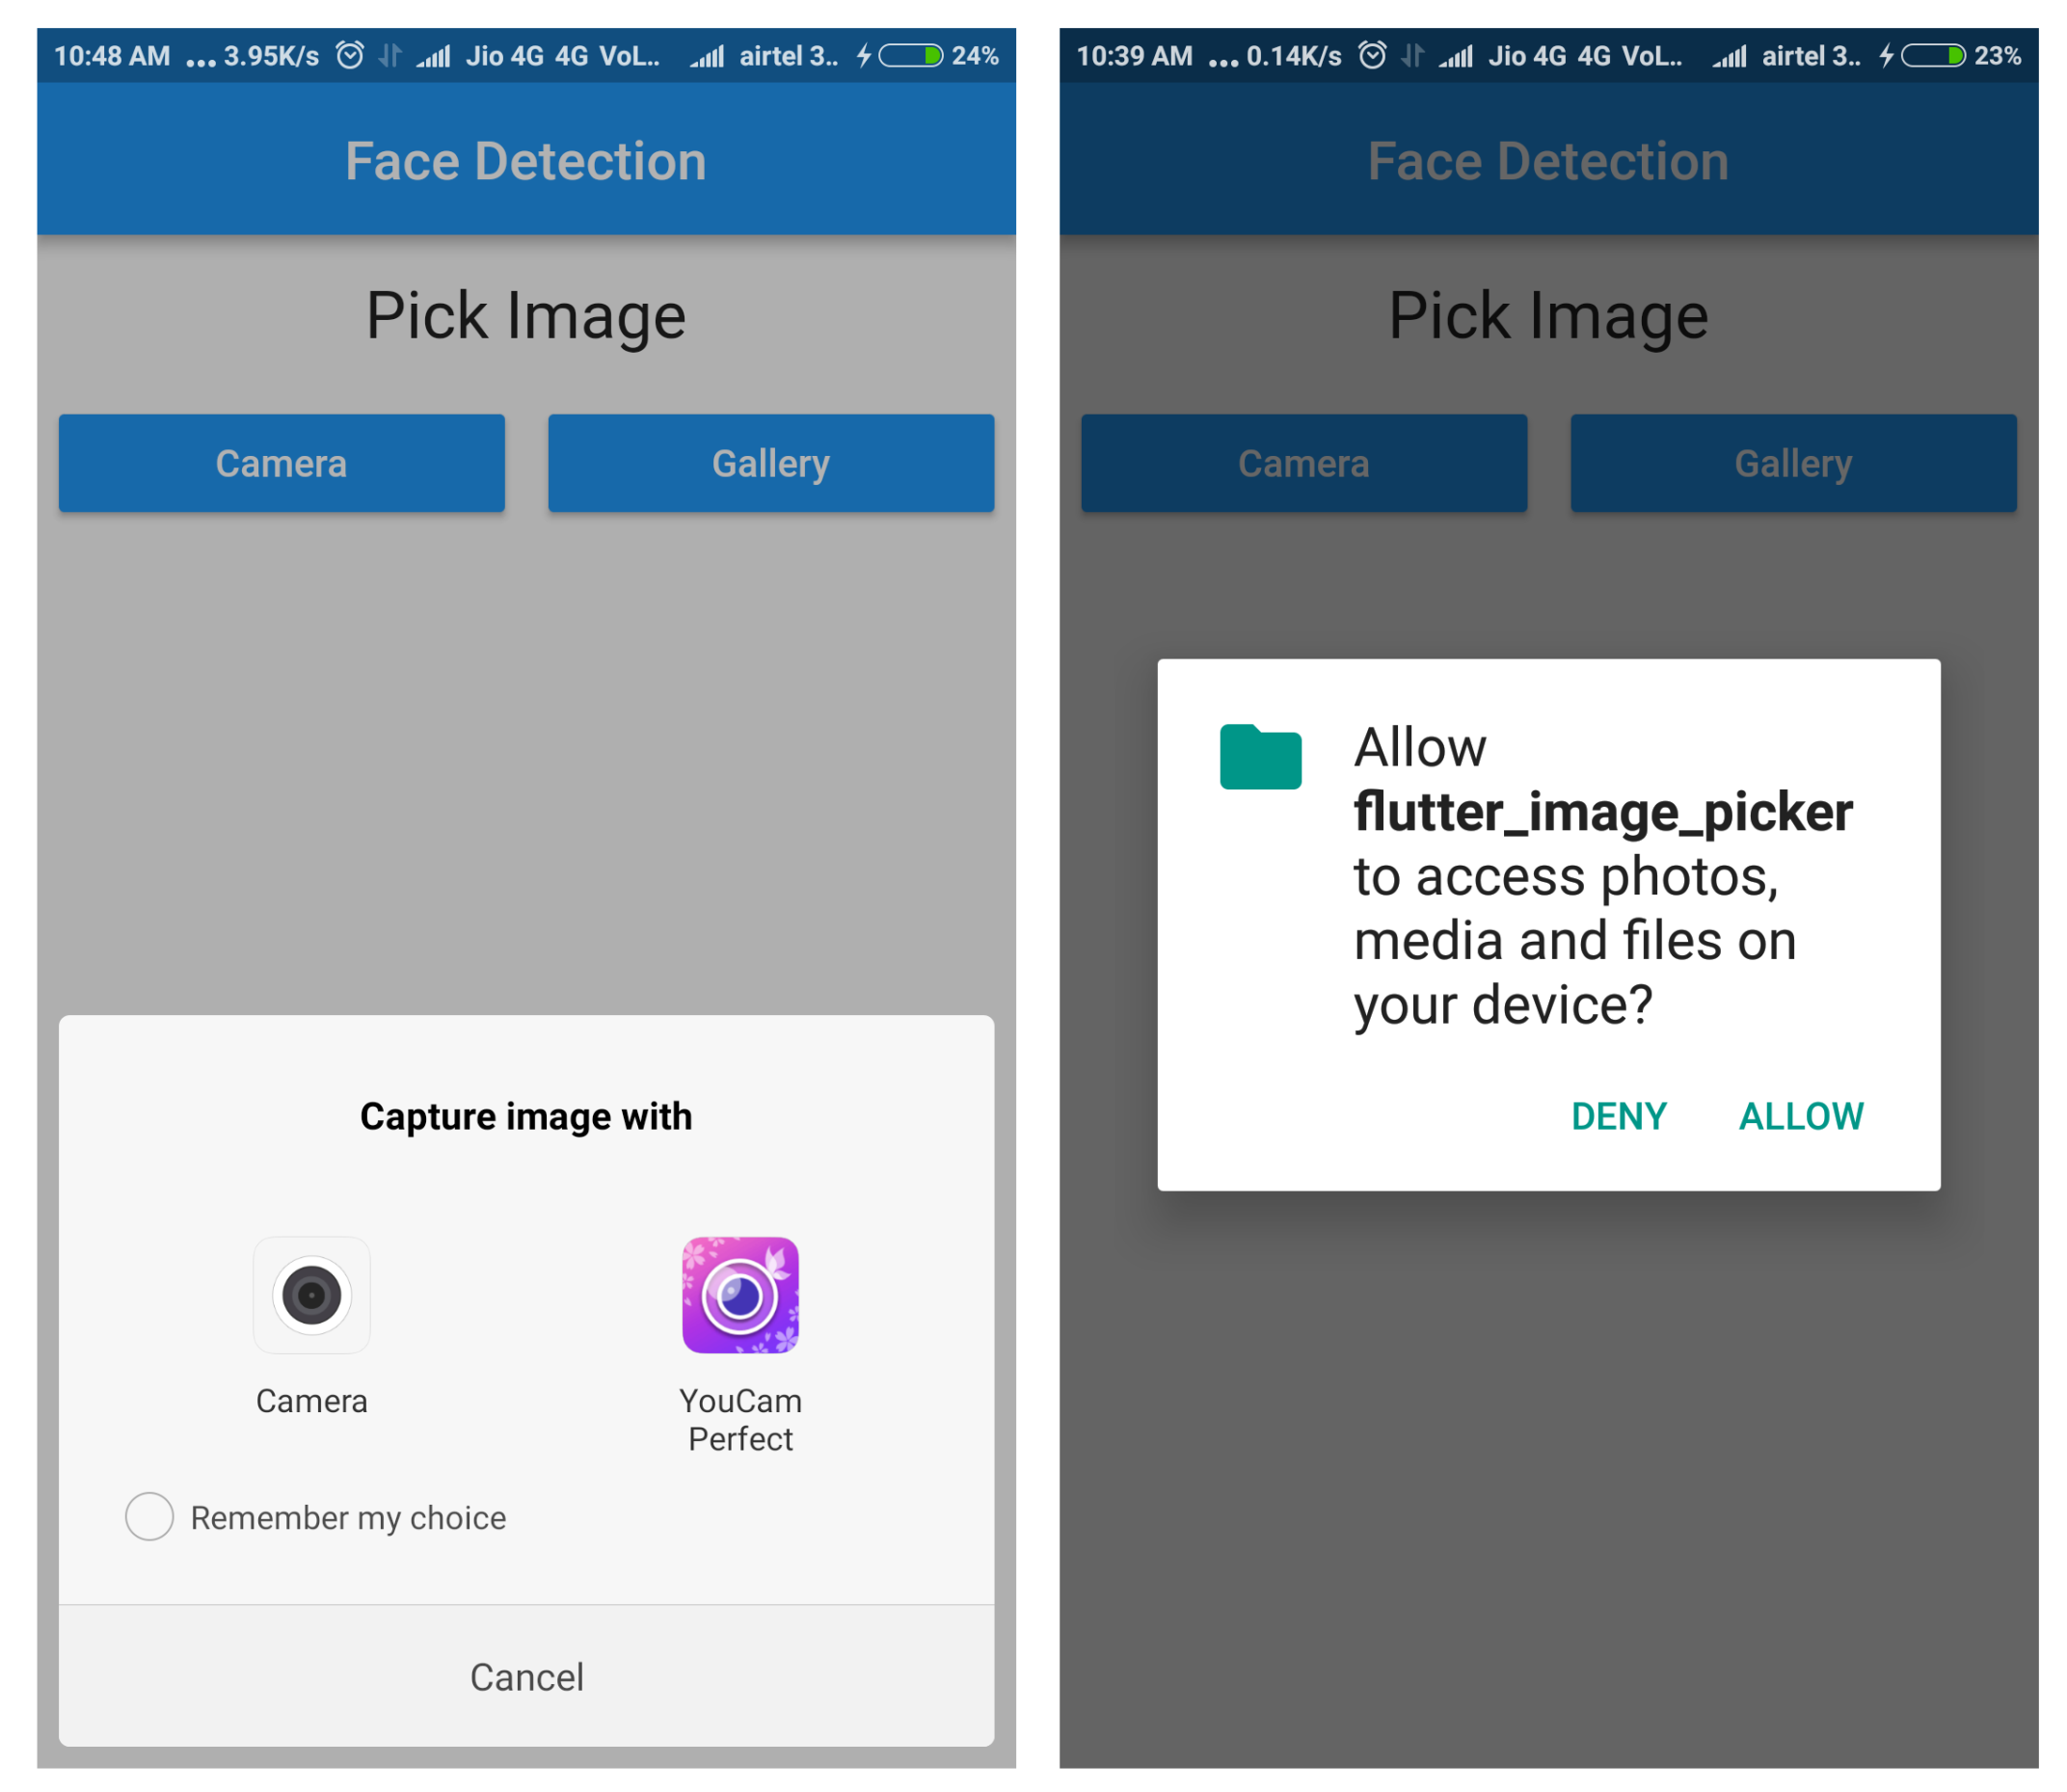
  1. Now, let's define onPickImageSelected(). This method uses the image_picker library to direct the user either to the gallery or the camera to get an image:
void onPickImageSelected(String source) async {
var imageSource;
if (source == ‘Camera’) {
imageSource = ImageSource.camera;
} else {
imageSource = ImageSource.gallery;
}
final scaffold = _scaffoldKey.currentState;
try {
final file = await ImagePicker.pickImage(source: imageSource);
if (file == null) {
throw Exception('File is not available');
}
Navigator.push(
context,
new MaterialPageRoute(
builder: (context) => FaceDetectorDetail(file)),
);
} catch (e) {
scaffold.showSnackBar(SnackBar(
content: Text(e.toString()),
));
}
}

First, imageSource is set to either camera or gallery using an if-else block. If the value passed is Camera, the source of the image file is set to ImageSource.camera; otherwise, it is set to ImageSource.gallery.

Once the source of the image is decided pickImage() is used to pick the correct imageSource. If the source was Camera, the user will be directed to the camera to take an image; otherwise, they will be directed to choose an image from the gallery.

To handle the exception if the image was not returned successfully by pickImage(), the call to the method is enclosed inside a try-catch block. If an exception occurs, the execution is directed to the catch block and a snackbar with an error message being shown on the screen by making a call to showSnackBar():

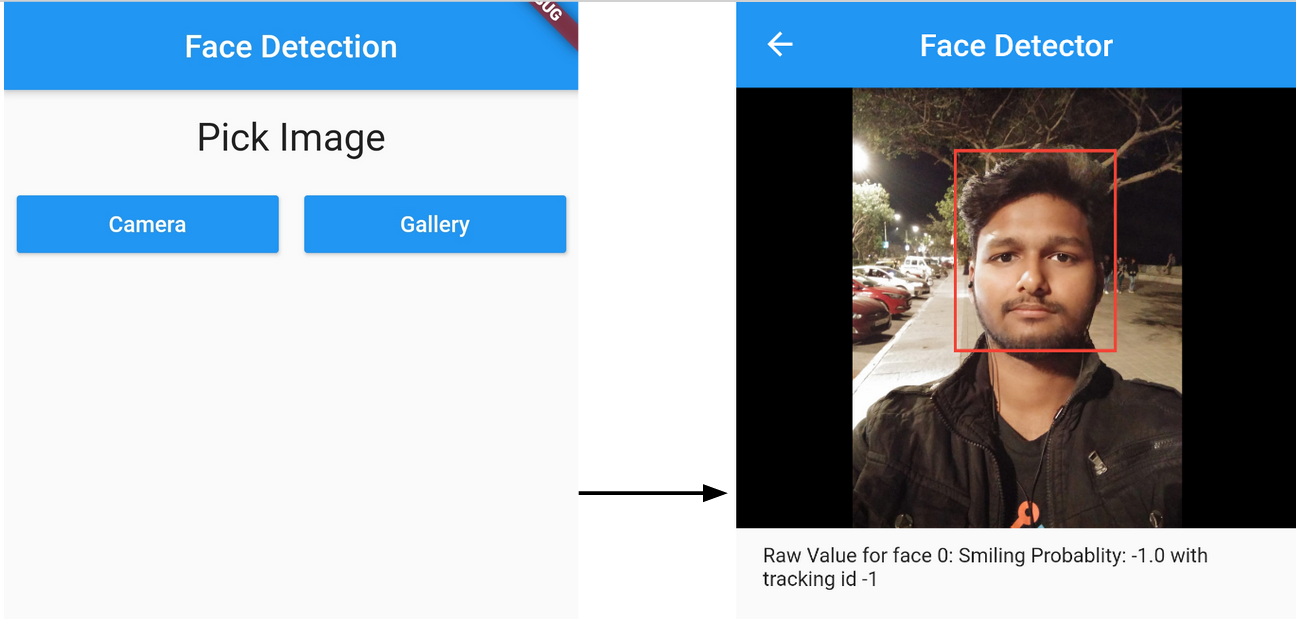
After the image has been chosen successfully and the file variable has the required uri, the user migrates to the next screen, FaceDetectorDetail, which is discussed in the section, Creating the second screen, and using Navigator.push() it passes the current context and the chosen file into the constructor. On the FaceDetectorDetail screen, we populate the image holder with the selected image and show details about the detected faces.

Creating the whole user interface

Now, we create the whole user interface, all of the created widgets are put together inside the build() method overridden inside the FaceDetectorHomeState class.

In the following code snippet, we create the final scaffold for the first screen of the application:

@override
Widget build(BuildContext context) {
return Scaffold(
key: _scaffoldKey,
appBar: AppBar(
centerTitle: true,
title: Text('Face Detection'),
),
body: SingleChildScrollView(
child: Column(
children: <Widget>[
buildRowTitle(context, 'Pick Image'),
buildSelectImageRowWidget(context)
],
)
)
);
}

The text of the toolbar is set to Face Detection by setting the title inside the appBar. Also, the text is aligned to the center by setting centerTitle to true. Next, the body of the scaffold is a column of widgets. The first is a text title and the next is a row of buttons.

Creating the second screen

Next, we create the second screen. After successfully obtaining the image selected by the user, we migrate to the second screen of the application, where we display the selected image. Also, we mark the faces that were detected in the image using Firebase ML Kit. We start by creating a stateful widget named FaceDetection inside a new Dart file, face_detection.dart.

Getting the image file

First of all, the image that was selected needs to be passed to the second screen for analysis. We do this using the FaceDetection() constructor.

Constructors are special methods that are used for initializing the variables of a class. They have the same name as the class. Constructors do not have a return type and are called automatically when the object of the class is created.

We declare a file variable and initialize it using a parameterized constructor as follows:

File file; 
FaceDetection(File file){
this.file = file;
}

Now let's move on to the next step.

Analyzing the image to detect faces

Now, we analyze the image to detect faces. We will create an instance of the FirebaseVision face detector to detect the faces using the following steps:

  1. First, we create a global faces variable inside the FaceDetectionState class, as shown in the following code:
List<Face> faces;
  1. Now we define a detectFaces() method, inside which we instantiate FaceDetector as follows:

void detectFaces() async{
final FirebaseVisionImage visionImage = FirebaseVisionImage.fromFile(widget.file);
final FaceDetector faceDetector = FirebaseVision.instance.faceDetector(FaceDetectorOptions( mode: FaceDetectorMode.accurate, enableLandmarks: true, enableClassification: true));
List<Face> detectedFaces = await faceDetector.processImage(visionImage);
for (var i = 0; i < faces.length; i++) {
final double smileProbablity = detectedFaces[i].smilingProbability;
print("Smiling: $smileProb");
}
faces = detectedFaces;
}

We first create a FirebaseVisionImage instance called visionImage of the image file that was selected using the FirebaseVisionImage.fromFile() method. Next, we create an instance of FaceDetector by using the FirebaseVision.instance.faceDetector() method and store it in a variable called faceDetector. Now we call processImage() using the FaceDetector instance, faceDetector, which was created earlier, and pass in the image file as a parameter. The method call returns a list of detected faces, which is stored in a list variable called detectedFaces. Note that processImage() returns a list of type Face. Face is an object whose attributes contain the characteristic features of a detected face. A Face object has the following attributes:

  • getLandmark
  • hashCode
  • hasLeftEyeOpenProbability
  • hasRightEyeOpenProbability
  • headEulerEyeAngleY
  • headEylerEyeAngleZ
  • leftEyeOpenProbability
  • rightEyeOpenProbability
  • smilingProbability

Now we iterate through the list of faces using a for loop. We can get the value of smilingProbablity for the ith face using detectedFaces[i].smilingProbability. We store it in a variable called smileProbablity and print its value to the console using print(). Finally, we set the value of the global faces list to detectedFaces.

The async modifier added to the detectFaces() method enables asynchronous execution of the method, which means that a separate thread, different from the main thread of execution, is created. An async method works on callback mechanisms to return the value computed by it once the execution has been completed.

To make sure that the faces are detected as soon as the user migrates to the second screen, we override initState() and call detectFaces() from inside it:

 @override
void initState() {
super.initState();
detectFaces();
}

initState() is the first method that is called after the widget is created.

Marking the detected faces

Next, marking the detected faces. After detecting all the faces present in the image, we will paint rectangular boxes around them with the following steps:

  1.  First we need to convert the image file into raw bytes. To do so, we define a loadImage method as follows:
void loadImage(File file) async {
final data = await file.readAsBytes();
await decodeImageFromList(data).then(
(value) => setState(() {
image = value;
}),
);
}

The loadImage() method takes in the image file as input. Then we convert the contents of the file into bytes using file.readAsByte() and store the result in data. Next, we call decodeImageFromList(), which is used to load a single image frame from a byte array into an Image object and store the final result value in the image. We call this method from inside detectFaces(), which was defined earlier.

  1. Now we define a CustomPainter class called FacePainter to paint rectangular boxes around all the detected faces. We start as follows:
class FacePainter extends CustomPainter {
Image image;
List<Face> faces;
List<Rect> rects = [];
FacePainter(ui.Image img, List<Face> faces) {
this.image = img;
this.faces = faces;
for(var i = 0; i < faces.length; i++) {
rects.add(faces[i].boundingBox);
}
}
}
}

We start by defining three global variables, image, faces, and rects. image of type Image is used to get the byte format of the image file. faces is a List of Face objects that were detected. Both image and faces are initialized inside the FacePainter constructor. Now we iterate through the faces and get the bounding rectangles of each of the face using faces[i].boundingBox and store it in the rects list.

  1. Next, we override paint() to paint the Canvas with rectangles, as follows:
 @override
void paint(Canvas canvas, Size size) {
final Paint paint = Paint()
..style = PaintingStyle.stroke
..strokeWidth = 8.0
..color = Colors.red;
canvas.drawImage(image, Offset.zero, Paint());
for (var i = 0; i < faces.length; i++) {
canvas.drawRect(rects[i], paint);
}
}

We start by creating an instance of the Paint class to describe the style to paint the Canvas, that is, the image we have been working with. Since we need to paint rectangular borders, we set style to PaintingStyle.stroke to paint just the edges of the shape. Next, we set strokeWidth, that is, the width of the rectangular border, to 8. Also, we set the color to red. Finally, we paint the image using cavas.drawImage(). We iterate through each of the rectangles for the detected faces inside the rects list and draw rectangles using canvas.drawRect().

Displaying the final image on the screen

After successfully detecting faces and painting rectangles around them, we will now display the final image on the screen. We first build the final scaffold for our second screen. We will override the build() method inside FaceDetectionState to return the scaffold as follows:

 @override
Widget build(BuildContext context) {
return Scaffold(
appBar: AppBar(
title: Text("Face Detection"),
),
body: (image == null)
? Center(child: CircularProgressIndicator(),)
: Center(
child: FittedBox(
child: SizedBox(
width: image.width.toDouble(),
height: image.width.toDouble(),
child: CustomPaint(painter: FacePainter(image, faces))
),
),
)
);
}

We start by creating the appBar for the screen, providing a title, Face Detection. Next, we specify the body of the scaffold. We first check the value of the image that stores the byte array of the image selected. Till the time it is null we are sure that the process of detecting faces is in progress. Therefore, we use a CircularProgressIndicator(). Once the process for detecting faces is over the user interface is updated to show a SizedBox with the same width and height as the selected image. The child property of the SizedBox is set to CustomPaint, which uses the FacePainter class we created earlier to paint rectangular borders around the detected faces.

Creating the final MaterialApp

At last, we create the final MaterialApp. We create the main.dart file, which provides the point of execution for the whole code. We create a stateless widget called FaceDetectorApp, which is used to return a MaterialApp specifying the title, theme, and home screen:

class FaceDetectorApp extends StatelessWidget {
@override
Widget build(BuildContext context) {
return new MaterialApp(
debugShowCheckedModeBanner: false,
title: 'Flutter Demo',
theme: new ThemeData(
primarySwatch: Colors.blue,
),
home: new FaceDetectorHome(),
);
}
}

Now we define the main() method to execute the whole application by passing in the instance of FaceDetectorApp() as follows:

void main() => runApp(new FaceDetectorApp());

CONTINUE READING
83
Tech Concepts
36
Programming languages
73
Tech Tools
Icon Unlimited access to the largest independent learning library in tech of over 8,000 expert-authored tech books and videos.
Icon Innovative learning tools, including AI book assistants, code context explainers, and text-to-speech.
Icon 50+ new titles added per month and exclusive early access to books as they are being written.
Mobile Deep Learning with TensorFlow Lite, ML Kit and Flutter
notes
bookmark Notes and Bookmarks search Search in title playlist Add to playlist download Download options font-size Font size

Change the font size

margin-width Margin width

Change margin width

day-mode Day/Sepia/Night Modes

Change background colour

Close icon Search
Country selected

Close icon Your notes and bookmarks

Confirmation

Modal Close icon
claim successful

Buy this book with your credits?

Modal Close icon
Are you sure you want to buy this book with one of your credits?
Close
YES, BUY

Submit Your Feedback

Modal Close icon
Modal Close icon
Modal Close icon