
Before you can do anything, you need to install Cocos2d. Let's get started.
There are several ways to install Cocos2d. Some methods are easy, whereas some are harder to get started, but it will make upgrading in the future much easier. Before you install Cocos2d, you need to ensure that you have the latest version of Xcode installed. Xcode can be found on the Mac App Store or on the Apple Developer Program portal. Additionally, to push your apps into an iOS device, you will need a paid iOS developers account. New accounts can be made at http://developer.apple.com/ios.
Using the installer is the easiest method of installation and is recommended for first time users because it will install the relevant documentation and project templates automatically.
To install Cocos2d with the installer, follow these steps:
Download the latest version of the installer from http://www.cocos2d-swift.org/download
Open the installer and follow the prompts to install Cocos2d.
Go to the Mac App Store and install SpriteBuilder; we will use this in later chapters.

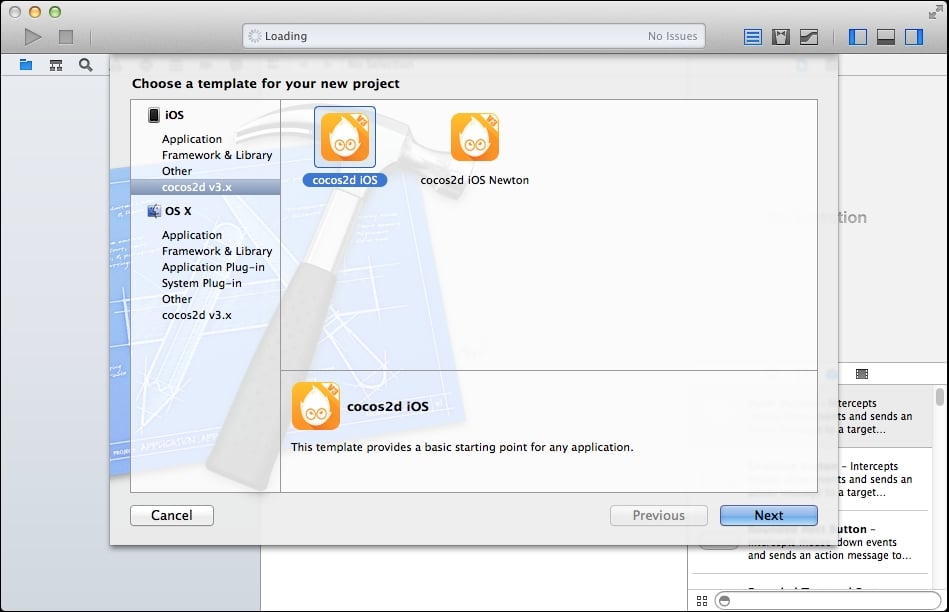
You can start by creating a new project from the template that you just installed in Xcode. Open up Xcode and click New Project. You will see a new section in the templates for cocos2d v3.x. Click on this, and create a new project with the cocos2d iOS template, as shown in the following figure. You can now build and run the template, and have a play around with the example app:
Tip
Cocos2D-Swift Version 3 was a minor upgrade from Version 2. Its main features were an official support for Android, built-in physics engine, and a cleaned up API. As part of the API cleanup, many classes were either renamed or removed all together. This can make it difficult to follow tutorials from old versions.
To build and run the Cocos2d app for Android, you need to install Apportable, a cross-compiler that will compile the Objective-C code to run on Android devices. This sounds crazy, but it actually works; you are about to try it for yourself.
You will also need to plug in an Android device and ensure that USB debugging is enabled. This step is different for every Android device, so if you are not sure how to do it, the best method is to go online and search for Enable USB debugging on <device name>.
The first step is to download and install Apportable, the instructions for which can be found at https://www.Apportable.com. You will be asked to sign up to an account, but it is completely free to build Cocos2d games; you can even push your game to the Google Play Store. The steps on how to install your app in your Android phone are as follows:
Once you have installed Apportable, open a terminal window and navigate to the Hello World project folder.
From inside the project folder, run the command
Apportable load.You will then be asked a series of questions. First, you will be asked whether your app is using OpenGL ES 1 or 2. Answer with 2. The difference between these options is that Cocos2d v3 is built on top of Open GL ES v2. They have a different API and so selecting the correct option is important.
The next question will ask whether your app should initially launch in portrait or landscape. Obviously, this will change between projects, but for now, answer L for landscape.
You will then see a large amount of terminal output while Apportable builds the project. Once the build is complete, Apportable will attempt to install your app in the Android device that is plugged into your computer.
Once the app is installed, it will automatically open. If your phone is locked, you will have to manually unlock it.
Now that you have successfully built and deployed your first Cocos2d app, let's see how it actually works. In Xcode, open up IntroScene.m.
The IntroScene.m file corresponds with the first scene you see when you load up your app. We will go into more detail on scenes in the next chapter, but for now, all you need to know is what a scene looks like. The first part of the init() method is a slightly different method compared to the standard Objective-C init pattern.
First, assign
self, and then check to make sure that it did not returnnil. This is a standard Objective-C pattern to guard against a sub-class or super class not initiating properly:// Apple recommend assigning self with supers return value self = [super init]; if (!self) return(nil);Next, is your first piece of Cocos2d code:
// Create a colored background (Dark Grey) CCNodeColor *background = [CCNodeColor nodeWithColor:[CCColor colorWithRed:0.2f green:0.2f blue:0.2f alpha:1.0f]]; [self addChild:background];CCNodeColoris a Cocos2d object that allows you to create and display a rectangle of a single color.You create the color node by passing in the color that you want in Cocos2d; colors are represented by the
CCColorclass. For now, you are making a dark gray background, but experiment by changing the color values, and then building and running the app to see the effect.Once you have created the color node, you need to add it to the scene so that Cocos2d knows how to render it. Until you add it, it will not be visible on screen. You add the background child to self, which in this case is the intro scene.
Now, you have a solid background color, but the app is still pretty boring. Let's add some text to say '
Hello World':// Hello World CCLabelTTF *label = [CCLabelTTF labelWithString:@"Hello World" fontName:@"Chalkduster" fontSize:36.0f]; label.positionType = CCPositionTypeNormalized; label.color = [CCColor redColor]; label.position = ccp(0.5f, 0.5f); // Middle of screen [self addChild:label];
CCLabelTTF is a label class that allows you to add text to your scene. Labels are created by passing in a string, a font name, and a font size, and then setting a position type. Position types will be covered in the next chapter as well, but a normalized position type allows you to position your node with a percentage from the left and bottom, rather than a fixed position. This is of great value when you are developing an app that will run on multiple screen sizes, such as Android phones and tablets. Set the label color to red and then set the position to (0.5, 0.5) using ccp, which is Cocos2d shorthand for making a new CGPoint array. Points in Cocos2d have an origin at the bottom-left of the scene. Remember that this is a percentage, so we are placing it 50 percent in and 50 percent up, which is the center of the screen. Once you have finished setting up your label, you add it to the scene so that it will be rendered.
Now you need a way to get to the next scene, where your game will have some interaction. You need to add a button:
    // Helloworld scene button
    CCButton *helloWorldButton = [CCButton buttonWithTitle:@"[ Start ]" fontName:@"Verdana-Bold" fontSize:18.0f];
    helloWorldButton.positionType = CCPositionTypeNormalized;
    helloWorldButton.position = ccp(0.5f, 0.35f);
    [helloWorldButton setTarget:self selector:@selector(onSpinningClicked:)];
    [self addChild:helloWorldButton];
CCButton is a button node that gives you a target and a selector for when the node is tapped on. You can also set a block to run on tap instead, but in this example, we are using the target / selector paradigm. You create the button in a similar way to the label with a string, font name, font size, and position. The difference now is that you also need to set the target and selector. You will need to set the target to self, and run a method that is in this class, which for this example is onSpinningClicked. Add this button to the scene to be rendered as well.
Let's have a look at the method that is called when you tap the button:
- (void)onSpinningClicked:(id)sender
{
    // start spinning scene with transition
    [[CCDirector sharedDirector] replaceScene:[HelloWorldScene scene]
                               withTransition:[CCTransition transitionPushWithDirection:CCTransitionDirectionLeft duration:1.0f]];
}
In this method, you are making a call to the CCDirector: the director of the game that manages the scene currently on the screen to replace the current scene with the HelloWorld scene. We will use a transition to do this, which will be covered fully later in this book. For now, we will start with a simple transition that will push the new scene that comes in from the left. You don't have to use a transition, but can add a nice bit of polish to your game.
Let's take a look at the scene you have transitioned to. If you play around with the app you will see that you have an image that is rotating, and that starts in the center of the screen. When you tap the screen, it moves to where you tapped. Let's see how this works.
Starting in the
initmethod, the first part is always the same, but there is something new now:// Apple recommend assigning self with supers return value self = [super init]; if (!self) return(nil); // Enable touch handling on scene node self.userInteractionEnabled = YES;Enabled user interaction tells the
CCDirectorclass that you want the scene to receive touches. This is so that when you tap the screen, your image moves.Next, you create the background in the same way as in
IntroScene.m. The following code is another new concept:// Add a sprite _sprite = [CCSprite spriteWithImageNamed:@"Icon-72.png"]; _sprite.position = ccp(self.contentSize.width/2,self.contentSize.height/2); [self addChild:_sprite];You are now creating the image that starts in the middle of the screen. These images are known as sprites, and they are created using their image names. Using the names makes Cocos2d look for an image in the app bundle, with the name you provide. You save the sprite reference in an instance variable, so it can be moved around the screen. Then, the position of the sprite is set to start in the center of the screen. Note that this is different to the position type that was used before; now you are setting it to a fixed coordinate rather than a percentage. Then, add the sprite to the scene to be rendered.
Tip
The Cocos2d template stores its nodes in instance variables. Apple recommends against this practice, stating that the preferred method to store variables accessible within a class is through properties. Apple's recommended practice will be used in this book. More information can be found at https://developer.apple.com/library/mac/documentation/Cocoa/Conceptual/ProgrammingWithObjectiveC/EncapsulatingData/EncapsulatingData.html.
Now, you will add an animation to your sprite in order to make it spin:
    // Animate sprite with action
    CCActionRotateBy* actionSpin = [CCActionRotateBy actionWithDuration:1.5f angle:360];
    [_sprite runAction:[CCActionRepeatForever actionWithAction:actionSpin]];
This code creates a CCActionRotateBy action with a duration of 1.5 seconds and an angle of 360 degrees clockwise. This means that you want the sprite to rotate once by 360 degrees, and take 1.5 seconds to complete the rotation. You will notice that in the app, the rotation runs continuously; this is achieved on the next line with the relatively self-explanatory CCActionRepeatForever action. You then run the action on your sprite in order to start the rotation. There are many different types of CCAction that will be covered in this book; we have only just touched the surface of what is possible with this example:
// Create a back button
    CCButton *backButton = [CCButton buttonWithTitle:@"[ Menu ]" fontName:@"Verdana-Bold" fontSize:18.0f];
    backButton.positionType = CCPositionTypeNormalized;
    backButton.position = ccp(0.85f, 0.95f); // Top Right of screen
    [backButton setTarget:self selector:@selector(onBackClicked:)];
    [self addChild:bcackButton];
Next, you create a button that will take you back to the main menu. This works exactly the same as in the previous scene.
Now, let's look at how you handle touch. Scroll down to the code and find the
touchBeganmethod.Note
In Xcode, you can use Ctrl+6 and start typing the method you are looking for. This is a quick way to navigate code.
-(void) touchBegan:(UITouch *)touch withEvent:(UIEvent *)event {
    CGPoint touchLoc = [touch locationInNode:self];

    // Log touch location
    CCLOG(@"Move sprite to @ %@",NSStringFromCGPoint(touchLoc));

    // Move our sprite to touch location
    CCActionMoveTo *actionMove = [CCActionMoveTo actionWithDuration:1.0f position:touchLoc];
    [_sprite runAction:actionMove];
}
How does touchBegan work? It gets activated when you first touch the screen, and you get a location of touch translated into the coordinate space of your node. This is an important step because UIKit (the framework used by iOS) uses a different coordinate space to Cocos2d and OpenGL. If the location doesn't get translated, you would end up moving your node to the wrong position on the screen.
Tip
It is important to note the difference between touchBegan and touchEnded. Choosing the correct one depends on what you are trying to achieve with your UI. If you want an action to occur as soon as the user touches the screen, then use touchBegan. If you want an action to occur when the user lifts their finger, then use touchEnded.
The template then logs the position that you are moving the sprite to, using a CCLog – a macro helper that allows you to disable logging in release builds.
Next, you will create a CCActionMoveTo action. This action is similar to CCActionRotateBy, but now you are moving a node to an identified position rather than rotating a node by an angle. You want your sprite to move to the touch position, using the touch location that was translated. For this example, you want the move to take 1 second, but feel free to change the duration and rebuild to see the effects. Once you have created the action, run it on the sprite. Note that you are using the instance variable that was created in the init method.