
Variables change in potentially many different circumstances: when the player changes their position, when enemies are destroyed, when the level changes, and so on. Consequently, you'll frequently need to check the value of a variable to branch the execution of your scripts that perform different sets of actions, depending on the value. For example, if PlayerHealth reaches 0 percent, you'll perform a death sequence, but if PlayerHealth is at 20 percent, you might only display a warning message. In this specific example, the PlayerHealth variable drives the script in a specified direction. C# offers two main conditional statements to achieve a program branching like this. These are the if statement and the Switch statement. Both are highly useful.
The if statement has various forms. The most basic form checks for a condition and will perform a subsequent block of code if, and only if, that condition is true. Consider the following code sample 1-2:
01 using UnityEngine;
02 using System.Collections;
03
04 public class MyScriptFile : MonoBehaviour
05 {
06     public string PlayerName = "";
07     public int PlayerHealth = 100;
08     public Vector3 Position = Vector3.zero;
09
10     // Use this for initialization
11     void Start () {
12     }
13
14     // Update is called once per frame
15     void Update ()
16     {
17         //Check player health - the braces symbol {} are option for one-line if-statements
18         if(PlayerHealth == 100)
19         {
20         Debug.Log ("Player has full health");
21         }
22     }
23 }
The preceding code is executed like all other types of code in Unity, by pressing the Play button from the toolbar, as long as the script file has previously been instantiated on an object in the active scene. The if statement at line 18 continually checks the PlayerHealth class variable for its current value. If the PlayerHealth variable is exactly equal to (==) 100, then the code inside the {} braces (in lines 19–21) will be executed. This works because all conditional checks result in a Boolean value of either true or false; the conditional statement is really checked to see whether the queried condition (PlayerHealth == 100) is true. The code inside the braces can, in theory, span across multiple lines and expressions. However, here, there is just a single line in line 20: the Debug.Log Unity function outputs the Player has full health string to the console, as shown in the following screenshot. Of course, the if statement could potentially have gone the other way, that is, if PlayerHealth was not equal to 100 (perhaps, it was 99 or 101), then no message would be printed. Its execution always depends on the previous if statement evaluating to true.
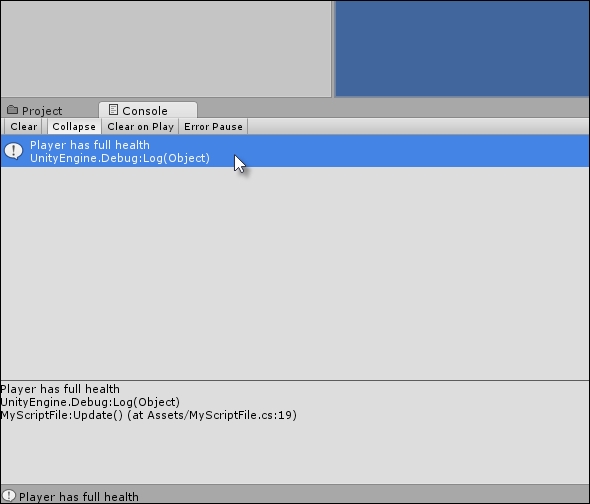
The Unity Console is useful for printing and viewing debug messages
More information on the if statements, the if-else statement, and their usage in C# can be found online at http://msdn.microsoft.com/en-GB/library/5011f09h.aspx.
Note
Unity Console
As you can see in the preceding screenshot, the console is a debugging tool in Unity. It's a place where messages can be printed from the code using the Debug.Log statement (or the Print function) to be viewed by developers. They are helpful to diagnose issues at runtime and compile time. If you get a compile time or runtime error, it should be listed in the Console tab. The Console tab should be visible in the Unity Editor by default, but it can be displayed manually by selecting Console in the Window menu from the Unity application file menu. More information on the Debug.Log function can be found at http://docs.unity3d.com/ScriptReference/Debug.Log.html.
You can, of course, check for more conditions than just equality (==), as we did in code sample 1-2. You can use the > and < operators to check whether a variable is greater than or less than another value, respectively. You can also use the != operator to check whether a variable is not equal to another value. Further, you can even combine multiple conditional checks into the same if statement using the && (AND) operator and the || (OR) operator. For example, check out the following if statement. It performs the code block between the {} braces only if the PlayerHealth variable is between 0 and 100 and is not equal to 50, as shown here:
if(PlayerHealth >= 0 && PlayerHealth <= 100 && PlayerHealth !=50)
{
Debug.Log ("Player has full health");
}
Note
The if-else statement
One variation of the if statement is the if-else statement. The if statement performs a code block if its condition evaluates to true. However, the if-else statement extends this. It would perform an X code block if its condition is true and a Y code block if its condition is false:
if(MyCondition)
{
//X - perform my code if MyCondition is true
}
else
{
//Y – perform my code if MyCondition is false
}As we've seen, the if statement is useful to determine whether a single and specific condition is true or false and to perform a specific code block on the basis of this. The switch statement, in contrast, lets you check a variable for multiple possible conditions or states, and then lets you branch the program in one of many possible directions, not just one or two as is the case with if statements. For example, if you're creating an enemy character that can be in one of the many possible states of action (CHASE, FLEE, FIGHT, HIDE, and so on), you'll probably need to branch your code appropriately to handle each state specifically. The break keyword is used to exit from a state returning to the end of the switch statement. The following code sample 1-3 handles a sample enemy using enumerations:
01 using UnityEngine;
02 using System.Collections;
03
04 public class MyScriptFile : MonoBehaviour
05 {
06     //Define possible states for enemy using an enum
07     public enum EnemyState {CHASE, FLEE, FIGHT, HIDE};
08
09     //The current state of enemy
10     public EnemyState ActiveState = EnemyState.CHASE;
11
12     // Use this for initialization
13     void Start () {
14     }
15
16     // Update is called once per frame
17     void Update ()
18     {
19          //Check the ActiveState variable
20          switch(ActiveState)
21          {
22          case EnemyState.FIGHT:
23          {
24                //Perform fight code here
25                Debug.Log ("Entered fight state");
26          }
27                break;
28
29
30          case EnemyState.FLEE:
31          case EnemyState.HIDE:
32          {
33               //Flee and hide performs the same behaviour
34               Debug.Log ("Entered flee or hide state");
35          }
36               break;
37
38          default:
39          {
40               //Default case when all other states fail
41               //This is used for the chase state
42               Debug.Log ("Entered chase state");
43           }
44               break;
45           }
46     }
47 }
Note
Enumerations
This line 07 in code sample 1-3 declares an enumeration (enum) named EnemyState. An enum is a special structure used to store a range of potential values for one or more other variables. It's not a variable itself per se, but a way of specifying the limits of values that a variable might have. In code sample 1-3, the ActiveState variable declared in line 10 makes use of EnemyState. Its value can be any valid value from the ActiveState enumeration. Enums are a great way of helping you validate your variables, limiting their values within a specific range and series of options.
Another great benefit of enums is that variables based on them have their values appear as selectable options from drop-down boxes in the Object Inspector, as shown in the following screenshot:
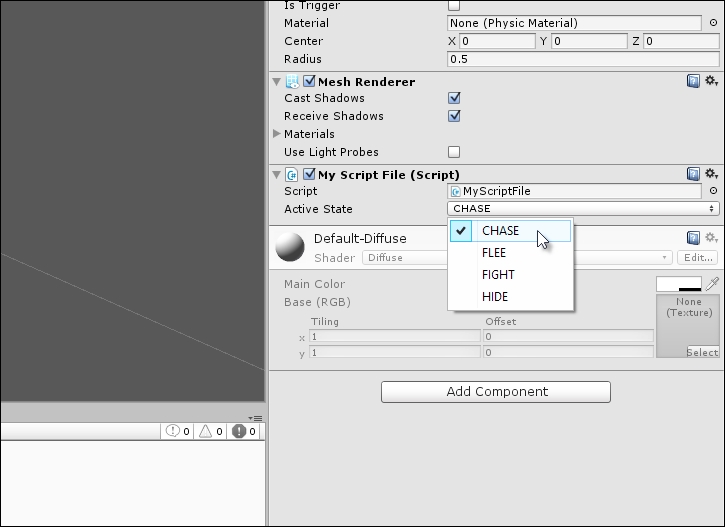
Enumerations offer you drop-down options for your variables from the Object Inspector
More information on enums and their usage in C# can be found online at http://msdn.microsoft.com/en-us/library/sbbt4032.aspx.
The following are the comments for code sample 1-3:
Line 20: The
switchstatement begins. Parentheses,(), are used to select the variable whose value or state must be checked. In this case, theActiveStatevariable is being queried.Line 22: The first case statement is made inside the
switchstatement. The following block of code (lines 24 and 25) will be executed if theActiveStatevariable is set toEnemyState.Fight. Otherwise, the code will be ignored.Lines 30 and 31: Here, two case statements follow one another. The code block in lines 33 and 34 will be executed if, and only if,
ActiveStateis eitherEnemyState.FleeorEnemyState.Hide.Line 38: The default statement is optional for a
switchstatement. When included, it will be entered if no other case statements aretrue. In this case, it would apply ifActiveStateisEnemyState.Chase.Lines 27, 36, and 44: The
breakstatement should occur at the end of a case statement. When it is reached, it will exit the completeswitchstatement to which it belongs, resuming program execution in the line after theswitchstatement, in this case, line 45.Tip
More information on the
switchstatement and its usage in C# can be found at http://msdn.microsoft.com/en-GB/library/06tc147t.aspx.