
Maintain a virtual record of all of your documents, links, and videos in your Edmodo Library. Learn how to organize your content and share it with others.
Choose the content you would like to share with your groups. Determine how you would like to organize it.
An online Library manages files and links for personal use and sharing with group members.
Click on the Book icon.
Create a new folder.
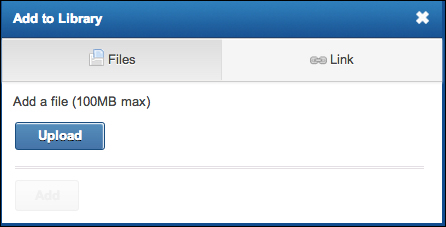
Add to library by clicking on Add to Library.
Share to groups.
Click on the Book icon located on the top left-hand side of your Edmodo home screen. At the top-left of this screen you will see the Add to Library tab. Click on this tab and upload either a file from your computer or attach a link from the Internet. Once the file has been uploaded, click on Add. To attach the Internet link, first click on Link and then copy and paste the URL into the embed tab. The title of the Internet page will automatically appear below the pasted URL. Click on Add to include the link in your Library.
To organize your Library items, click on the New tab on the left-hand side of your Library screen. This will create a new folder. Type in a name for the newly created folder and click on Create. To add a file or link to the folder, click on the item to highlight it. You can now view that item on the right-hand side of the split screen. Click on the Folder tab at the bottom of the item. A list of all of the folders in your Library will appear. Check the appropriate folder or folders with which you would like to include the link or file. Then click on the blue-colored Apply tab. If you have an extensive list of folders, rather than scrolling down the list, you can also search for the folder by typing the name of the folder in the search bar from the same screen.
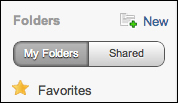
The list of your folders is located on the left-hand side of your Library screen. Choose the appropriate folder to view. Items in the folder may be organized by dragging-and-dropping into a particular order. The items may also be highlighted and then launched in play view. Clicking on the Launched in Play View tab will bring up the file or link for you to view. To return to the Library, simply click on Back to library.
To share a folder with a group, click on the designated folder. At the top of this view, click on the People icon to choose the group with which you intend to share the folder. Check the group or groups to automatically share the folder with. You may also choose to make the folder public by checking this designation at the top of this screen view. To leave this sharing view, just click anywhere on your screen outside sharing view.
The gear icon located just to the right of the people icon will allow you to delete or edit the name of your folder. If you choose to delete the folder, a Delete Folder view will appear. You will be asked to confirm your desire to delete the folder.
When folders are shared with you by another group, the list will appear on the left-hand side of your Library screen next to your My Folders list. Click on Shared to see this list of shared folders and items. All of your shared Library items can be filtered at the top of the Library home screen. The Filter by type tab will provide a drop-down list from which you can choose the items to be filtered. The default is All types and includes both the Internet links and files, which have been uploaded. To sort the two, choose the appropriate designation for either links or files. In the same area, it is also possible to choose to view a list of all items in your Library or to view them as a matrix. The most recently added Library item will appear at the head of the list or at the top of the matrix, with the last item being identified as the one that was added first.
If you haven't intentionally added a link or file to your Edmodo Library, but have shared these with one of your Edmodo groups, you can still easily search for these items. Additionally, documents that you have already created via your Google Drive account can be easily linked to your Edmodo Library.
Any links and files that you have been attaching to your Edmodo notes are automatically added to your Library. To see these items, click on Attached to Posts located on the top left-hand side of your screen. These are not items that you have added to your Library, but rather were added by Edmodo. The items are automatically sorted. Click on the group with whom you had originally shared the item to see this. To find the group, click on the blue-colored All Groups tab and use the drop-down menu to find the desired group name.
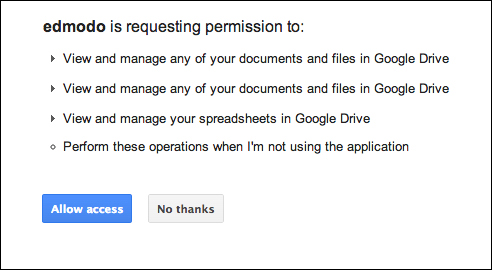
If you have been using Google Drive to create documents, you do not need to download the document to your computer and upload it to Edmodo in order to share it with your groups. Edmodo has eliminated this need by creating a shortcut to connect your two accounts. To do this, click on the Book icon to take you to the Library view in Edmodo. On the left-hand side of the screen, click on the Google Docs tab. Since your Google account has not been linked to Edmodo prior to this point, you will see a large Connect with Google Docs tab. Click on this tab. You will be taken to a Google screen that asks for your permission to connect the two accounts. By allowing access, Edmodo may view and manage any of your documents and files in Google Drive. You may choose to not allow Edmodo this access. If you decide not to allow the access, you can still download a file from Google Drive and then upload it into your Edmodo Library. However, by allowing Edmodo this access, you skip these steps and save time. You may also disconnect Edmodo's access to your Google Drive account at any time. To do this, in the Google Docs view of your Edmodo Library, click on the Disconnect Account tab on the right-hand side of your screen.