Book Image

Learn Arduino Prototyping in 10 days

By : Kallol Bosu Roy Choudhuri
Book Image

Learn Arduino Prototyping in 10 days

By: Kallol Bosu Roy Choudhuri

Overview of this book

This book is a quick, 10-day crash course that will help you become well acquainted with the Arduino platform. The primary focus is to empower you to use the Arduino platform by applying basic fundamental principles. You will be able to apply these principles to build almost any type of physical device. The projects you will work through in this book are self-contained micro-controller projects, interfacing with single peripheral devices (such as sensors), building compound devices (multiple devices in a single setup), prototyping standalone devices (powered from independent power sources), working with actuators (such as DC motors), interfacing with an AC-powered device, wireless devices (with Infrared, Radio Frequency and GSM techniques), and finally implementing the Internet of Things (using the ESP8266 series Wi-Fi chip with an IoT cloud platform). The first half of the book focuses on fundamental techniques and building basic types of device, and the final few chapters will show you how to prototype wireless devices. By the end of this book, you will have become acquainted with the fundamental principles in a pragmatic and scientific manner. You will also be confident enough to take up new device prototyping challenges.
Table of Contents (13 chapters)

The Piezo Buzzer project

In this section, we will learn how to use a Piezo Buzzer and make sounds using some in-built C functions. A Piezo Buzzer is like a small speaker capable of emitting sounds at various frequencies. A typical Piezo Buzzer is shown in the following figure:

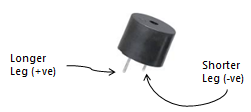
Figure 3: A Piezo Buzzer

A Piezo Buzzer has two legs, one longer positive leg and one shorter negative leg. The negative leg is connected to the ground while the longer positive leg is usually connected to an Arduino pin via a 100 Ohms resistor.

Sometimes, you may find a small sticker pasted to the top of a brand new Piezo Buzzer that says, "Remove after washing". Do not get confused by this, it is just a leftover sticker from the Buzzer manufacturing process, which was not removed. Just ignore and remove the sticker. Do not wash the Buzzer!

For building the Piezo Buzzer project, we will use the...