


Getting a full working Maven install up and running is not within the scope of this book. It's okay though, don't panic! The Apache Software Foundation has you covered, it has a guide to setting up Maven up in just five minutes! See the following link:
http://maven.apache.org/guides/getting-started/maven-in-five-minutes.html
If you are running the Debian derivative of Linux, it is as easy as using this command:
sudo apt-get install maven
Or if you are running a Mac with Homebrew, it is just this code:
brew install maven
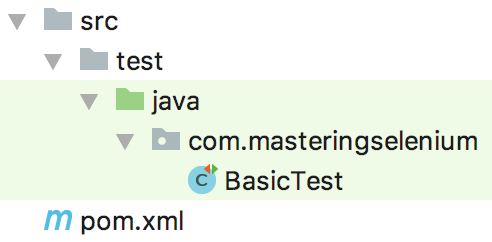
Once you have Maven installed and working, we will start our Selenium project with a basic POM file. We are going to start by creating a basic Maven directory structure and then creating a file called pom.xml in it. Take a look at the following screenshot:
There are two main testing frameworks that you will come across in a Java environment; JUnit and TestNG. I personally find TestNG to be easier to get up and running out of the box, but I find JUnit to be more extensible. TestNG certainly seems to be popular on the Selenium mailing list, with many threads asking questions about it; you don't often see JUnit questions any more.
I'm not going to suggest either one as the right choice, as they are both capable frameworks that you will probably come across in the enterprise world. Since TestNG seems to be the more popular option, we will focus on a TestNG implementation in this chapter.
If you prefer JUnit, you will want to have a look at Appendix 2, Working with jUnit. In this, we will implement the same base project, but we will use JUnit instead of TestNG. This means instead of worrying about which one is best, you can have a look at a TestNG implementation and a JUnit implementation. You can then choose which one you prefer and read the relevant section.
So, to start with, let's have a look at a basic POM code for a TestNG-based Maven project:
<?xml version="1.0" encoding="UTF-8"?>
<project xmlns="http://maven.apache.org/POM/4.0.0"
         xmlns:xsi="http://www.w3.org/2001/XMLSchema-instance"
         xsi:schemaLocation="http://maven.apache.org/POM/4.0.0
         http://maven.apache.org/xsd/maven-4.0.0.xsd">

    <groupId>com.masteringselenium.demo</groupId>
    <artifactId>mastering-selenium-testng</artifactId>
    <version>DEV-SNAPSHOT</version>
    <modelVersion>4.0.0</modelVersion>

    <name>Mastering Selenium TestNG</name>
    <description>A basic Selenium POM file</description>
    <url>http://www.masteringselenium.com</url>

    <properties>
        <project.build.sourceEncoding>UTF-
        8</project.build.sourceEncoding>
        <project.reporting.outputEncoding>UTF-
        8</project.reporting.outputEncoding>
        <java.version>1.8</java.version>
        <!-- Dependency versions -->
        <selenium.version>3.12.0</selenium.version>
        <testng.version>6.14.3</testng.version>
        <!-- Plugin versions -->
        <maven-compiler-plugin.version>3.7.0</maven-compiler-
        plugin.version>
        <maven-failsafe-plugin.version>2.21.0</maven-failsafe-
        plugin.version>
        <!-- Configurable variables -->
        <threads>1</threads>
    </properties>

    <build>
        <plugins>
            <plugin>
                <groupId>org.apache.maven.plugins</groupId>
                <artifactId>maven-compiler-plugin</artifactId>
                <configuration>
                    <source>${java.version}</source>
                    <target>${java.version}</target>
                </configuration>
                <version>${maven-compiler-plugin.version}</version>
            </plugin>
        </plugins>
    </build>

    <dependencies>
        <dependency>
            <groupId>org.seleniumhq.selenium</groupId>
            <artifactId>selenium-java</artifactId>
            <version>${selenium.version}</version>
            <scope>test</scope>
        </dependency>
        <dependency>
            <groupId>org.seleniumhq.selenium</groupId>
            <artifactId>selenium-remote-driver</artifactId>
            <version>${selenium.version}</version>
            <scope>test</scope>
        </dependency>
        <dependency>
            <groupId>org.testng</groupId>
            <artifactId>testng</artifactId>
            <version>${testng.version}</version>
            <scope>test</scope>
        </dependency>
    </dependencies>

</project>
What you are seeing here is mainly Maven boilerplate code. The groupId, artifactId, and version are subject to standard naming conventions, which are as follows :
- groupId should be a domain that you own/control and is entered in reverse
- artifactId is the name that will be allocated to your JAR file, so remember to make it what you want your JAR file to be called
- version should always be a number with -SNAPSHOT appended to the end; this shows that it is currently a work in process
We have added the Maven compiler plugin so that we can define the version of Java that is required to compile the code we are going to write. We have opted to require Java 8, since this is the minimum version of Java currently supported by Selenium.
Next, we have the libraries that our code depends upon; these are stored in the dependencies block. To get us started, we have added a dependency for Selenium and a dependency for TestNG. Note that we have given them a scope of test; this ensures that these dependencies are only loaded into the classpath when tests are run and are never packaged up in any artifacts that are generated as part of the build process.
You can now open up this POM file using your IDE (in this book, I'm assuming that you are using IntelliJ IDEA, but any modern IDE should be able to open up a POM file and create a project from it).
We now have the basis of our Selenium project. The next step is to create a basic test that we can run using Maven. Start by creating a src/test/java directory. Your IDE should automatically work out that this directory is a test sources directory. We then need to create a new package in this directory called com.masteringselenium. Finally, inside this package, we will create a file called BasicTest.java. Into this file we are going to put the following code:
package com.masteringselenium;

import org.openqa.selenium.By;
import org.openqa.selenium.WebDriver;
import org.openqa.selenium.WebElement;
import org.openqa.selenium.firefox.FirefoxDriver;
import org.openqa.selenium.support.ui.ExpectedCondition;
import org.openqa.selenium.support.ui.WebDriverWait;
import org.testng.annotations.Test;

public class BasicTest {

    private ExpectedCondition<Boolean> pageTitleStartsWith(final
    String searchString) {
        return driver -> driver.getTitle().toLowerCase().
        startsWith(searchString.toLowerCase());
    }

    private void googleExampleThatSearchesFor(final
    String searchString) {

        WebDriver driver = new FirefoxDriver();

        driver.get("http://www.google.com");

        WebElement searchField = driver.findElement(By.name("q"));

        searchField.clear();
        searchField.sendKeys(searchString);

        System.out.println("Page title is: " + driver.getTitle());

        searchField.submit();

        WebDriverWait wait = new WebDriverWait(driver, 10, 100);
        wait.until(pageTitleStartsWith(searchString));

        System.out.println("Page title is: " + driver.getTitle());

        driver.quit();
    }

    @Test
    public void googleCheeseExample() {
        googleExampleThatSearchesFor("Cheese!");
    }

    @Test
    public void googleMilkExample() {
        googleExampleThatSearchesFor("Milk!");
    }
}
These two tests should be quite familiar; it's the basic Google cheese scenario with all the main grunt work abstracted out into a method that we are able to call multiple times with different search terms. We now have everything we need to run our tests. To kick them off, type the following command into a Terminal window:
mvn clean verify
You will now see Maven downloading all of the Java dependencies from Maven central. When it is completed, it will build the project and then run the tests.
You will now see Firefox load up and then your test will fail, since with Selenium 3 all of the driver binaries (the part that actually drives the browser) are no longer bundled with Selenium. You will now have to download the relevant binaries to be able to run your tests.
For now, we will download a binary and then pass an environmental variable into the JVM so that we can get this initial test running. Later on, we will take a look at a slightly more streamlined way to do this that will automatically download the required driver binaries.
We are running our tests against Firefox, so we will need to download the geckodriver binary; the latest one is available at https://github.com/mozilla/geckodriver/releases.
Now that we have a usable driver binary, we need to tell Selenium where to find it. Luckily, the Selenium team have already provided us with a way to do this. When Selenium starts up and tries to instantiate a driver object, it will look for a system property that holds the location of the required executable. These system properties are in the format WebDriver.<DRIVER_TYPE>.driver. To get our test working, all we need to do is pass this system property on the command line:
mvn clean verify -Dwebdriver.gecko.driver=<PATH_TO_GECKODRIVER_BINARY>
This time, Firefox should load up correctly, run your tests without any error, and finally give you a pass.
We now have a very basic project set up to run a couple of very basic tests using Maven. Right now, this will run very quickly, but as you start adding more and more tests to your project, things are going to start to slow down. To try and mitigate this problem, we are going to utilize the full power of your machine by running your tests in parallel.


