


Follow these steps to install a Mosquitto server on Windows. Take into account that you will require Windows Vista or higher (Windows 7, 8, 8.1, 10, or greater). The instructions also work on Windows Server 2008, 2012, 2016, or greater:
- Download the executable file listed under Binary Installation and Windows that provides the native build on the Mosquitto downloads web page: http://mosquitto.org/download. For Mosquitto 1.4.15, the filename is mosquitto-1.4.15-install-win32.exe. You must click or tap on the filename and you will be redirected to the Eclipse repository with many mirror options, including a default recommendation, from which you can download the executable file.
- Run the previously downloaded executable file and the mosquitto Setup Wizard will display its welcome dialog box. Click Next > to continue. The setup wizard will display the dependencies that you must install: OpenSSL and pthreads. The dialog box will display the links that you can use to download and run installers for these two requirements, as shown in the following screenshot:
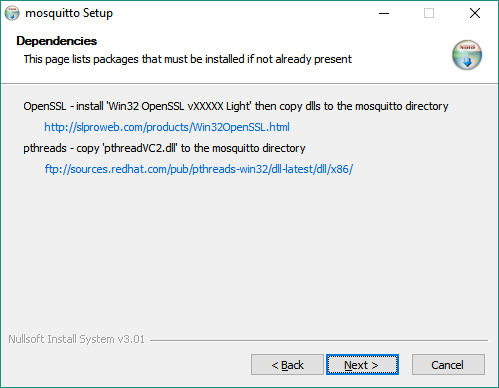
- If you don't have Win32 OpenSSL v1.0.2j Light installed on Windows, go to the Win32 OpenSSL web page, http://slproweb.com/products/Win32OpenSSL.html, and download the Win32 OpenSSL v1.1.0g Light file listed in a table under Download Win32 OpenSSL. Do not download the Win64 version, because you will need the Win32 version to make it possible for Mosquitto to have its dependencies. If you already have Win32 OpenSSL v1.1.0g Light installed, advance to step 7. For Win32 OpenSSL v1.1.0g Light, the filename is Win32OpenSSL_Light-1_1_0g.exe. Run the downloaded executable file and OpenSSL Light (32-bit) will display its welcome dialog box. Click Next > to continue.
- The setup wizard will display the License Agreement. Read it, select I Accept the agreement, and click Next >. Select the folder in which you want to install OpenSSL Light (32-bit) if you don't want to use the default folder. Remember the folder you specify, because you will need to copy a few DLL files from this folder later. The default folder is C:\OpenSSL-Win32.
- Click Next > to continue, specify a different Start Menu folder if necessary, and click Next >. Select The OpenSSL binaries (/bin) directory as the desired option for Copy OpenSSL DLLs to. This way, the installation will copy the DLLs to a bin subfolder within the previously specified folder, by default C:\OpenSSL-Win32\bin.
- Click Next > to continue. Review the selected installation options and click Install to complete the installation for OpenSSL Light (32-bit). Finally, consider a donation to the Win32 OpenSSL project and click Finish to exit setup.
- Go to the following address in your web browser: ftp://sources.redhat.com/pub/pthreads-win32/dll-latest/dll/x86. The browser will display many files for this FTP directory. Right-click on pthreadVC2.dll and save the file in your Downloads folder. You will have to copy this DLL to the Mosquitto installation folder later.
- Now, go back to the mosquitto Setup window and click Next > to continue. By default, Mosquitto will install the files and the Mosquitto Service. Leave the default components to install those selected and click Next > to continue.
- Select the folder in which you want to install Mosquitto if you don't want to use the default folder. Remember the folder you specify, because you will need to copy a few DLL files to this folder later. The default folder is C:\Program Files (x86)\mosquitto. Click Install to complete the installation. Notice that the mosquitto Setup Wizard might display errors related to missing DLLs. We will fix this issue in the next steps. Once the installation has completed, click Finish to close the mosquitto Setup Wizard.
- Open a File Explorer window and go to the bin subfolder within the folder in which you installed OpenSSL Light (32-bit), by default C:\OpenSSL-Win32\bin.
- Copy the following four DLLs: libcrypto-1_1.dll, libeay32.dll, ssleay32.dll, and libssl-1_1.dll. Now, go to the folder in which you installed Mosquitto and paste these four DLLs. By default, the Mosquitto installation folder is C:\Program Files (x86)\mosquitto. You will need to provide administrator permission to paste the DLLs in the default folder.
- Open a File Explorer window and go to your Downloads folder. Copy the pthreads DLL you downloaded in one of the previous steps, pthreadVC2.dll. Now, go to the folder in which you installed Mosquitto and paste this DLL. You will need to provide administrator permission to paste the DLL into the default Mosquitto installation folder.
- Now that all the dependencies are included in the Mosquitto installation folder, it is necessary to run the installation again to make the Mosquitto setup configure the Windows service. Run the previously downloaded Mosquitto installation executable again. For Mosquitto 1.4.15, the filename is mosquito-1.4.15-install-win32.exe. Make sure you specify the same installation folder as the folder in which you copied the DLLs and that the Service component is activated. Click Next > many times and click Install to complete the configuration for the Windows service. Once the installation has completed, click Finish to close the mosquitto Setup Wizard.
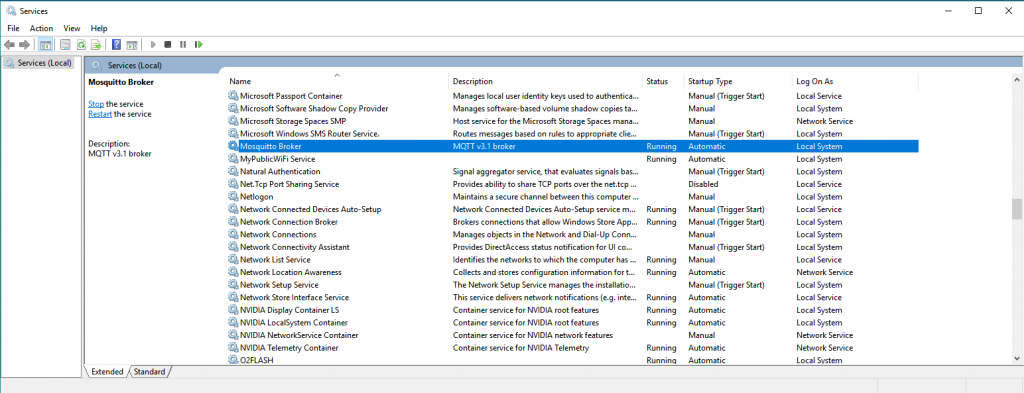
- Open the Services application in Windows and search for the service whose name is Mosquitto Broker. Right-click on the service name and select Start. The Status will change to Running. By default, the service is configured to have its Startup Type set to Automatic. If you don't want to automatically start the Mosquitto Broker service, change the Startup Type to Manual. You will have to repeat the step you just did to manually start the service before working with Mosquitto on a Windows computer. Notice that the description for the service is MQTT v3.1 broker, as shown in the following screenshot. The description is outdated because the service provides an MQTT 3.1.1 server that is also compatible with MQTT 3.1:
Open a Windows PowerShell or a Command Prompt window and run the following command to check whether the Mosquitto MQTT server is listening at the default TCP port, 1883:
netstat -an | findstr 1883
The following lines show the results of the previous command that indicate the Mosquitto MQTT server has opened an IPv4 and an IPv6 listen socket on port 1883:
    TCP 0.0.0.0:1883 0.0.0.0:0 LISTENING
    TCP [::]:1883 [::]:0 LISTENING


