
Introducing the book’s sample application
For this book, we will use the world of Formula 1 motor car racing as the basis for a packaged application that we will build together. Formula 1 is, for me, the motorsport that is equivalent to enterprise application software, due to its scale and complexity. It is also a sport that I follow. My knowledge of both of these fields helped me when building the examples that we will use.
We will refer to our application as FormulaForce throughout this book, though please keep in mind Salesforce’s branding policies when naming your own application, as they prevent the use of the word “Force” in company or product titles.
This application will focus on the data collection aspects of races, drivers, and their many statistics, utilizing platform features to structure, visualize, and process this data in both historic and current contexts.
Consult the Salesforce CLI documentation if you have not authorized a connection to your Dev Hub org, then run the following commands to create a Salesforce DX project for your application and create a special org known as a scratch org for you to perform your development work in. This org is given the alias dev and set as the project default.
These orgs only last 7 days (by default, the maximum is 30 days) so be sure to synchronize regularly, as described later in this chapter:
sf generate project --name formulaforce
cd formulaforce
sfdx force:org:create
 --definitionfile config/project-scratch-def.json
  --setalias dev
  --setdefaultusername
code .
The preceding code command is used as a convenience to quickly open VSCode in the current directory. From here, you can open the integrated terminal and continue to execute Salesforce DX CLI commands from within the IDE. Additionally, at the time of writing, the new sf env create scratch command was in beta so was not used above, but is an example of Salesforce’s strategy to better arrange and unify its commands.
The .forceIgnore file allows you to control which aspects of the scratch org and your local files are synchronized. Later in this book, in Chapter 2, Leveraging Platform Features, we will cover permission sets as a means to configure security rather than using the less flexible profiles feature. In preparation for this, enter the following into the .forceIgnore file and save it. This stops any unwanted profile changes that you might directly or indirectly make from being synchronized with your project:
# Profiles
 *.profile-meta.xml
The project directory layout created by the sf generate project command automatically includes a /force-app folder. As a convention in this book, we will be using a different directory layout for source code that allows us to contain all the source files for the application experiences and open-source libraries used throughout this book.
To modify the project directory to support this convention, first create a new source folder in the root of the project, then rename the force-app folder to formulaforce before then moving this folder as a sub-folder into the new source folder. Note that the formulaforce folder will contain a default folder with empty directories, and my preference is to delete these and allow them to be created organically as the application development progresses. Finally, update your sfdx-project.json as shown below to let the sfdx CLI know where the source folder has moved to:
{
  "packageDirectories": [
    {
      "path": "source/formulaforce",
      "default": true
    }
  ],
  "namespace": "",
  "sfdcLoginUrl": "https://login.salesforce.com",
  "sourceApiVersion": "56.0"
}
We will revisit the source directory layout of the project later in this chapter. For now, we will create some initial Custom Objects and Fields, as detailed in the following table. Do not worry about creating any custom tabs just yet. You can use your preferred approach for creating these initial objects. Also make sure to select the Allow Search checkbox on the initial screen when creating the following objects. Ensure that you have opened your project’s current scratch org by running the following command:
sfdx force:org:open
From within Visual Studio Code and with your project open, you can use the shortcut key combination Cmd + Shift + P on a Mac or Ctrl + Shift + P on Windows to open the Command Palette. Start typing SFDX Open and you will see the SFDX: Open Default Org command to quickly open your scratch org without typing the preceding command. You can also run other Salesforce DX commands this way, such as creating scratch orgs.
Here is a list of objects along with their field names and types:
|
Object |
Field name and type |
|
|
|
|
|
|
|
|
|
|
|
|
Table 1.3: Custom Objects created in this chapter
The following screenshot shows the preceding objects within the Schema Builder tool, available under the Setup menu:
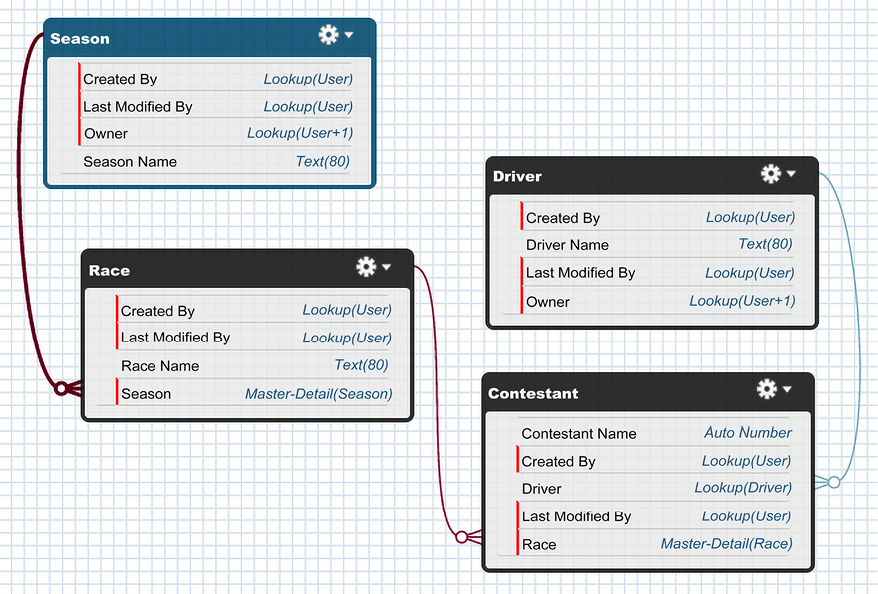
Figure 1.2: Custom Objects shown in the Schema Builder
Once you have completed creating the preceding objects, you should synchronize them with your project:
sfdx force:source:pull
This is an important command when using Salesforce DX to ensure you always have the latest changes as a permanent record in file form. Once this command completes the Salesforce CLI will place files representing the objects and corresponding UI layout information within new subdirectories within the /source/formulaforce/main/default folder. This is because the CLI is not sure of the desired final location of such files. You can now move the two new /objects and /layouts sub-folders directly under /source/formulaforce/main folder to confirm their final location. You only need to do this once for new files, once they are moved Salesforce CLI will update them automatically in their new location.
The entire project and the files representing your application can then be stored in source control from this point onward if desired. We will review these files further later.