
In tkinter, a typical one-line textbox widget is called Entry. In this recipe, we will add such an Entry widget to our GUI. We will make our label more useful by describing what the Entry widget is doing for the user.
Creating textbox widgets
Getting ready
This recipe builds upon the Creating buttons and changing their text attributes recipe, so download it from the repository and start working on it.
How to do it...
Follow these steps to create textbox widgets:
- Start with the GUI_create_button_change_property.py module and save it as GUI_textbox_widget.py.
- Use the tk alias of tkinter to create a StringVar variable:
name = tk.StringVar()
- Create a ttk.Entry widget and assign it to another variable:
name_entered = ttk.Entry(win, width=12, textvariable=name)
- Use this variable to position the Entry widget:
name_entered.grid(column=0, row=1)
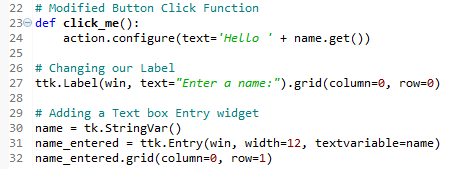
The preceding instructions produce the following code (GUI_textbox_widget.py):
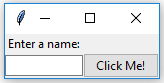
- Run the code and observe the output; our GUI looks like this:
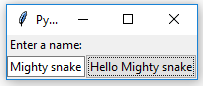
- Enter some text and click the button; we will see that there is a change in the GUI, which is as follows:
Let's go behind the scenes to understand the code better.
How it works...
In step 1 we are creating a new Python module, and in step 2 we are adding a StringVar type of tkinter and saving it in the name variable. We use this variable when we are creating an Entry widget and assigning it to the textvariable attribute of the Entry widget. Whenever we type some text into the Entry widget, this text will be saved in the name variable.
In step 4, we position the Entry widget and the preceding screenshot shows the entire code.
In line 24, as shown in the screenshot, we get the value of the Entry widget using name.get().
When we created our button, we saved a reference to it in the action variable. We use the action variable to call the configure method of the button, which then updates the text of our button.
We have not used OOP yet, so how come we can access the value of a variable that was not even declared yet? Without using OOP classes, in Python procedural coding, we have to physically place a name above a statement that tries to use that name. So, how does this work (it does)? The answer to this is that the button click event is a callback function, and by the time the button is clicked by a user, the variables referenced in this function are known and do exist.
Line 27 gives our label a more meaningful name; for now, it describes the textbox below it. We moved the button down next to the label to visually associate the two. We are still using the grid layout manager, which will be explained in more detail in Chapter 2, Layout Management.
Line 30 creates a variable, name. This variable is bound to the Entry widget and, in our click_me() function, we are able to retrieve the value of the Entry widget by calling get() on this variable. This works like a charm.
Now we observe that while the button displays the entire text we entered (and more), the textbox Entry widget did not expand. The reason for this is that we hardcoded it to a width of 12 in line 31.
Python is a dynamically typed language and infers the type from the assignment. What this means is that if we assign a string to the name variable, it will be of the string type, and if we assign an integer to name, its type will be an integer.
Using tkinter, we have to declare the name variable as the tk.StringVar() type before we can use it successfully. The reason is that tkinter is not Python. We can use it with Python, but it is not the same language. See https://wiki.python.org/moin/TkInter for more information.
We've successfully learned how to create textbox widgets. Now, let's move on to the next recipe.