Book Image

Python GUI Programming Cookbook - Third Edition

By : Burkhard Meier
Book Image

Python GUI Programming Cookbook - Third Edition

By: Burkhard Meier

Overview of this book

Python is a multi-domain, interpreted programming language that is easy to learn and implement. With its wide support for frameworks to develop GUIs, you can build interactive and beautiful GUI-based applications easily using Python. This third edition of Python GUI Programming Cookbook follows a task-based approach to help you create effective GUIs with the smallest amount of code. Every recipe in this book builds upon the last to create an entire, real-life GUI application. These recipes also help you solve problems that you might encounter while developing GUIs. This book mainly focuses on using Python’s built-in tkinter GUI framework. You'll learn how to create GUIs in Python using simple programming styles and object-oriented programming (OOP). As you add more widgets and expand your GUI, you will learn how to connect to networks, databases, and graphical libraries that greatly enhance the functionality of your GUI. You’ll also learn how to use threading to ensure that your GUI doesn't become unresponsive. Toward the end, you’ll learn about the versatile PyQt GUI framework, which comes along with its own visual editor that allows you to design GUIs using drag and drop features. By the end of the book, you’ll be an expert in designing Python GUIs and be able to develop a variety of GUI applications with ease.
Table of Contents (13 chapters)

Adding several widgets in a loop

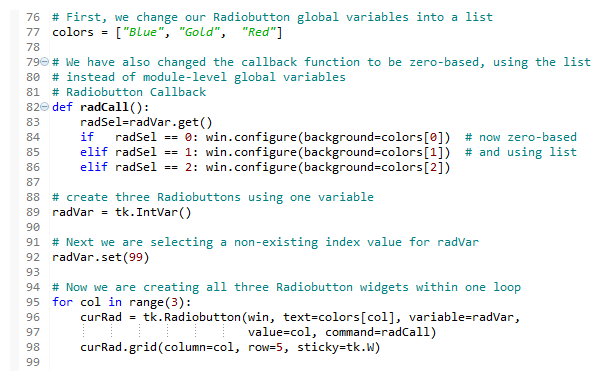
So far, we have created several widgets of the same type (for example, a radio button) by basically copying and pasting the same code and then modifying the variations (for example, the column number). In this recipe, we start refactoring our code to make it less redundant.

Getting ready

We are refactoring some parts of the previous recipe's code, Using scrolled text widgets, so you need that code for this recipe.

How to do it...

Here's how we refactor our code:

  1. Start with the GUI_scrolledtext_widget.py module and save it as GUI_adding_widgets_in_loop.py.
  2. Delete the global name variables and create a Python list instead:
colors = ["Blue", "Gold", "Red"]

  1. Use the get() function on the radio button variable:
radSel=radVar.get()
  1. Create logic with an if ... elif structure:
if radSel == 0: win.configure(background=colors[0])
elif radSel == 1: win.configure(background=color[1])
elif radSel == 2: win.configure(background=color[2])
  1. Use a loop to create and position the radio buttons:
for col in range(3):
curRad = tk.Radiobutton(win, text=colors[col], cariable=radVar,
value, command=radCall)
curRad.brid(column=col, row=5, sticky=tk.W)
  1. Run the code (GUI_adding_widgets_in_loop.py):

Running this code will create the same window as before, but our code is much cleaner and easier to maintain. This will help us when we expand our GUI in the coming recipes.

How it works...

In line 77, we have turned our global variables into a list. In line 89, we set a default value to the tk.IntVar variable that we named radVar. This is important because, while in the previous recipe we had set the value for radio button widgets to start at 1, in our new loop it is much more convenient to use Python's zero-based indexing. If we did not set the default value to a value outside the range of our radio button widgets, one of the radio buttons would be selected when the GUI appears. While this in itself might not be so bad, it would not trigger the callback and we would end up with a radio button selected that does not do its job (that is, change the color of the main win form).

In line 95, we replace the three previously hardcoded creations of the radio button widgets with a loop that does the same. It is just more concise (fewer lines of code) and much more maintainable. For example, if we want to create 100 instead of just 3 radio button widgets, all we have to change is the number inside Python's range operator. We would not have to type or copy and paste 97 sections of duplicate code, just 1 number.

Line 82 shows the modified callback function.

This recipe concludes the first chapter of this book. All the following recipes in all of the next chapters will build upon the GUIs we have constructed so far, greatly enhancing it.