In the fast-paced world of web development, React is a widely used library for building applications, while Node.js and Express support scalable server-side solutions and web services. TypeScript enhances JavaScript projects with robustness and maintainability, making it an essential tool for large-scale applications.
This edition provides a hands-on guide to mastering these technologies, with new chapters and updated content that reflects current industry practices. Begin with a solid foundation in TypeScript to build high-quality web applications. Explore React 19, leveraging the Hooks API and Redux Toolkit for state management. Then transition to server-side development with Express, incorporating modern practices like JWT-based authentication and Prisma ORM for database management. A major focus of this edition is production readiness. Learn how to containerize your application with Docker and Podman, automate builds and tests with GitHub Actions, and deploy to the cloud.
New chapters add monitoring and observability with OpenTelemetry and Grafana plus a hands-on guide to AI-assisted development with LLM coding agents. Other updates include Vitest for testing and expanded content on Postgres and Prisma ORM.
By the end of this book, you will have built and deployed a comprehensive full-stack application, ready for production.
We've already briefly looked at classes and interfaces in previous sections. Let's take a deeper look and see why these types can help us write better code. Once we complete this section, we will be better prepared to write more readable, reusable code with fewer bugs.
Classes
At a high level, classes in TypeScript look like classes in JavaScript. They are a container for a related set of fields and methods that can be instantiated and reused. Modern JavaScript also supports classes with features like private fields, but TypeScript adds extra compile-time features for encapsulation, such as public, private, protected, and readonly modifiers, which we'll see shortly. Let's take a look at a new example.
We will be creating many files in this project, and some of them will use the same name for some types. If you get errors about "duplicate identifiers," just go to the other file and comment out that code.
Create a new file called classes.ts and enter the following code:
This example has a simple class called Person that is very similar to something you would see in JavaScript. Let's explain this code in bullet form to make it easier to follow:
Person: Firstly, we have a name for the class so that it can be easily reused.
constructor: Next, we have a method called constructor that can help build an instance of the class. Constructors are used to initialize any fields that the class might have and to do any other setup for the class instance, such as running functions (in this case, it does nothing).
msg: Then, we have a single field called msg, which is called using the this keyword.
this: Inside a class method, the this keyword represents the running instance of the class, in other words, an actual object instance of the Person class. This is a JavaScript feature and indicates that the field or method being referenced belongs to that object and that object alone. Note that the value of this in JavaScript depends on how a function is called, not where it is defined, so passing a method around as a standalone function can change what this refers to; for now, we'll just use it inside class methods where it behaves as described.
speak: Next, there is a method called speak that writes the msg value to the console. We then create an instance of our class. Finally, we set the msg field to a value of hello and call the speak method.
Now, let's look at how classes differ between TypeScript and JavaScript.
Access modifiers
We stated previously that one of the main principles of object-oriented development is encapsulation, or information hiding. Well, if we take a look at the code again, clearly, we are not hiding the msg variable as it is exposed and editable outside of the class. This is the default accessibility of all class members in TypeScript. If an explicit accessor is not set, that member is accessible and modifiable outside of the class. If you want this behavior explicitly, you can set the public accessor, but this shouldn't be necessary since again, it is the default.
Let's see what TypeScript allows us to do with accessors. Let's update the code like this:
As you can see, we updated the constructor with a parameter that uses a keyword called private. This syntax is called a parameter property, and it does two things in one line. Firstly, it tells the compiler that the class has a field called msg of the string type that should be private. Secondly, by adding this field to the constructor, we are saying that whenever we call the constructor, e.g., new Person("hello"), we want the msg field to be set to whatever the parameter is set to.
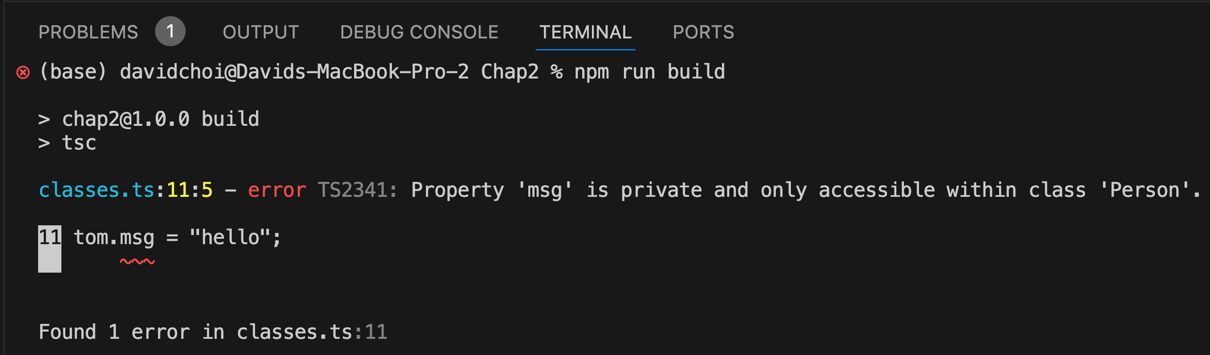
Now, what does setting something to private actually do? By setting the field to private, we make it inaccessible from outside the class. The result of this is that tom.msg = "hello" no longer works and causes an error. Try removing the comments, //, before tom.msg = "hello" and compiling. You should see this message:
Figure 2.9 – Classes error
As you can see, it complains that a private member, msg, cannot be accessed from outside of the class. Also, please note that we only applied our modifier to a field, but access modifiers can be applied to any member field or method.
Let's continue modifying this code. Update the Person type with this code:
As you can see, we've modified how the msg variable is being set and initialized. This code does the same thing as the code we just saw previously. However, it's a more verbose version.
Now, thus far, we've only been using the private accessor. However, keep in mind that as we discussed in Chapter 1, there is the alternative # symbol, which is part of JavaScript, for making members private. An important difference between the two is that TypeScript's private is only enforced at compile time and disappears in the emitted JavaScript, so the field is still reachable at runtime through tricks like bracket access, whereas JavaScript's # private fields are truly private at runtime. Once we begin building our application, I will utilize that symbol most of the time unless there is some particular capability that only the TypeScript-style accessor can provide:
Once you complete this update, VSCode IntelliSense complains because, in the speak function, we are attempting to change the value of msg even though it has already been set once through the constructor, which again is not allowed once you use readonly on a field.
The private and readonly access modifiers are not the only modifiers available in TypeScript. There are several other types of access modifiers. However, they will make more sense if we explain them in the context of inheritance later. Now, as we continue this chapter, we will be introducing more features of newer versions of JavaScript, which forces us to modify the TypeScript compiler configuration. So, let's take a short detour and discuss TypeScript configuration.
TypeScript configuration
TypeScript was first released in late 2012. Since then, multiple versions of ECMAScript, the official JavaScript standard, have been released. Therefore, to allow developers to target their desired JavaScript versions, and also to control various configuration settings around compilation and project setup, tsconfig.json was created. This configuration file is quite extensive and allows you to control many aspects of TypeScript configuration and transpilation, but for our purposes, we'll focus on a few of the most often-used settings. Note that starting with TypeScript 6.0 (released in March 2026), several of these defaults changed significantly, so the sections below reflect the modern defaults.
Let's learn about TypeScript configuration by adding a tsconfig.json file to the root of our Chap2 project:
As you'll recall from the beginning of this chapter, we copied over an existing tsconfig.json file. The settings we are about to create will be the same as that file, and so if you like, you can just follow along without having to recreate that file.
First, open your terminal and enter this command:
npx tsc --init
(Make sure you use two dashes before init.) This code triggers the TypeScript compiler, tsc, and causes it to create a file called tsconfig.json in the root of our Chap2 folder. You'll also notice that, unlike our installation of TypeScript, we are not using npm. Although both command-line tools are related, npm is intended for installing dependencies, and npx is for executing them. In addition, npx allows the execution of some commands without first having to install them globally. Let's continue.
Now that we've created our tsconfig.json file, let's take a look at some of the settings. Starting at the top, we can see a field called compilerOptions, and this is exactly what it seems. This section has various flags for setting compilation/transpilation and development-time IntelliSense. Here's a list of some of the more commonly used flags:
target: This flag is used to control which version of ECMAScript our code will be transpiled into. Remember, TypeScript is a development-time technology, and therefore, we need to select the desired version of ECMAScript that will actually run. Starting with TypeScript 6.0, the default value is ES2025; in TypeScript 5.x it was ES2016, and in earlier versions it was ES3. Note that ES5 and below are now deprecated targets, so the lowest supported target is ES2015. For our purposes, we want the absolute latest version, so write ESNext in your file, like this:
"target": "ESNext",
lib: This setting will configure the ECMAScript version and the various APIs that are available during development. In other words, it will provide IntelliSense, which makes available ECMAScript capabilities and methods that are only found in those versions of ECMAScript and API that we select. As you can see, it is an array and can take multiple values. For our development, we will use the following:
"lib": [
  "ESNext",
  "DOM",
  "DOM.Iterable"
]
You already know what ESNext is. DOM means the API that allows us to interact with DOM nodes. Another way of saying DOM nodes is HTML elements.DOM.Iterable allows us to work with collections of DOM nodes, such as NodeList.
module: This flag allows us to control what type of module format we will use. A module is simply an encapsulated set of code, sort of like a class, where we can be selective about what to expose to the outside world. A module is always a single JavaScript or TypeScript file.
The modern form of creating modules uses ES6 syntax, which we will learn about soon. But there is an older form, called CommonJS, which is still heavily used in the Node.js ecosystem. TypeScript 6.0 changed the default for this flag from commonjs to esnext, reflecting the shift toward ESM across the ecosystem. Keep in mind that if you are targeting Node.js, using ESNext modules usually requires setting "type": "module" in your package.json. We will again use the latest format based on ESNext. Update the module flag like this:
"module": "ESNext"
strict: This flag forces more type checks and stricter type rules enforcement. It is actually a flag that represents multiple related flags but exists as a single convenience flag, since many devs want the complete set of strictness rules. The sub-flags it turns on include noImplicitAny (which we mentioned earlier in the any section), strictNullChecks, strictFunctionTypes, strictBindCallApply, strictPropertyInitialization, noImplicitThis, alwaysStrict, and useUnknownInCatchVariables. For example, the strictNullChecks sub-flag forces any variables that may get a value of null or undefined to be explicitly set to those types in their variable declaration. This is a pretty important flag since it prevents variables from unintentionally getting set as undefined and potentially causing exceptions at runtime. Another important sub-flag for OOP purposes is strictPropertyInitialization. This flag forces fields created within classes to be initialized either at declaration or in the constructor. Starting with TypeScript 6.0, strict defaults to true, whereas in earlier versions it defaulted to false and had to be enabled manually. We will leave the strict flag set to true for our project.
OK, we now have the ability to select our desired ECMAScript and API versions. So, let's continue learning about TypeScript class capabilities.
Getters and setters
Another feature of classes is actually available in both TypeScript and JavaScript: getters and setters:
Getter: A property that allows modification or validation of a related field before returning it
Setter: A property that allows modification or computation of a value before setting it to a related field
These are also known as property accessors. Let's look at an example. Create another file called getSet.ts and add the following code:
Our code is quickly getting more complicated. If you are new to JavaScript entirely, I provide a JavaScript refresher in Chapter 3, Building Better Apps with ES6+ Features. In this chapter, I will focus on TypeScript.
The code is short, but there's a fair amount happening here, so let's go over it. First, near the very top, just after the class Speaker declaration starts, you can see that our message field is not set in the constructor but is set up as a private field, using the # symbol, and therefore it is not accessible directly from outside our class. In addition, that field is set immediately on declaration, because in TypeScript, with strict mode on, a field must have a value either on declaration or set in the constructor. The only initializer the constructor takes as a parameter is our name field.
Now, let's add our actual getter and setter and overwrite the // getter setter comment with this:
getMessage() {
if (!this.#message.includes(this.name)) {
throwError("message is missing speaker's name");
}
returnthis.#message;
}
setMessage(val: string) {
let tmpMessage = val;
if (!val.includes(this.name)) {
tmpMessage = this.name + " " + val;
}
this.#message = tmpMessage;
}
You can see that we start by declaring the get Message() property accessor. This is our getter. In the getter, we test to see whether our message field value has the speaker's name in it by using the JavaScript includes function. This function is like contains in other languages, and it searches for the given parameter as a substring of the original string. Now, if our if statement does not find the speaker's name (the ! symbol is a negation symbol), we throw an exception to indicate an unwanted situation. Notice also that our message field is called this.#message. This is because when we use the # symbol when declaring a field, we must always use it subsequently when calling the associated field. The setter, also called Message, is indicated by the set keyword, and this property receives a string and adds the speaker's name if needed by checking whether it is missing from the message field.
Note that although both getter and setter look like functions under the hood, syntactically they are accessed like fields, without parentheses. When they are used later in code, you read and assign to them as if they were regular properties.
Now then, after the definition of our Speaker class is finished, we have the actual instantiation and usage of our class, as shown here. Add this code below the setter:
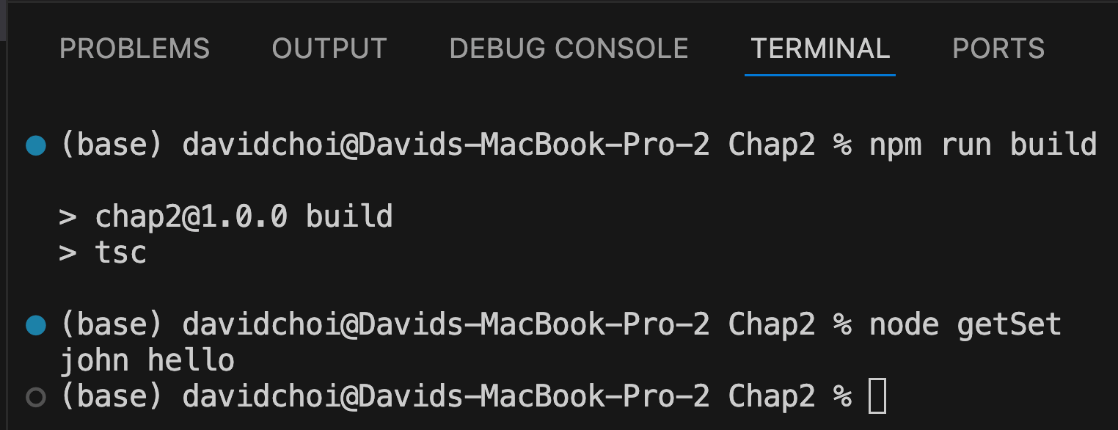
The speaker object is instantiated as a new speaker with the name john and its Message property is set to hello. This mechanism allows us to set the message field without actually exposing it to the outside world. Thereafter, the message is written to the console.
Let's compile and run this code:
Figure 2.10 – getSet output
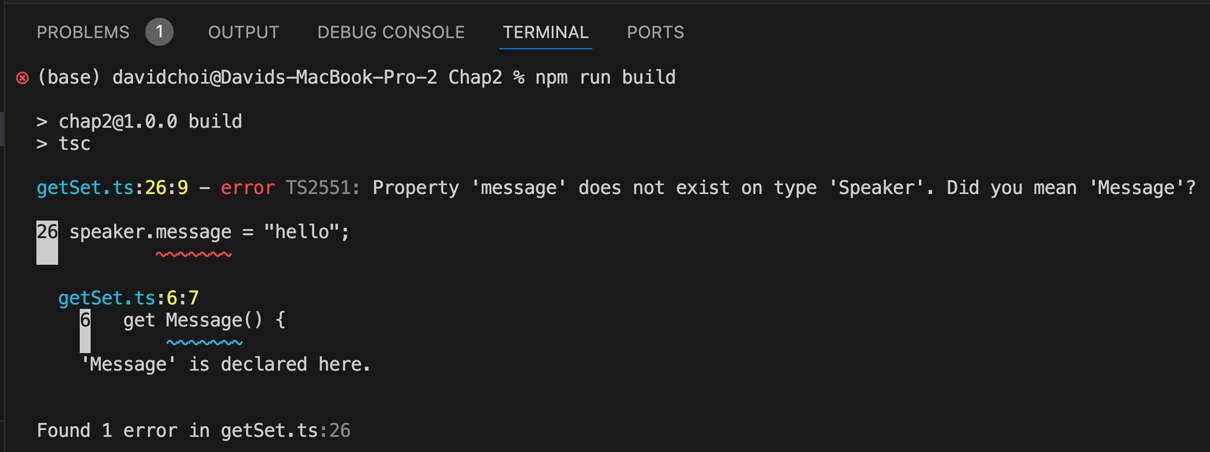
To drive the point home further, let's try switching the speaker.Message = "hello" line to speaker.message = "hello". If you compile, you should see this error:
Figure 2.11 – Message field error
This occurred because message is a private field and cannot be accessed from outside our class directly.
You may be wondering why I mentioned getters and setters here when they are available in regular JavaScript, too. The honest answer is that in this example nothing is strictly TypeScript-only, # private fields and get/set are both standard JavaScript features today, but getters and setters are such a core part of how we do encapsulation in class-based OOP that they belong in any serious discussion of classes. If you look at the example, you can see that the message field is private and the getter and setter properties are public. So, to allow good encapsulation, a common pattern is to hide our field and only expose it when needed via a getter and/or setter or some method that allows modification of the field. Also, remember that when deciding on an access level for your members, you want to start with the most restrictive capabilities first and then become less restrictive as needed.
More concretely, by allowing field access via getters and setters, we can run validation and transformation logic on the way in and on the way out, as we've done in our example where the setter prepends the speaker's name if it is missing and the getter refuses to return a message that doesn't contain it. This gives us much tighter control over what enters and leaves our class than a plain public field ever could.
Static properties and methods
Finally, let's discuss static properties and methods. When you mark something as static inside a class, you are saying that this member is a member of the class type and not of the class instance. In other words, you access it through the class name (e.g., ClassA.typeName) rather than through an instance (a.typeName). Note that, like get/set and # private fields, static is a standard JavaScript feature rather than something TypeScript adds on top.
Let's look at an example. Create a new file called staticMember.ts and add the following code:
If you attempt to compile this code, it will fail with a message along the lines of "Property 'typeName' does not exist on type 'ClassA'. Did you mean to access the static member 'ClassA.typeName' instead?" Again, static members must be accessed using the class name. Here is the fixed version of the code:
As you can see, we reference typeName with the class name.
So then, the question is, why might you want to use a static member instead of an instance member? There are a few common reasons: you might want a utility or helper method that doesn't need any instance state (the getFullName method in the previous example is a simple case of this), you might want to define constants that belong to the class itself, or you might want to share data across class instances. For example, you might want to do something like this:
In the case of this example, I am trying to determine the last class instance that has called the run function at any given time. If you compile and run this code, you will see that the displayed value in the terminal will be a, because a's run method ran last. Note that this "last instance" pattern is fine as an illustration, but in real code it is shared mutable global state and is usually better avoided.
Another point to be aware of is that inside a class, static members can be accessed by both static and instance members. However, static members cannot access instance members, because when a static method runs there is no specific instance for this to refer to.
One last note: if you are using strict mode (which is the default from TypeScript 6.0 onward), you may notice that declaring static typeName: string; without an initializer works here even though strictPropertyInitialization normally requires fields to be initialized. That check applies to instance fields, not to static ones, so a static field can stay uninitialized until it is first assigned.
Now, we have learned about classes and their features in this section. This will help us design our code for encapsulation, which will enhance its quality. Next, we will learn about interfaces and contract-based coding.
Interfaces
In OOP design, another important principle is abstraction. The goal of abstraction is to reduce complexity and the tight coupling of code by not exposing the internal implementation (we already covered abstraction in Chapter 1, Understanding TypeScript). One way of doing this is to use interfaces to show only the signature of a type, as opposed to its internal workings. An interface is also sometimes called a contract, since having specific types for parameters and return types enforces certain expectations between both the user and the creator of the interface. So, another way of thinking about interfaces is as strict rules about what can come out of and go into values of that type. Note that, as we hinted earlier in the type aliases section, a type alias describing an object shape can do much of the same job as an interface; the main practical differences are that interface declarations with the same name automatically merge, interfaces are conventionally used to describe the shape a class must implement, and interfaces cannot describe unions or other non-object types, whereas type aliases can.
Now, interfaces are just a set of rules. In order to have working code, we need an implementation of those rules to get anything done. So, let's show an example of an interface with implementation to get started. Create a new file called interfaces.ts and add the following interface definition:
This interface defines an Employee type that we will later use as the shape for concrete objects. As you can see, there is no implementation of the getUniqueId function, just its signature. The implementation comes later when we define it. Remember that an interface exists only at compile time; it does not emit any JavaScript, so you never new an interface the way you new a class.
Now, add the implementation to the interfaces.ts file. Insert the following code, which creates two instances of the Employee interface:
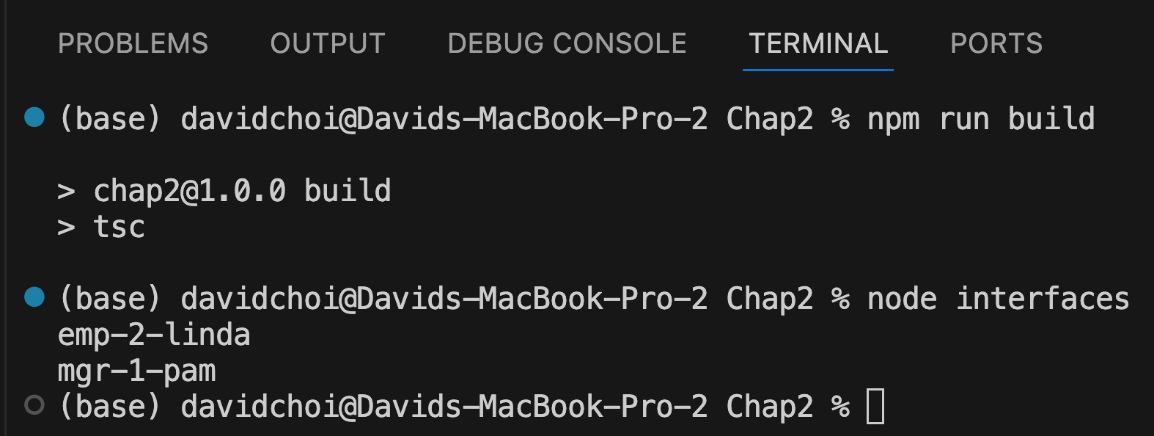
So, we create an object literal called linda that conforms to the Employee interface, setting the two field names, name and id, and then implementing the getUniqueId function. Later, we console log linda.getUniqueId call. After that, we create another object, called pam, that also conforms to the same interface. However, not only does it have different field values, but its implementation of getUniqueId is also different from the linda object. This is one of the main uses of interfaces: to allow for a single structure across objects but to enable different implementations. In practice, the more common way to provide that implementation is to have a class declare implementsEmployee and fill in the members there; the object literal form we are using here is just the simplest way to demonstrate the idea. In this way, we provide strict rules for the type structure, but also allow some flexibility in terms of how functions go about doing their work. Here's the output of our code:
Figure 2.12 – Employee interface results
Another possible use of interfaces is when using third-party APIs. Sometimes, the type information is not well documented, and all you're getting back is untyped JSON or the object type is extremely large and has many fields you will never use. It is quite tempting, under these circumstances, to just use any as the type and be done with it, but as we saw in the any section, that effectively disables type checking for those values. However, you should prefer providing a type declaration if at all possible.
What you can do under these circumstances is to create an interface that has only the fields that you know and care about. Then, you can declare your data type to be of this type. At development time, TypeScript will not be able to check the type since for API network calls, data will be coming in at runtime. Regardless, since TypeScript only cares about the shape of any given type, it will ignore the fields not mentioned in your type declaration, and as long as the data comes in with the fields you defined in your interface, the runtime will not complain and you will maintain development-time type safety. However, please do ensure you handle null and undefined fields appropriately, as they can cause exceptions during runtime.
In this section, we learned about interfaces, how they act as contracts for the shape of a value, and how they relate to type aliases and classes. We will be able to use interfaces to abstract away the implementation details of a class and, therefore, produce loose coupling between our code and, thus, better code quality. In the next section, we will learn about how classes and interfaces allow us to perform inheritance and, therefore, code reuse.
Read this chapter and the full book FREE of cost - No Credit card required!
Plus access over 8,000 other expert tech books and videos just by signing up - No commitment!
CONTINUE READING
83
Tech Concepts
36
Programming languages
73
Tech Tools
Unlimited access to the largest independent learning library in tech of over 8,000 expert-authored tech books and videos.
Innovative learning tools, including AI book assistants, code context explainers, and text-to-speech.
50+ new titles added per month and exclusive early access to books as they are being written.






 Free Chapter