Styling is extremely important in any application we build, especially since it is the first aspect of any application the user experiences. In this section, we'll start structuring our styles appropriately.
First, let's open our main.css file, located in the CSS directory. When you open this file, you'll see default boilerplate styles. At this point, let's skip through these to create our own styles. We'll review those styles as we continue to develop our applications.
Find the following line in main.css:
/* ==========================================================================
   Author's custom styles
========================================================================== */
It's after this comment that we want to include the global styles for the semantic code we wrote previously.
Start by defining the global site styling such as the background color:
html{
    background: #231F20;
    border-top: 10px solid #FDFF3A;
    border-bottom: 5px solid #FDFF3A;
    width: 100%;
}
In the previous styling, we are making some stylistic choices like setting our background color and some borders. The important part here is that the width is defined at 100 percent for the HTML element. This will basically allow us to extend to 100 percent of the width of the phone for all our content.
We then have to define overall fonts on the page. This will be basic for now and can continue to extend as design as per our application, but for now take a look at the following styles:
h1, h2, p, a {
    font-family: Arial, Helvetica, sans-serif;
    text-decoration: none;
}

h1, h2 {
    color: #A12E33;
    font-weight: bold;
    margin: 0;
    padding: 0;
}

h1 {
    font-size: 18px;
}

h2 {
    font-size: 14px;
    font-weight: normal;
}

p {
    color: #F15E00;
    font-size: 12px;
}

a,
a:visited {
    color: #F19C28;
}
In the previous code, you can see that we are working from a higher level down, the essential understanding of Cascading Style Sheets. We first define our headers, anchors, and paragraphs by using a specific font family and having no decoration.
As we work down the previous styles, we start to define each one more specifically, with headers having no padding or margins and a specific color. Then, when we go down further, we can see that each type of header has a specific font size and we do the same for paragraphs and anchors.
Once we've defined some of our fonts and site styling, we include some basic layout information for the <div> element containing our content:
.site-wrapper {
    padding: 5px 10px 10px;
}
Since our element automatically scales to 100 percent of the width of the screen, we tell the content to have a padding of 5px at the top, 10px at the left and right, and 10px on the bottom. Alternatively, we could have written the following styles:
    padding-top: 5px;
    padding-left: 10px;
    padding-right: 10px;
    padding-bottom: 10px;
The former is known as a shorthand property setting and is considered best practice.
Since we also want to make sure our second header is differentiated in some form, we can use a CSS3 pseudo class selector and property to define the before and after content, as following:
hgroup h2:before,
hgroup h2:after {
    content: " :: ";
}
Note
Keep in mind that the
:before
and :after
pseudo selectors are supported in Safari 3.2 and above.
The previous selector targets the <h2> elements within the <hgroup> element and appends the content we have defined in the property before and after it, as per the :before and :after pseudo class selector.
Next, let's style our navigation to look and feel a bit more useable.
nav ul {
    padding: 0;
}

nav li {
    list-style: none;
}

nav a {
    display: block;
    font-size: 12px;
    padding: 5px 0;
}
Here we remove the padding off the <ul> element and then remove the default styling option from each list element. Finally, we make sure each anchor is displayed correctly by setting the font size to 12px and add padding to the top and bottom of each anchor to allow for easy selection on the iPhone.
Finally, we'll add some styling to our footer.
footer p {
    text-align: center;
}
Very simply, we're aligning the paragraph within the footer to center. Since we've defined the default styles for our paragraph in our fonts section, the styling gets picked.
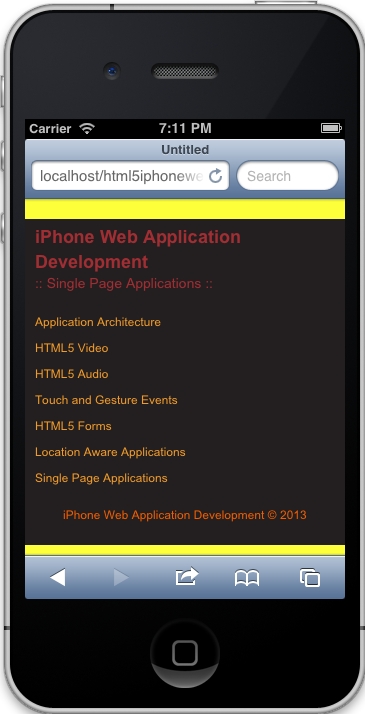
When the previous styles are applied properly, your result should be similar to the following display: