Book Image

Google App Inventor

By : Ralph Roberts
Book Image

Google App Inventor

By: Ralph Roberts

Overview of this book

<center><iframe src="http://www.youtube.com/embed/UgRhYG_bvW8" width="500" height="315" frameborder="0"></iframe></center> <p>The number of mobile apps has grown exponentially in the last two years. If you want to join the crowd, Google’s App Inventor is the easiest and best tool for you to get started with. It is a tool to create Android phone apps and uses a graphical user interface, and drag and drop methods to create apps. It’s so simple that anyone can build an app.<br /><br />Learn how Google App Inventor eliminates the mystery around programming. It is a visual language, where we simply drag and drop blocks (graphic elements representing blocks of code) in various combinations to give us applications that run on our phones or other Android-based devices. No programming background is required. Playing with blocks has never been more fun!<br /><br />The emphasis is on creating apps that work and that you understand fully. The first part of the book gives you a sound foundation in the basics, and lots of tips on how to use App Inventor. The second part is all about creating complete apps ready for real world use. The book includes apps that communicate, use databases to remember, surf the Web and other networks, use GPS and various sensors on your phone, and let you write or play games.</p>
Table of Contents (19 chapters)
Google App Inventor
Credits
About the Author
About the Reviewers
www.PacktPub.com
Preface

Time for action adding an error trap


We can add an error trap against letters in the radius textbox crashing the app by a slight addition to the Calculate button.

  1. 1. From Built-In/Control, latch onto an ifelse framework and pull it out.

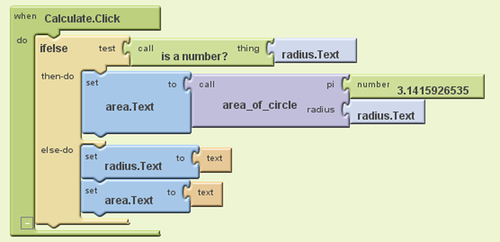
  2. 2. Detach area.Text from the click button frame (the blocks plugged into it will follow along), and click this assembly into the then-do socket of the ifelse framework.

  3. 3. Click the ifelse (and all its attached blocks) into the Calculate.Click button frame.

  4. 4. The ifelse needs a test so it knows what to do or not do. Easy to set up. In Built-In/Math, grab (is a number?) and click it into the test socket.

  5. 5. Click radius.Text into the is a number? socket.

  6. 6. Finally, we give this something else to do by copying the two clear operations from the Clear button click frame, and we are done (see below for how it looks). Our test is now complete.

    Note

    An alternative is to select area component and set NumbersOnly checkbox to checked.

What just happened?

Okay, pretty cool...