
Lighting is a fundamental part of most 3D video games. 2D games do not naturally lend themselves to lighting effects, but with the right technique we can create a 2D experience where lighting plays a vital role. This adds suspense to our 2D scene.
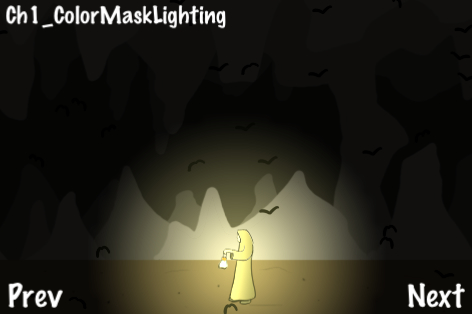
In this recipe we see a monk walking through a dark cave carrying a lantern. The monk's lantern gives off light in a circular shape that illuminates dark parts of the scene. As the monk moves through the cave a colony of bats becomes visible.
Please refer to the project RecipeCollection01 for full working code of this recipe. Also
note that code used to create the 'flying bats' effect has been omitted as that was covered in a previous recipe.
Execute the following code:
@interface Ch1_ColorMaskLighting : Recipe
{
  SimpleAnimObject *burnSprite;
  SimpleAnimObject *lightSprite;
  SimpleAnimObject *monkSprite;
  CCRenderTexture *darknessLayer;

  NSMutableArray *bats;
  CCAnimation *batFlyUp;
  CCAnimation *batGlideDown;
}

@end

@implementation Ch1_ColorMaskLighting

-(CCLayer*) runRecipe {
  //Add our PLISTs to the SpriteFrameCache singleton
  CCSpriteFrameCache * cache = [CCSpriteFrameCache sharedSpriteFrameCache];
  [cache addSpriteFramesWithFile:@"simple_bat.plist"];
  [cache addSpriteFramesWithFile:@"monk_lantern.plist"];

  //Add cave background
  CCSprite *caveBg = [CCSprite spriteWithFile:@"cave.png"];
  [caveBg setPosition:ccp(240,160)];
  [self addChild: caveBg z:0 tag:TAG_CAVE_BG];

  //Set up the burn sprite that will "knock out" parts of the darkness layer depending on the alpha value of the pixels in the image.
  burnSprite = [SimpleAnimObject spriteWithFile:@"fire.png"];
  burnSprite.position = ccp(50,50);
  burnSprite.scale = 10.0f;
  [burnSprite setBlendFunc: (ccBlendFunc) { GL_ZERO, GL_ONE_MINUS_SRC_ALPHA }];
  [burnSprite retain];
  burnSprite.velocity = ccp(1,0);

  //Add a 'light' sprite which additively blends onto the scene. This represents the cone of light created by the monk's candle.
  lightSprite = [SimpleAnimObject spriteWithFile:@"fire.png"];
  lightSprite.position = ccp(50,50);
  lightSprite.scale = 10.0f;
  [lightSprite setColor:ccc3(100,100,50)];
  [lightSprite setBlendFunc: (ccBlendFunc) { GL_ONE, GL_ONE }];
  lightSprite.velocity = ccp(1,0);
  [self addChild:lightSprite z:4 tag:TAG_LIGHT_SPRITE];

  //Add the monk
  monkSprite = [[SimpleAnimObject alloc] init];
  monkSprite.position = ccp(50,50);
  monkSprite.velocity = ccp(1,0);
  [self addChild:monkSprite z:1 tag:TAG_MONK];

  //Animate the monk to simulate walking.
  CCAnimation *animation = [[CCAnimation alloc] initWithName:@"monk_lantern_walk" delay:0.1f];
  for(int i=1; i<=5; i+=1){
    [animation addFrame:[cache spriteFrameByName:[NSString stringWithFormat:@"monk_lantern_0%i.png",i]]];
  }
  for(int i=4; i>=2; i-=1){
    [animation addFrame:[cache spriteFrameByName:[NSString stringWithFormat:@"monk_lantern_0%i.png",i]]];
  }
  [monkSprite runAction:[CCRepeatForever actionWithAction: [CCAnimate actionWithAnimation:animation]]];

  //Add the 'darkness' layer. This simulates darkness in the cave.
  darknessLayer = [CCRenderTexture renderTextureWithWidth:480 height:320];
  darknessLayer.position =  ccp(240,160);
  [self addChild:darknessLayer z:0 tag:TAG_DARKNESS_LAYER];

  //Schedule physics updates
  [self schedule:@selector(step:)];

  return self;
}

-(void)step:(ccTime)delta {
  CGSize s = [[CCDirector sharedDirector] winSize];

  //Clear the darkness layer for redrawing. Here we clear it to BLACK with 90% opacity.
  [darknessLayer clear:0.0f g:0.0f b:0.0f a:0.9f];

  //Begin the darkness layer drawing routine. This transforms to the proper location, among other things.
  [darknessLayer begin];

  //Limit drawing to the alpha channel.
  glColorMask(0.0f, 0.0f, 0.0f, 1.0f);

  //Draw the burn sprite only on the alpha channel.
  [burnSprite visit];

  //Reset glColorMask to allow drawing of colors.
  glColorMask(1.0f, 1.0f, 1.0f, 1.0f);

  //Finish transformation.
  [darknessLayer end];

  //Make the monk walk back and forth.
  if(monkSprite.position.x > 480){
    monkSprite.flipX = YES;
    burnSprite.velocity = ccp(-1,0);
    lightSprite.velocity = ccp(-1,0);
    monkSprite.velocity = ccp(-1,0);
  }else if(monkSprite.position.x < 0){
    monkSprite.flipX = NO;
    burnSprite.velocity = ccp(1,0);
    lightSprite.velocity = ccp(1,0);
    monkSprite.velocity = ccp(1,0);
  }

  //Update our SimpleAnimObjects
  [burnSprite update:delta];
  [lightSprite update:delta];
  [monkSprite update:delta];
}

@endCocos2d exposes just the right amount of OpenGL drawing logic to make complex manipulations of rendering order look easy. To achieve this effect we use CCRenderTexture. First, we clear the screen using the following call:
[darknessLayer clear:0.0f g:0.0f b:0.0f a:0.9f];
We then limit drawing to only the alpha channel
using a glColorMask call. This, in effect, tells OpenGL to modify the opacity (only the opacity, not the color) of the graphics buffer based on what we render. So, we render the fire.png texture to simulate light that is 2D and diffuses in a circle.
Finally, we additively draw another fire.png texture over this one to simulate the brightness and color of the light.
The node darknessLayer is only rendered within the screen's viewing area while burnSprite and lightSprite are rendered at the lantern's position.
Using a similar technique lights can be created in all shapes, sizes, and colors. These can include animated lights like torches, shaped lights like a car's headlights, or short, quick lighting effects like a bright flash from an explosion.
Most importantly, this effect gives us the ability to tease the player with what may or may not lurk in the shadows of the game world.