

The biggest challenge when developing a cross-platform application is the specific platform features APIs. Many common platform features exists across the platforms, but there isn't always a simple way to use them. For instance, showing an alert dialog message box or opening a URL from your application is a supported feature for iOS, Android, and Windows Phone but the APIs are completely different and platform specific, and a Portable Class Library has no access to all these features.
For our convenience, Xamarin.Forms supports some of the common platform-specific features out of the box. The architectural design and how you can create your own abstractions and implementations to use them in runtime in the portable library is discussed in Chapter 4, Different Cars, Same Engine.
We will explore the following Xamarin.Forms APIs:
Device.OpenUri– opens a URL in native browserDevice.StartTimer– triggers time-dependent tasksDevice.BeginInvokeOnMainThread– any background code that needs to update the user interfacePage.DisplayAlert– shows simple alert message dialogsXamarin.Forms.Map– a NuGet cross-platform map library
Let's create an application to see the usage of the preceding APIs.
Create a cross-platform project from scratch using the default template named
XamFormsCommonPlatform.Create a new folder and add a new class named
MainPage.cs.Paste the following code:
public class MainPage: ContentPage {
  private Button openUriButton;
  private Button startTimerButton;
  private Button marshalUIThreadButton;
  private Button displayAlertButton;
  private Button displayActionSheetButton;
  private Button openMapButton;
  private StackLayout stackLayout;

  public MainPage() {
    openUriButton = new Button {
      Text = "Open Xamarin Evolve"
    };
    startTimerButton = new Button {
      Text = "Start timer"
    };
    marshalUIThreadButton = new Button {
      Text = "Invoke on main thread"
    };
    displayAlertButton = new Button {
      Text = "Display an alert"
    };
    displayActionSheetButton = new Button {
      Text = "Display an ActionSheet"
    };
    openMapButton = new Button {
      Text = "Open platform map"
    };

  openUriButton.Clicked += OpenUriButton_Clicked;
  startTimerButton.Clicked += StartTimerButton_Clicked;
  marshalUIThreadButton.Clicked += MarshalUIThreadButton_Clicked;
  displayAlertButton.Clicked += DisplayAlertButton_Clicked;
  displayActionSheetButton.Clicked += DisplayActionSheetButton_Clicked;
  openMapButton.Clicked += OpenMapButton_Clicked;

  stackLayout = new StackLayout {
    Orientation = StackOrientation.Vertical,
    Spacing = 10,
    Padding = new Thickness(10),
    VerticalOptions = LayoutOptions.FillAndExpand,
    HorizontalOptions = LayoutOptions.FillAndExpand,
    Children = {
    openUriButton,
    startTimerButton,
    marshalUIThreadButton,
    displayAlertButton,
    displayActionSheetButton,
    openMapButton
    }
  };

  Content = stackLayout;
}

  void OpenMapButton_Clicked(object sender, EventArgs e) {

}

  async void DisplayActionSheetButton_Clicked(object sender, EventArgs e) {
    string action = await DisplayActionSheet("Simple ActionSheet", "Cancel", "Delete", new string[] {
      "Action1",
      "Action2",
      "Action3",
    });

    Debug.WriteLine("We tapped {0}", action);
  }

  async void DisplayAlertButton_Clicked(object sender, EventArgs e) {
    bool result = await DisplayAlert("Simple Alert Dialog", "Sweet!", "OK", "Cancel");
    Debug.WriteLine("Alert result: {0}", result ? "OK" : "Cancel");
  }

  void MarshalUIThreadButton_Clicked(object sender, EventArgs e) {
    Task.Run(async() => {
      for (int i = 0; i < 3; i++) {
      await Task.Delay(1000);
      Device.BeginInvokeOnMainThread(() => {
        marshalUIThreadButton.Text = string.Format("Invoke {0}", i);
      });
     }
    });
  }

  void StartTimerButton_Clicked(object sender, EventArgs e) {
    Device.StartTimer(new TimeSpan(0, 0, 1), () => {
     Debug.WriteLine("Timer Delegate Invoked");
     return true; // false if we want to cancel the timer.
    });
  }

  void OpenUriButton_Clicked(object sender, EventArgs e) {
    Device.OpenUri(new Uri("http://xamarin.com/evolve"));
  }
}
Ignore the
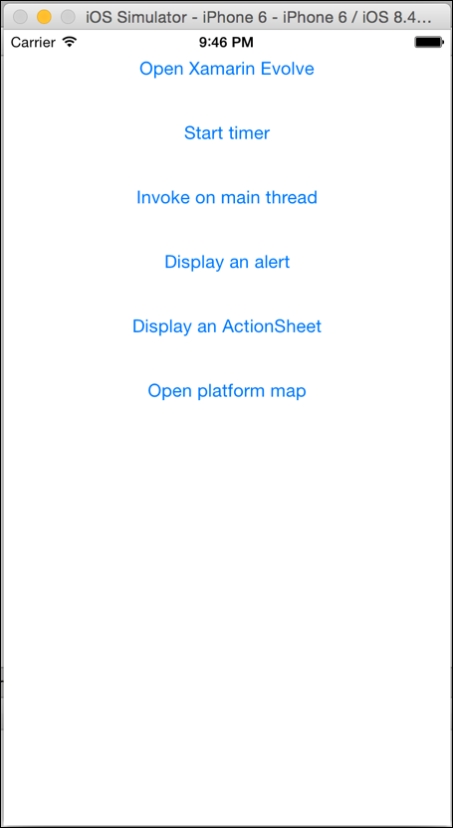
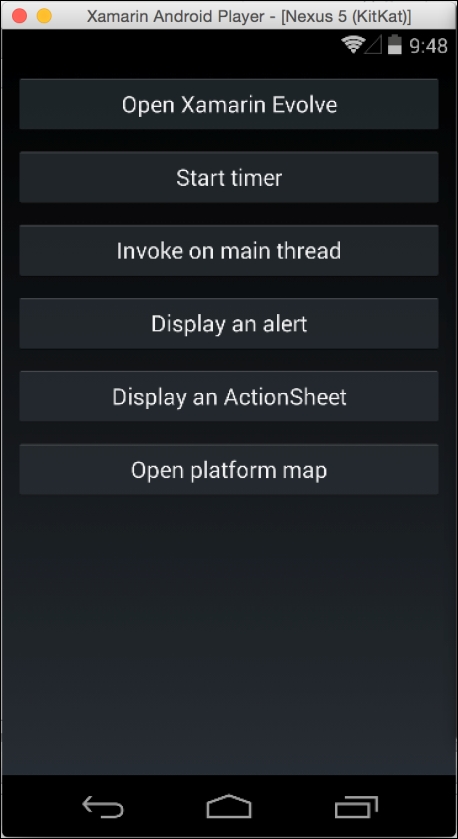
OpenMapButton_Clickedmethod for now; we will need to make some configuration soon to make it work.Run each application and test all the buttons except Open platform map, which has no functionality yet.
You should see something similar to the following screenshot:
In iOS:

To add Cross-Maps to our application, we first need to make some platform-specific configurations.
For all the projects in our solution, add the
Nugetpackage:Xamarin.Form.Maps.For the iOS and Windows Phone application projects, add the following code after
Forms.Init(). As a reminder, the call is inMainActivity.csfor Android and inAppDelegate.csin iOS.Xamarin.FormsMaps.Init();
In the Android project, we need to pass the two required parameters as the
Forms.Initcall.Xamarin.FormsMaps.Init(this, bundle);
For the iOS 7 apps, there is no need for any modifications, but iOS 8 requires two keys in the
info.plistfile. Open the file and view its source, then add the following key/value pair:
For Android, you need to get a Google Maps API v2 key; visit the link to complete this requirement: https://developers.google.com/maps/documentation/android/.
Open
Properties/AndroidManifest.xml, view source, and add or update the following in your <application> tag:<meta-dataandroid:name="com.google.android.maps.v2.API_KEY" android:value="YOUR_API_KEY" />
Right-click the Android project and choose Options. Select the Android Application section and in Required Permissions, check the following:
Internet
AccessNetworkState
AccessCoarseLocation
AccessFineLocation
AccessLocationExtraCommands
AccessMockLocation
AccessWifiState
Open the
Properties/WMAppmanifest.xmlfile in the Windows Phone Silverlight project and add the following in Capabilities:ID_CAP_MAPID_CAP_LOCATION
Add a new page with a right-click in the
Custom Pagesfolder and Add | New File. Name itMapPage.Make the
MapPageclass aContentPagesubclass.Add the following code:
private Map map;
private StackLayout stackLayout;

public MapPage() {
  MapSpan span = MapSpan.FromCenterAndRadius(new Position(40.730599, -73.986581), Distance.FromMiles(0.4));

  map = new Map(span) {
    VerticalOptions = LayoutOptions.FillAndExpand
  };

  stackLayout = new StackLayout {
    Spacing = 0,
    Children = {
      map
    }
  };

  Content = stackLayout;
}
In
MainPage.cs, add the following line of code in theOpenMapButton_Clickedmethod:Navigation.PushModalAsync (new MapPage ());
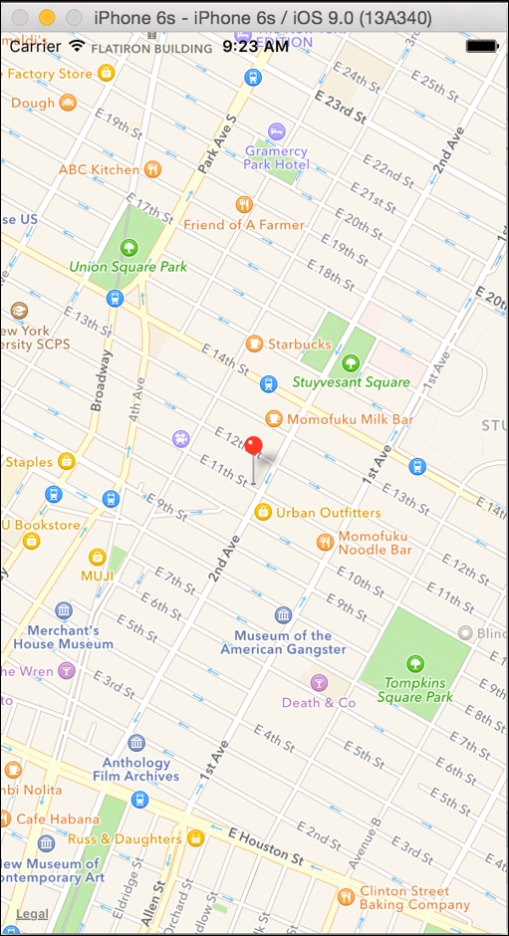
Run your applications, tap the Open platform map, and check out Manhattan!
We can also change the map type and add pins on a map. The available pin types are the following:
Generic
Place
SavedPin
SearchResult
To add a pin on the map, use the following code:
Position position = new Position(40.730599, -73.986581);
Pin pin = new Pin {
  Type = PinType.Place,
  Position = position,
  Label = "New York",
  Address = "New York"
};

map.Pins.Add(pin);
Yes, it is that easy! The Xamarin team did a great job abstracting this common feature to accomplish the most basic operations with a map.
In iOS:


Xamarin has provided us with all the abstractions that we can reference in our PCL core library and the implementations of these platform-specific features for our native projects. Using the DependencyService (a service we will cook in Chapter 4, Different Cars, Same Engine), a Service Locator mechanism to resolve dependencies in runtime, Xamarin makes it possible for us to create native applications with these common features in a very short time.
Device.OpenUri in runtime will inject implementation that will allow it to use the iOS UIAlertController, in Android the AlertDialog, and in Windows Phone the MessageBox platform-specific APIs. Device.StartTimer will hide the equivalent timer APIs and the same practice goes for all the plugins we demonstrated.
The same rules apply for the Xamarin.Forms.Map library, but some configuration requirements are needed.
Chapter 4, Different Cars, Same Engine
https://developer.xamarin.com/guides/cross-platform/xamarin-forms/controls/layouts/