

This section will show you how to set up your development environment. Soon, you'll have everything you need to begin building your own high-powered applications for AutoCAD.
To work through the examples in this book, you must have (or obtain) the following software:
Autodesk AutoCAD 2014 (or a vertical product such as AutoCAD Mechanical 2014)
Microsoft Visual Studio 2010 (or Microsoft Visual C# 2010 Express Edition)
Microsoft .NET Framework 4.0
You should also download the following important items:
The AutoCAD 2014 ObjectARX SDK (http://www.objectarx.com)
The AutoCAD 2014 .NET Wizards (http://www.autodesk.com/developautocad)
If you don't already have AutoCAD 2014 installed, you can download a 30-day free trial version from Autodesk. We will use Microsoft Visual Studio 2010 as our development environment. You can use either the free version, called the Express Edition, or the paid version which goes by various names (Professional Edition, Premium Edition, and so on), depending on the tools and features included. Visual Studio will install .NET Framework 4.0 if it is not already installed.
First install Microsoft Visual Studio 2010 (or Visual C# 2010 Express Edition).
Next, go to www.objectarx.com and download and install ObjectARX 2014 SDK. While not strictly required (unless you are using the following AutoCAD .NET Wizards), there is an advantage to using the libraries in the SDK rather than those installed by default with AutoCAD (this will be covered in greater detail shortly).
Now, download the AutoCAD 2014 .NET Wizards for Visual Studio. The AutoCAD .NET Wizards are maintained by the DevTech team at Autodesk (Autodesk Developer Network, or ADN). The Wizards simplify your AutoCAD .NET project setup. You can download the AutoCAD 2014 .NET Wizards from www.autodesk.com/developautocad.
Before you install the AutoCAD 2014 .NET Wizards, right-click on the installer file,
AutoCADNetWizards.msi, and select Properties. In the Properties dialog box, select the Compatibility tab and enable the Run this program in compatibility mode for: Previous version of Windows option. Click on OK.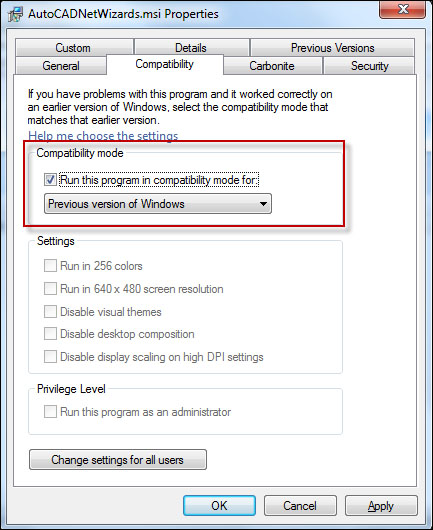
Install the AutoCAD 2014 .NET Wizards. By default these are installed at
C:\Program Files (x86)\Autodesk\AutoCAD 2014 .NET Wizards\.Tip
Downloading the example code
You can download the example code files for all Packt books you have purchased from your account at http://www.PacktPub.com. If you purchased this book elsewhere, you can visit http://www.PacktPub.com/support and register to have the files e-mailed directly to you.
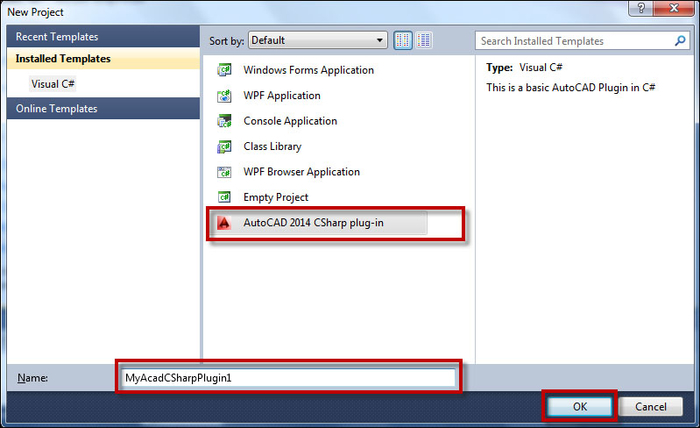
Now that the .NET Wizards are installed, open Microsoft Visual Studio and start a new project. Select the AutoCAD 2014 CSharp plug-in template and specify a name for the plugin. Click on OK.
In the AutoCAD .NET Wizard Configurator dialog, specify the location of
AcMgd.dllandacad.exe. The Express Editions of Visual Studio do not allow you to specify this executable file by name, although the Professional versions allow it. This information is required in order to debug our AutoCAD .NET plugins, so the Wizard essentially configures the Express Edition to enable debugging.While we could actually set these values manually by modifying our project's
.csproj.userfile (an XML file containing these settings as well as your platform configuration setting), we will allow the Wizard to handle this detail for us.
Before we dismiss the Configurator dialog box, we'll tell the Wizard which namespaces to include in our project. By default, the Wizard includes the AutoCAD and
AutoCAD.DatabaseServicesnamespaces. With our selections made, click on OK to close the Configurator and open our project.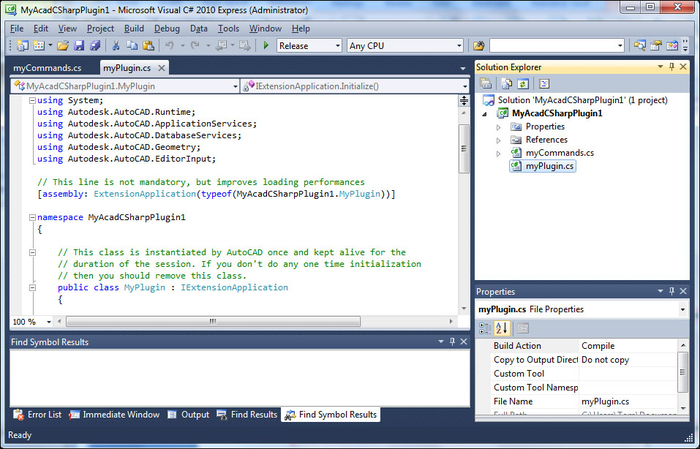
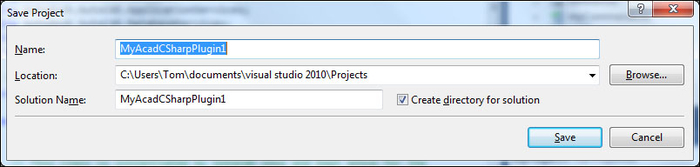
We will make use of this project in the next task. For now, let's just save it.
When debugging an AutoCAD project, the paid version of Visual Studio 2010 offers better debugging capability than the Visual Studio 2010 Express Editions. We mitigate this by using the .NET Wizard. If you are using Visual C# 2010 Express Edition, which is used for the examples in this book, be sure to specify the Expert settings option (go to Tools | Settings | Expert settings). This ensures, among other things, that the Object Browser tool is accessible from the Visual C# 2010 Express Edition toolbar and menu.
The AutoCAD .NET Wizards require us to first install the ObjectARX 2014 SDK. The SDK ships with the same set of DLLs as those which are installed in the AutoCAD executable folder. As you saw, we linked to the DLLs that shipped with the ObjectARX 2014 SDK. This is the preferred method, as the DLLs in the SDK are simplified and contain no dependencies on the AutoCAD UI, unlike those which were installed with the product.
There is a separate, optional ObjectARX documentation installer available at the same location where you downloaded the ObjectARX 2014 SDK. This installer will integrate the ObjectARX 2014 help documentation with the Microsoft Visual Studio 2010 help system. This is not required in order to create .NET projects for AutoCAD, but I wanted to make you aware of the option. Much of the .NET API (Application Programming Interface) consists of .NET wrappers around the existing ObjectARX SDK functions. So, you might find it convenient to have the ObjectARX help files integrated with your development environment.
In Visual Studio, we specify the solution configuration. In the Build menu, click on Configuration Manager. Set Active solution configuration to Release (we'll use Debug in Controlling the drawing environment (Should know); <New...> and <Edit...> are beyond the scope of this book).