Spending too much time setting up your drawing, configuring viewports, layouts, and so on? Our next project will simplify layout setup to just a few clicks.
In case you missed the previous section, we created a fairly simple command which displayed information about entities we (or someone) created in ModelSpace. Most of the plugins you'll create will draw, or otherwise process, AutoCAD entities on screen. By process, I mean the count, move, deform, delete, grow, shrink, change layer, change color, read entity properties (and report them), or read or write data that is attached to a specific entity or lives in an external file (for example, an Excel spreadsheet).
Other plugins are designed to assist in setting up the AutoCAD drawing environment, populating a title block, creating layers, layouts, and the like. In this project, we'll capture the configuration details from a selected layout in the active drawing. Then, we will clone the layout, its entities (such as viewports) and their properties, into a new drawing database, which we'll save as an AutoCAD template drawing. This template can be used to import specific layouts into our drawing, or to create entirely new drawings with the same layout configuration as the one that we cloned. But that's not all…
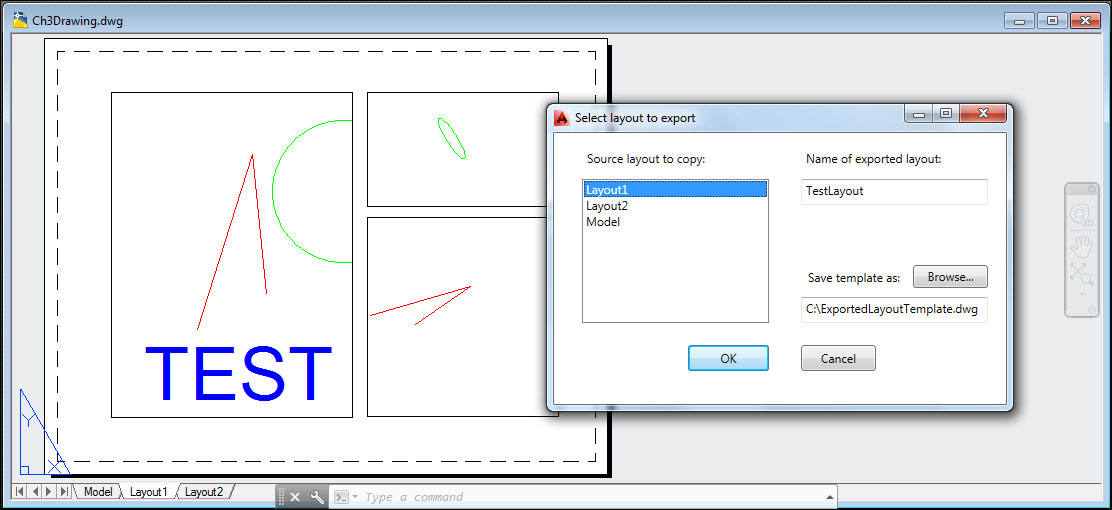
We will also create a simple, yet powerful, front end to drive this command: our user interface will specify the layout to export, the layout's new name in the template drawing, and the full filename of the template drawing that we are saving.
Following the examples from the previous recipes, create a new project, Ch3AcadPlugin. In the Configuration Manager, set the configuration type to Debug.
Add a Window to the project. Right-click on the project name Ch3AcadPlugin in the Solution Explorer, click on Add and then on Window… In the Add new item dialog box, select Window (WPF), specify the name Window1.xaml, and click on OK.
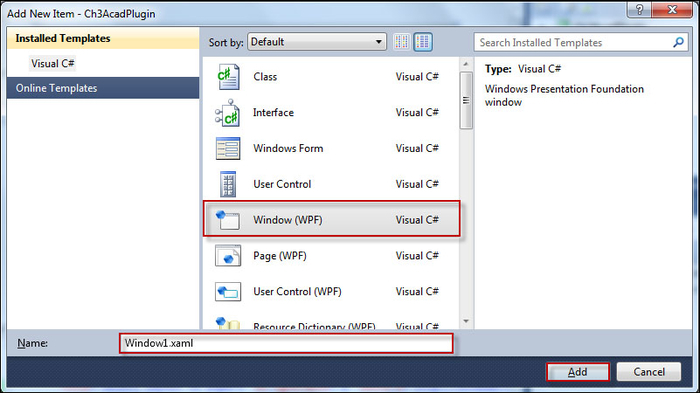
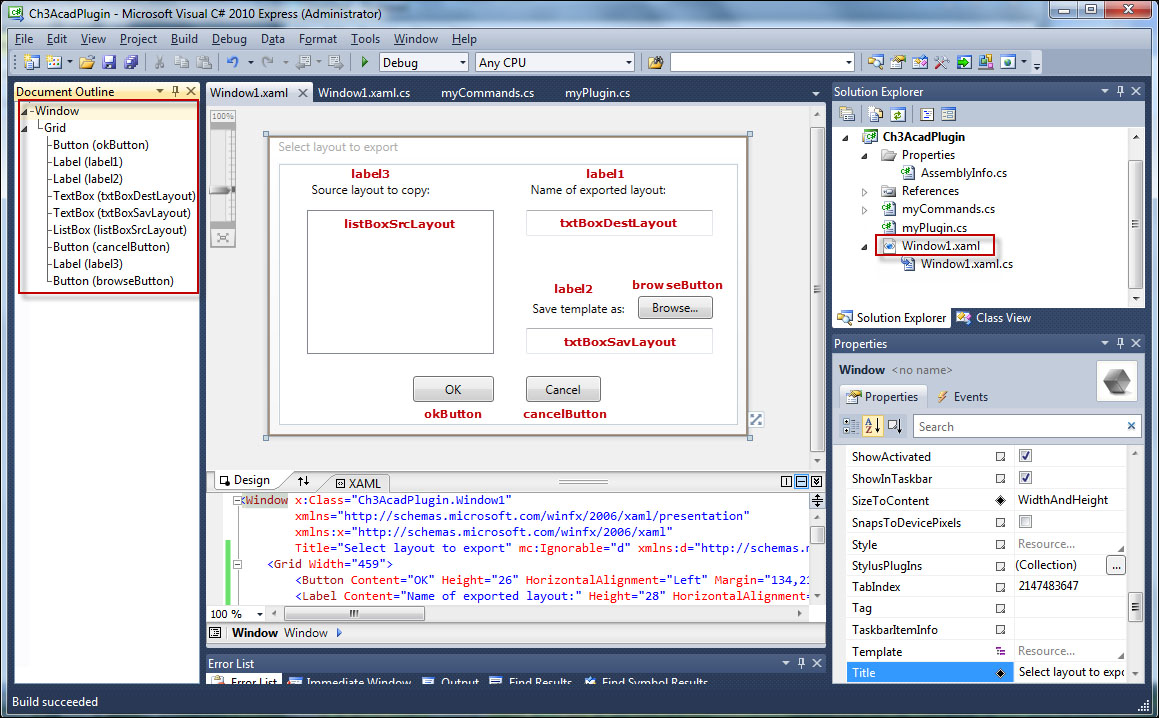
From the Toolbox (View | Toolbox), add some controls: a listbox, three textboxes, and three buttons to the window, as shown in the following screenshot. Name the controls according to the text in the screenshot (don't actually add the red text to your form). The buttons, textboxes, and listbox will also require event handler function definitions in the code: Click on the event handlers for the buttons, TextChanged event handlers for the textboxes, and a SelectionChanged event handler for the listbox.
Let's list the steps required to complete the task:
Open the
Window1.xaml.csfile in Visual Studio. At the top of the file, below the using System… statements, add three additional using statements:using Autodesk.AutoCAD.ApplicationServices; using Autodesk.AutoCAD.DatabaseServices; using AcadApp = Autodesk.AutoCAD.ApplicationServices;
In the
Window1class definition, add three string variables:namespace Ch3AcadPlugin { /// <summary> /// Interaction logic for Window1.xaml /// </summary> public partial class Window1 : Window { public static string txtSrcLayout; public static string txtDestLayout; public static string txtSavLayoutIn the
Window()method, just below InitializeComponent(), add code to get the active document and database:public Window1() { InitializeComponent(); //Get active drawing and database Document doc = AcadApp.Application.DocumentManager.MdiActiveDocument; Database db = doc.Database;Next, we'll begin a transaction. Open the
Layoutdictionary and read the layout associated with eachObjectId. After populating our listbox with all of the layout names, we commit (and end) the transaction://Read layout names from layout dictionary and populate listbox using (Transaction tr = db.TransactionManager.StartTransaction()){ //Get each entry in the layout dictionary DBDictionary loDic = tr.GetObject(db.LayoutDictionaryId, OpenMode.ForRead, false) as DBDictionary; foreach (DBDictionaryEntry entry in loDic) { ObjectId loId = entry.Value; //Open the layout for read Layout lo = tr.GetObject(loId, OpenMode.ForRead) as Layout; //Add the layout name to the listbox this.listBoxSrcLayout.Items.Add(lo.LayoutName); } tr.Commit(); }//end transactionNow, we'll work with the
Clickevent handlers for the OK and Cancel buttons. First, let's start with the Cancel button://'Click' event handler for 'Cancel' button private void cancelButton_Click(object sender, RoutedEventArgs e){ this.Close(); //close the dialog }Add a
Clickevent handler for the OK button. Set the three variables we declared at the top of the file to the values contained in the textboxes and listbox. Then, call thelayoutToTmplt()function (in theMyCommandsclass), which will export the layout:private void okButton_Click(object sender, RoutedEventArgs e) { //Get values from textboxes and listbox txtDestLayout = txtBoxDestLayout.Text; txtSrcLayout = listBoxSrcLayout.SelectedItem.ToString(); txtSavLayout = txtBoxSavLayout.Text; this.DialogResult = true; this.Close(); //close the dialog //Call layoutToTmplt() to export the selected layout MyCommands.layoutToTmplt(); }The final modification to the UI code is the event handler for the Browse button:
private void browseButton_Click(object sender, RoutedEventArgs e){
   //Create SaveFileDialog
   Microsoft.Win32.SaveFileDialog dlg = new
     Microsoft.Win32.SaveFileDialog();
   //Set filter for file extension and default file extension
   dlg.DefaultExt = ".dwg";
   dlg.Filter = "Drawing (*.dwg)|*.dwg";
   //Display SaveFileDialog
   Nullable<bool> result = dlg.ShowDialog();
   //If file is selected, display file name in textbox
   if (result == true) {
       //Get the document filename from the dialog
       string fn = dlg.FileName;
       //Populate textbox with the document filename
      txtBoxSavLayout.Text = fn;
   }
}
That (and the empty event handlers for the other controls) completes the user interface code in
Window1.xaml.cs. The MyCommands class is where we will add the other methods, layoutToTemplt() and ShowDialog(). Let's create a new command XPLayout. Originally, I'd chosen ExportLayout, but there are other Export commands, and you have to type all the way toExportLto get the correct command (and that's too long). XPLayout calls just one tiny method,ShowDialog():CommandMethod("XPLayout")] public void XPLayout() { ShowDialog(); } public void ShowDialog() { Window1 mw = new Window1(); Application.ShowModalWindow(mw); }Add a method named
layoutToTmplt()and get the database of the current drawing. Also, create a temporary database for the template layout:public static void layoutToTmplt() { //Get current (reference) drawing database Database db1 = Application.DocumentManager.MdiActiveDocument.Database; Editor ed = Application.DocumentManager.MdiActiveDocument.Editor; //Temp database for template layout Database db2 = new Database(true, false);In a transaction, set the working database to the temp database. Add a layout to the temp database:
using (Transaction trans1 =
   db2.TransactionManager.StartTransaction()) {
   //Switch working database to temp database
   HostApplicationServices.WorkingDatabase = db2;
   //Add a layout to the temp database
   LayoutManager loMgr1 = LayoutManager.Current;
   ObjectId oIdLo2 = loMgr1.CreateLayout(Window1.txtDestLayout);
   Layout lo2 = (Layout)trans1.GetObject(oIdLo2,
      OpenMode.ForWrite);
We'll set the working database back to our reference database. Begin a new transaction, nested within our first transaction. Now, open the reference layout for read and copy it into the temp layout:
//Switch the working database back to reference database
HostApplicationServices.WorkingDatabase = db1;
using (Transaction trans2 =
   db1.TransactionManager.StartTransaction()) {
   //Get the Layout in the reference database
    LayoutManager loMgr2;
    loMgr2 = LayoutManager.Current;
   ObjectId oIdLo1 = loMgr2.GetLayoutId(Window1.txtSrcLayout);
   Layout lo1 = (Layout)trans2.GetObject(oIdLo1,OpenMode.ForRead);
   //Copy reference layout into temp layout
    lo2.CopyFrom(lo1);
Open the reference layout's block table record (for read). Add all of the
ObjectIdsin the block table record to a collection, and clone the reference layout's objects to the temp layout://Get block table record of reference layout BlockTableRecord btr = default(BlockTableRecord); btr = BlockTableRecord)trans2.GetObject(lo1.BlockTableRecordId, OpenMode.ForRead); //Make collection of object ids from reference layout block //table record ObjectIdCollection oIdCln = new ObjectIdCollection(); foreach (ObjectId oId in btr) oIdCln.Add(oId); //Clone objects in the reference layout to the temp layout IdMapping iMap = new IdMapping(); db2.WblockCloneObjects(oIdCln, lo2.BlockTableRecordId, iMap, DuplicateRecordCloning.MangleName, false);Finally, commit the inner (second) transaction, and then the outer (first) transaction. Save the temp layout as a
.dwgfile:trans2.Commit(); } trans1.Commit(); //Save the temp database as a .dwg template db2.SaveAs(Window1.txtSavLayout, DwgVersion.Newest); }
This project uses AutoCAD's WBlockClone operation to clone AutoCAD objects across databases. For our purposes, this means cloning from a reference database (the current drawing) to a temporary database (the template database).
To run the code in Debug mode in Visual Studio, click on Start Debugging in the Debug menu, or click on the green arrowhead symbol on the standard toolbar. When AutoCAD starts, type NETLOAD, navigate to and select Ch3AcadPlugin.dll. Then, in AutoCAD, open Ch3Drawing.dwg (included in the code bundle) and execute the XPLAYOUT command.
The ShowDialog() method displays the custom dialog box we created. The dialog accepts three inputs: the name of the source, or reference layout; the name of the layout when it is exported to an external drawing file; and the name of the template drawing file. When you click on OK, the WBlockClone operation is carried out across databases.
After the XPLAYOUT command is executed, try importing the exported layout. In AutoCAD, right-click on any layout tab and click on From template.... In the dialog box, specify the template drawing file that contains the exported layout.
In the Insert Layout(s) dialog box, select the layout we previously exported.
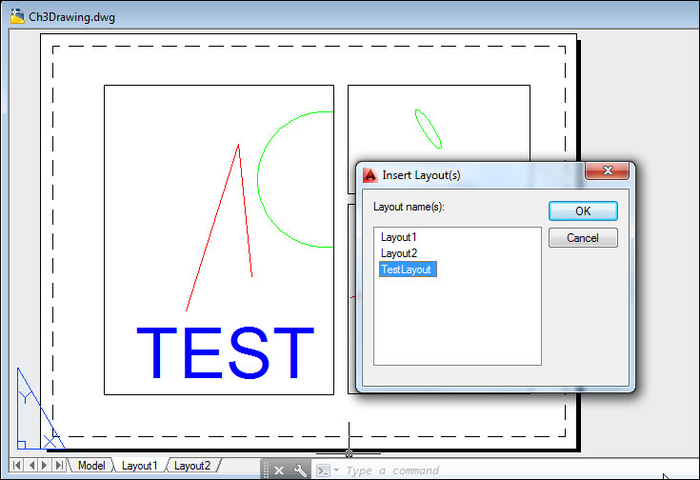
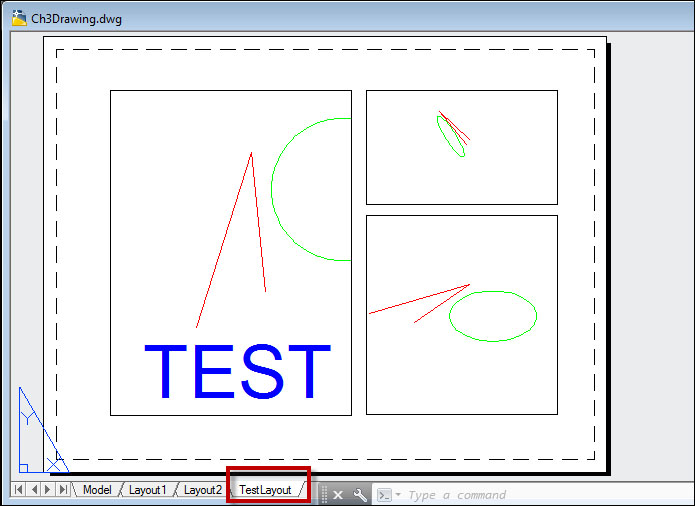
A new layout tab appears in the drawing window. Note that the cloned layout contains the same objects (viewports, text) as the reference layout.