

Software tools address specific needs. In the case of AutoCAD, that means drawing, revising, and publishing. What if we need to perform very elaborate calculations or sorting sequences on our AutoCAD data? It would be great to export our CAD data to another tool (for example, a spreadsheet) to operate on the data. And now we can! In this project, we will export AutoCAD data to MS Excel for processing (using the Excel API).
In this project, we'll take a drawing that has several layers and export the layer data to Excel. Once in Excel, we will sort the layer data using two criteria: first, we'll sort alphanumerically by layer color; then, within the range of each color, sort the data by the layer name. To capture the layer data, we'll use the WPF data binding that exists in AutoCAD 2013, the UIBindings.Collections class. One use for this class is to provide information about specific data collections (such as layers) to the AutoCAD Ribbon. We'll use it to collect a partial set of layer data to export to Excel.
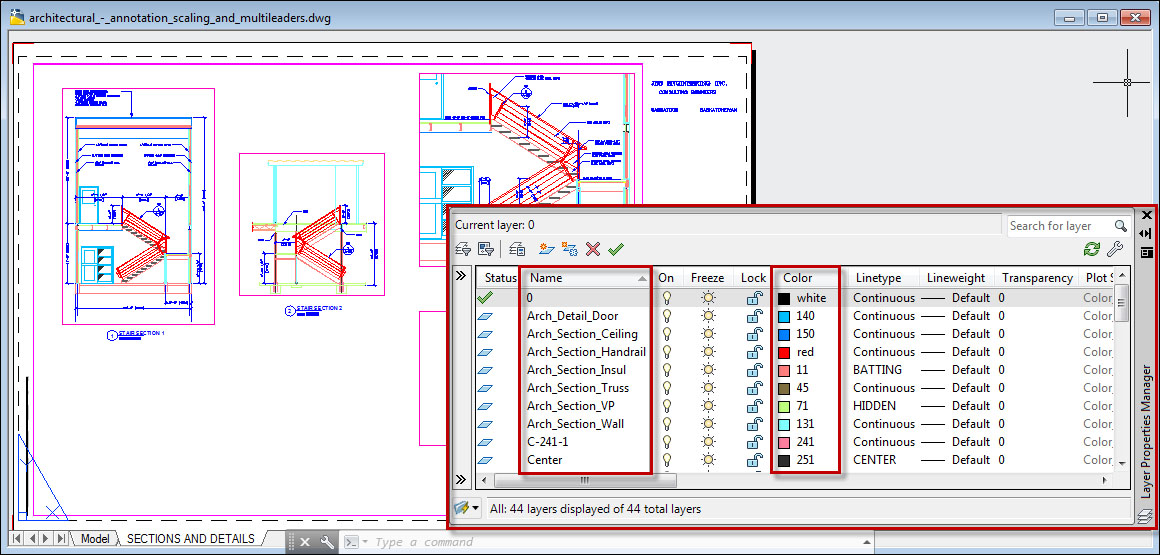
As a source of layers, let's use one of the AutoCAD's sample drawings, architectural_-_annotation_scaling_and_multileaders.dwg, which contains 44 layers. In previous releases, these drawings used to ship with AutoCAD. Today, that is no longer the case. Sample drawings are now centrally located. You can access them at: http://www.autodesk.com/autocad-samples. This drawing is found under the heading, AutoCAD 2010 Sample Files.
We will need to grab a couple of references to some Excel assemblies:
using System;
using System.Collections.Generic;
using System.Data;
using System.Diagnostics;
using System.Drawing;
using System.Linq;
using System.Text;
using System.Runtime.InteropServices;
using System.Reflection;
using Microsoft.Office.Interop;
using Microsoft.Office.Tools.Excel;
using Microsoft.VisualBasic;
using Autodesk.AutoCAD.ApplicationServices;
using Autodesk.AutoCAD.DatabaseServices;
using Autodesk.AutoCAD.EditorInput;
using Autodesk.AutoCAD.Geometry;
using Autodesk.AutoCAD.Runtime;
using Excel = Microsoft.Office.Interop.Excel;

// This line is not mandatory, but improves loading performances
[assembly: CommandClass(typeof(Ch8AcadPlugin.MyCommands))]

namespace Ch8AcadPlugin {
    public class MyCommands {

        private Excel.Application app = null;
        private Excel.Workbook workbook = null;
        private Excel.Worksheet worksheet = null;
        private Excel.Range wsrange = null;
In our custom command,
SortLayers, we will create an instance of MS Excel. Then we'll create an array of arrays: nine arrays, one for each of nine layer properties://Create new Excel application, workbook, and worksheet public void createWkBk() { try { app = new Excel.Application(); app.Visible = true; workbook = app.Workbooks.Add(1); worksheet = (Excel.Worksheet)workbook.Sheets[1]; } catch (System.Exception) { Console.Write("Error"); } } //Command to export layer data to MS Excel and then //sort the layers(rows) according to color [CommandMethod("SortLayers")] public void SortLayersByColor() { //Get the active document and database Document doc = Application.DocumentManager.MdiActiveDocument; Database db = doc.Database; Editor ed = doc.Editor; using (Transaction trans = db.TransactionManager.StartTransaction()) { //Create Excel app, workbook, worksheet, range createWkBk(); //Declare array of nine elements, each of which is also //an array string[][] headerAndData = new string[9][];Populate an array for each of the properties we will include in the partial set. The array contains row and column data, cell ranges, font properties, and alignment settings. This information is used to create the column headers:
      //Initialize the nine array elements, each one
      //representing a spreadsheet heading KEY: property, row,
      //column, range begin column, range end column, column
      //merge, bold text?, font size, column width, cell text
      //alignment(Horiz.)
      headerAndData [0] = new string[10] {"Layer Data for: " +
         Application.DocumentManager.MdiActiveDocument.Name,
         "1", "1", "A", "H", "2", "true", "16", "80", "C"};
      headerAndData [1] = new string[10] {"Name", "2", "1",
         "A", "A", "2", "true", "12", "25", "C"};
      headerAndData [2] = new string[10] {"Color", "2", "2",
         "B", "B", "2", "true", "12", "25", "C"};
      headerAndData [3] = new string[10] {"IsOff", "2", "3",
         "C", "C", "2", "true", "12", "25", "C"};
      headerAndData [4] = new string[10] {"IsFrozen", "2", "4",
         "D", "D", "2", "true", "12", "25", "C"};
      headerAndData [5] = new string[10] {"IsLocked", "2", "5",
         "E", "E", "2", "true", "12", "25", "C"};
      headerAndData [6] = new string[10] {"IsPlottable", "2",
         "6", "F", "F", "2", "true", "12", "25", "C"};
      headerAndData [7] = new string[10] {"PlotStyleName", "2",
         "7", "G", "G", "2", "true", "12", "25", "C"};
      headerAndData [8] = new string[10] {"Description", "2",
         "8", "H", "H", "2", "true", "12", "25", "C"};

      //Create spreadsheet headers for dwg file and layer
      //details, then add layer property data
      AddHeadersAndData(headerAndData);

      //Sort layers, first by Color, then by Layer Name
      SortRange();

      //Save the workbook and exit Excel, releasing the
      //COM objects to prevent hanging Excel process
      SaveWB();
   }
}
By reading the array contents, we'll populate the headers in the spreadsheet:
//Create spreadsheet headers for dwg file and layer details,
//and add layer property data
public void AddHeadersAndData(string[][] arr) {
   for (int i = 0; i < arr.Length; i++) {
      for (int j = 0; j < arr[i].Length; j++) {
         //Retrieve the header details
         string head = arr[i][j];
         string propertyName = arr[i][j];
         j++;
         int iRow = Convert.ToInt32(arr[i][j]);
         j++;
         int iCol = Convert.ToInt32(arr[i][j]);
         j++;
         string c1 = arr[i][j];
         j++;
         string c2 = arr[i][j];
         j++;
         int colMrg = Convert.ToInt32(arr[i][j]);
         j++;
         bool bBold = Convert.ToBoolean(arr[i][j]);
         j++;
         int iFont = Convert.ToInt32(arr[i][j]);
         j++;
         int iWidth = Convert.ToInt32(arr[i][j]);
         j++;
         Excel.XlHAlign hAlign = Excel.XlHAlign.xlHAlignCenter;
         if (arr[i][j] == "C") {
            //Horizontally align the header text to the center
            hAlign = Excel.XlHAlign.xlHAlignCenter;
         }
         else if(arr[i][j] == "L") {
            //Horizontally align the header text to the left
            hAlign = Excel.XlHAlign.xlHAlignLeft;
         }
         else if(arr[i][j] == "R") {
            //Horizontally align the header text to the right
            hAlign = Excel.XlHAlign.xlHAlignRight;
         }
         //Write the header rows to the cells
         worksheet.Cells[iRow,iCol] = head;
         wsrange = worksheet.get_Range(c1 + iRow.ToString(),
            c2 + iRow.ToString());
         wsrange.Borders.Color =
            System.Drawing.Color.Black.ToArgb();
         wsrange.Merge(colMrg);
         wsrange.Font.Bold = bBold;
         wsrange.Font.Size = iFont;
         wsrange.ColumnWidth = iWidth;
         wsrange.HorizontalAlignment = hAlign;
For each layer property that we list in the header, add corresponding layer data below the header:
         if (iRow > 1) {
            //If iRow is below the main heading, add Layer
            //data under each Layer Property heading
            iRow = 3;
            //Iterate through the layers in the AutoCAD WPF
            //data binding UIBindings.Collections class
            Autodesk.AutoCAD.Windows.Data.DataItemCollection
               dataItemCollection =
                  Application.UIBindings.Collections.Layers;
            foreach (System.ComponentModel.ICustomTypeDescriptor
               desc in dataItemCollection) {
               //Get the desired layer table record
               //properties and write them to the cells
               dynamic propertyValue =
               desc.GetProperties()[propertyName].GetValue(desc);
               worksheet.Cells[iRow, iCol] =
                  propertyValue.ToString();
               wsrange = worksheet.get_Range(c1 + iRow.ToString(),
                  c2 + iRow.ToString());
Add a border around each cell containing layer data and align the text to the left:
                  //Add a border around the cell
                  wsrange.Borders.Color =
                     System.Drawing.Color.Black.ToArgb();
                  wsrange.NumberFormat = "";
                  //Horizontally align the data text to the left
                  wsrange.HorizontalAlignment =
                     Excel.XlHAlign.xlHAlignLeft;
                  iRow = iRow + 1;
               }
            }
         }
      }
   }
Sort the layer data in Excel, first sorting by the color name, and then by layer name:
   //Sort spreadsheet range data, first by layer Color property,
   //and then by layer Name
   public void SortRange() {
      Excel.Range oRng = worksheet.get_Range("A3", "K50");
      oRng.Sort(oRng.Columns[2, Type.Missing],
         Excel.XlSortOrder.xlAscending, oRng.Columns[1,
         Type.Missing], Type.Missing,
         Excel.XlSortOrder.xlAscending, Type.Missing,
         Excel.XlSortOrder.xlAscending, Excel.XlYesNoGuess.xlNo,
            Type.Missing, Type.Missing,
            Excel.XlSortOrientation.xlSortColumns,
            Excel.XlSortMethod.xlPinYin,
            Excel.XlSortDataOption.xlSortNormal,
            Excel.XlSortDataOption.xlSortNormal,
            Excel.XlSortDataOption.xlSortNormal);
   }
Save and exit from Excel, and release COM objects:
   //Save the workbook and exit Excel, releasing the
   //COM objects to prevent hanging Excel process
   public void SaveWB() {
      workbook.Close();
      app.Quit();
	   System.Runtime.InteropServices.Marshal.
         ReleaseComObject(wsrange);
      System.Runtime.InteropServices.Marshal.
         ReleaseComObject(worksheet);
      System.Runtime.InteropServices.Marshal.
         ReleaseComObject(workbook);
      System.Runtime.InteropServices.Marshal.
         ReleaseComObject(app);
      wsrange = null;
      worksheet = null;
      workbook = null;
      app = null;
   }
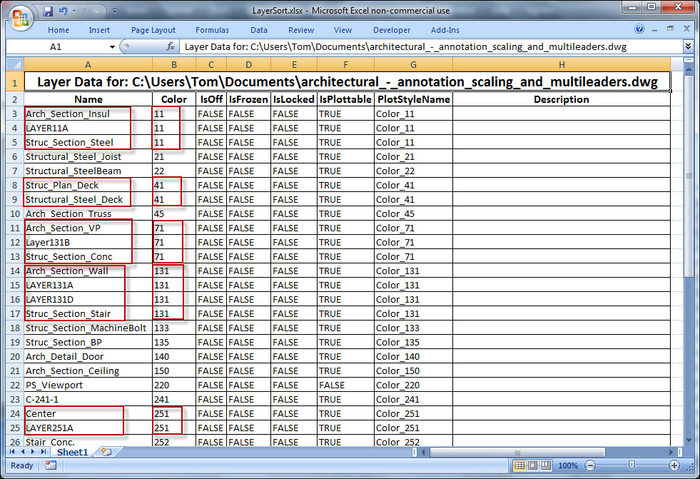
The resulting data, sorted by color and then by name, looks like this:
The UIBindings.Collections class contains common AutoCAD data collections, such as layer. We could obtain every layer property that is normally visible in the Layer Properties Manager dialog. For our purposes, we use only a subset of the available layer data.
The code is fairly straightforward, and some of it covers what must be familiar territory by now: getting the AutoCAD document, database, and editor. It may be beneficial to read up on the Excel API to get a better understanding of writing to cells, sorting the worksheet ranges, and so on.
No matter what API we use to communicate between AutoCAD and Excel, we may run into an issue where we have already saved and quit Excel, but the Excel process hangs. Subsequent Excel access through the API may result in unexpected behavior. It is necessary to release all Excel COM objects. The obvious ones are the apps, workbooks, and worksheets. Others that are often overlooked include worksheet collections and the worksheet range objects.
In this book, we only scratch the surface of using Microsoft's WPF, creating simple interfaces and hooking into one of AutoCAD's data collections. If you have more than a passing interest in learning how to leverage WPF in AutoCAD, it is strongly recommended to take a look at Fenton Webb's presentations on the subject (go to http://adndevblog.typepad.com/autocad/2013/05/api-webcast-archive.html to download the two presentations). Fenton is a long-time member of Autodesk's Developer Technical Services, and possesses a deep knowledge of the AutoCAD APIs. This project was inspired by one of Fenton's blog postings.