Using the .NET API, we'll add a custom button to the AutoCAD ribbon interface. At this point, I've grown tired of typing NETLOAD every time I want to load a .NET assembly. Instead, I want to define a custom button on the ribbon that I can click on and execute the NETLOAD command.
There are two common approaches to customizing the AutoCAD ribbon. One involves creating a partial CUIX file, and the other uses the .NET API to modify the ribbon at runtime. This being a book about the AutoCAD .NET API, we will focus on the latter.
First, let's designate
ID_CUSTOMCMDSas the internal name for our custom ribbon tab, and add some methods for adding and removing the custom tab. In this example, our tab will contain a panel which holds a single custom button. The button will include a two-level tooltip:using System; using Autodesk.AutoCAD.Runtime; using Autodesk.AutoCAD.Windows; using Autodesk.Windows; using Autodesk.AutoCAD.EditorInput; using System.Collections.Generic; // This line is not mandatory, but improves loading performances [assembly: CommandClass(typeof(Ch9AcadPlugin.MyCommands))] namespace Ch9AcadPlugin { public class MyCommands { //Declare the custom tab name here private const String TAB_ID = "ID_CUSTOMCMDS"; public void delRibbon() { Autodesk.Windows.RibbonControl rbnCtrl = Autodesk.AutoCAD.Ribbon.RibbonServices. RibbonPaletteSet.RibbonControl; //Check for the custom ribbon tab and delete for (int i = 0; i < rbnCtrl.Tabs.Count; i++) { if (rbnCtrl.Tabs[i].Id.Equals(TAB_ID)) { rbnCtrl.Tabs.Remove(rbnCtrl.Tabs[i]); return; } } } //Add the custom ribbon tab and panel public void addRibbon() { Autodesk.Windows.RibbonControl rbnCtrl = Autodesk.AutoCAD.Ribbon.RibbonServices. RibbonPaletteSet.RibbonControl; //Add custom ribbon tab RibbonTab rbnTab = new RibbonTab(); rbnTab.Title = "Custom commands"; rbnTab.Id = TAB_ID; rbnCtrl.Tabs.Add(rbnTab); //Add custom ribbon panel addRbnPnl(rbnTab); //Set the custom ribbon tab active rbnTab.IsActive = true; }Next, we'll add the ribbon panel, button, and tooltip, in that order. Label the panel Custom commands:
      //Add the custom ribbon panel, button, and tooltip
      //for the built-in NETLOAD command
      private void addRbnPnl(RibbonTab rbnTab) {
         //Add ribbon panel source
         Autodesk.Windows.RibbonPanelSource rbnPnlSrc =
            new RibbonPanelSource();
         rbnPnlSrc.Title = "Custom commands";
         //Add custom ribbon panel
         RibbonPanel rbnPnl = new RibbonPanel();
         rbnPnl.Source = rbnPnlSrc;
         rbnTab.Panels.Add(rbnPnl);
Add a button to the panel. Label the button to read NETLOAD, and set the
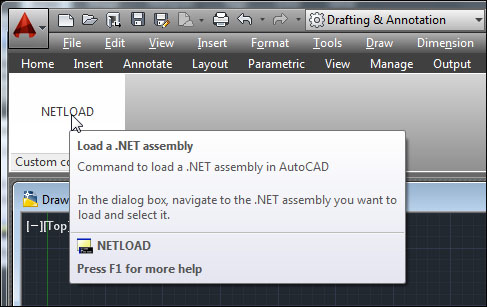
CommandParameterproperty toNETLOADas well://Add custom ribbon button Autodesk.Windows.RibbonButton rbnBtn = new RibbonButton(); rbnBtn.Text = "NETLOAD"; rbnBtn.CommandParameter = "NETLOAD "; rbnBtn.ShowText = true; rbnBtn.CommandHandler = new AdskCommandHandler();Add an expanded tooltip to the button. This tooltip has two levels of content. One which displays immediately when you hover with the cursor, and one which displays after a brief delay:
         //Add custom ribbon tooltip
         Autodesk.Windows.RibbonToolTip rbnTT =
            new RibbonToolTip();
         rbnTT.Command = "NETLOAD";
         rbnTT.Title = "Load a .NET assembly";
         rbnTT.Content =
            "Command to load a .NET assembly in AutoCAD";
         rbnTT.ExpandedContent =
            "In the dialog box, navigate to the .NET assembly you
            want to load and select it.";
         rbnBtn.ToolTip = rbnTT;
         rbnPnlSrc.Items.Add(rbnBtn);
      }
Now add a method to register the assembly, so the custom button persists the next time you start AutoCAD:
//Register the assembly
public void AppReg() {
   //AutoCAD registry key
   Microsoft.Win32.RegistryKey regKeyAcad =
      Microsoft.Win32.Registry.CurrentUser.OpenSubKey(
         Autodesk.AutoCAD.DatabaseServices.
         HostApplicationServices.Current.
         UserRegistryProductRootKey);
   //AutoCAD Application key
   Microsoft.Win32.RegistryKey regKeyAcadApp =
      regKeyAcad.OpenSubKey("Applications", true);
   //Check whether app is registered
   string appName =
      System.Reflection.Assembly.GetExecutingAssembly().
      GetName().Name;
   String[] subKeys = regKeyAcadApp.GetSubKeyNames();
   foreach (String subKey in subKeys) {
      if (subKey.Equals(appName)) {
         regKeyAcadApp.Close();
         return;
      }
   }
   //Get app location and full name
   string appPath = System.Reflection.Assembly.
      GetExecutingAssembly().Location;
   string appFullName = System.Reflection.Assembly.
      GetExecutingAssembly().GetName().FullName;
   //Add registry key for addin
   Microsoft.Win32.RegistryKey regKeyAddin =
      regKeyAcadApp.CreateSubKey(appName);
   regKeyAddin.SetValue("DESCRIPTION", appFullName,
      Microsoft.Win32.RegistryValueKind.String);
	regKeyAddin.SetValue("LOADCTRLS", 14,
      Microsoft.Win32.RegistryValueKind.DWord);
   regKeyAddin.SetValue("LOADER", appPath,
      Microsoft.Win32.RegistryValueKind.String);
   regKeyAddin.SetValue("MANAGED", 1,
      Microsoft.Win32.RegistryValueKind.DWord);
   regKeyAcadApp.Close();
}
Likewise, add a method to unregister the assembly. Make this one a command method, to allow us to unregister it from the command line:
//Command to unregister the assembly
[CommandMethod("AppUnreg")]
public void AppUnreg() {
   //AutoCAD registry key
   Microsoft.Win32.RegistryKey acadKey =
       Microsoft.Win32.Registry.CurrentUser.OpenSubKey(
       Autodesk.AutoCAD.DatabaseServices.
       HostApplicationServices.Current.
       UserRegistryProductRootKey);
   //AutoCAD Application key
   Microsoft.Win32.RegistryKey acadAppKey =
       acadKey.OpenSubKey("Applications", true);
   //Delete registry key
   string appName = System.Reflection.Assembly.
       GetExecutingAssembly().GetName().Name;
   acadAppKey.DeleteSubKeyTree(appName);
   acadAppKey.Close();
}
Add a handler to execute a command when the button is clicked:
public class AdskCommandHandler : System.Windows.Input.ICommand {
   public bool CanExecute(object parameter) {
      return true;
   }
   public event EventHandler CanExecuteChanged;

   public void Execute(object parameter) {
      RibbonButton rbnBtn = parameter as RibbonButton;
      if (rbnBtn != null) {
      //Execute command specified in ribbon button parameter
         Autodesk.AutoCAD.ApplicationServices.
            Application.DocumentManager.MdiActiveDocument.
            SendStringToExecute((String)rbnBtn.CommandParameter,
            true, false, true);
      }
   }
}
Finally, add an event handler to notify us when the ribbon becomes initialized, so we can add our custom tab:
using System;
using Autodesk.AutoCAD.Runtime;
using Autodesk.AutoCAD.ApplicationServices;
using Autodesk.AutoCAD.DatabaseServices;
using Autodesk.AutoCAD.Geometry;
using Autodesk.AutoCAD.EditorInput;
using Autodesk.Windows;
// This line is not mandatory, but improves loading performances
[assembly: ExtensionApplication(typeof(Ch9AcadPlugin.MyPlugin))]
namespace Ch9AcadPlugin {
   public class MyPlugin : IExtensionApplication {
      void IExtensionApplication.Initialize() {
         if (Autodesk.Windows.ComponentManager.Ribbon == null) {
            //Load custom ribbon on startup. Register
            //ItemInitialized event for when ribbon becomes
            //available
            Autodesk.Windows.ComponentManager.ItemInitialized +=
               new EventHandler<RibbonItemEventArgs>
               (ComponentManager_ItemInitialized);
         }
         else {
            //If ribbon control is available, add custom ribbon
            MyCommands MyCmds = new MyCommands();
            MyCmds.AppReg();
            MyCmds.addRibbon();
         }
      }
      void ComponentManager_ItemInitialized(object sender,
         RibbonItemEventArgs e) {
         //Is ribbon available?
         if (Autodesk.Windows.ComponentManager.Ribbon != null) {
            //If so, add custom ribbon
            MyCommands MyCmds = new MyCommands();
            MyCmds.addRibbon();
            //Delete ItemInitialized event handler –
            //no longer needed
            Autodesk.Windows.ComponentManager.ItemInitialized -=
               new EventHandler<RibbonItemEventArgs>
               (ComponentManager_ItemInitialized);
         }
      }
      void IExtensionApplication.Terminate() {
         // Do plug-in application clean up here
      }
   }
}
We first check to see whether the AutoCAD ribbon has been initialized before adding our custom tab, button, and so on. We then define a custom tab, panel, button, and tooltip. Then, when the user clicks the button, a handler executes the command that we specified in the button's CommandParameter property.