We saw earlier how we could optimize parameters by minimizing some distance function, D. This distance function, also called the loss function, is the performance measure by which we evaluate possible functions. In machine learning, a loss function measures how bad the model performs. A high loss function goes hand in hand with low accuracy, whereas if the function is low, then the model is doing well.
In this case, our issue is a binary classification problem. Because of that, we will be using the binary cross-entropy loss, as we can see in the following formula:

Let's go through this formula step by step:
DBCE: This is the distance function for binary cross entropy loss.
 : The loss over a batch of N examples is the average loss of all examples.
 : This part of the loss only comes into play if the true value, yi is 1. If yi is 1, we want
  to be as close to 1 as possible, so we can achieve a low loss.
 : This part of the loss comes into play if yi, is 0. If so, we want
  to be close to 0 as well.
In Python, this loss function is implemented as follows:
def bce_loss(y,y_hat):
  N = y.shape[0]
  loss = -1/N * (y*np.log(y_hat) + (1 - y)*np.log(1-y_hat))
  return loss
The output, A, of our logistic regressor is equal to  , so we can calculate the binary cross-entropy loss as follows:
loss = bce_loss(y,A)
print(loss)
out:
0.82232258208779863
As we can see, this is quite a high loss, so we should now look at seeing how we can improve our model. The goal here is to bring this loss to zero, or at least to get closer to zero.
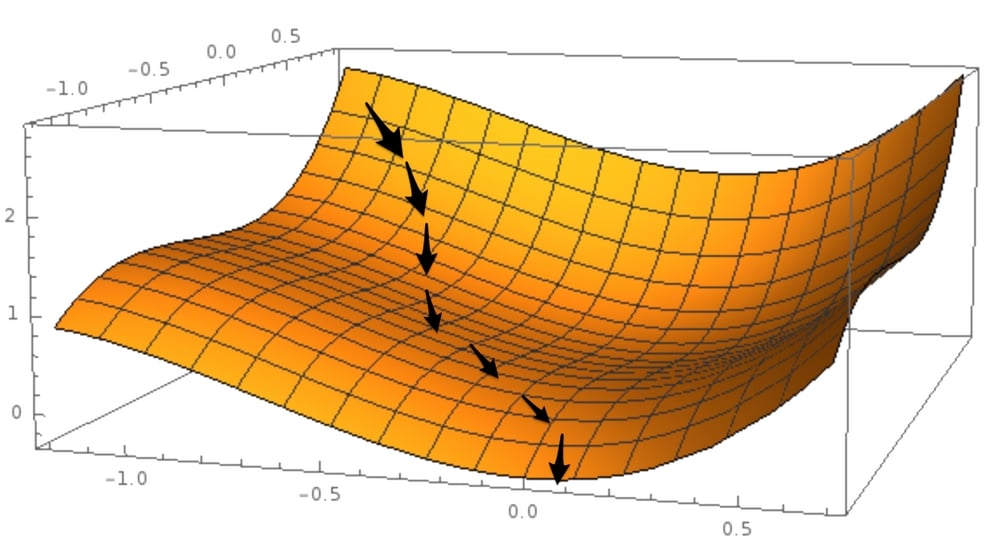
You can think of losses with respect to different function hypotheses as a surface, sometimes also called the "loss surface." The loss surface is a lot like a mountain range, as we have high points on the mountain tops and low points in valleys.
Our goal is to find the absolute lowest point in the mountain range: the deepest valley, or the "global minimum." A global minimum is a point in the function hypothesis space at which the loss is at the lowest point.
A "local minimum," by contrast, is the point at which the loss is lower than in the immediately surrounding space. Local minima are problematic because while they might seem like a good function to use at face value, there are much better functions available. Keep this in mind as we now walk through gradient descent, a method for finding a minimum in our function space.
Now that we know what we judge our candidate models,  , by, how do we tweak the parameters to obtain better models? The most popular optimization algorithm for neural networks is called gradient descent. Within this method, we slowly move along the slope, the derivative, of the loss function.
Imagine you are in a mountain forest on a hike, and you're at a point where you've lost the track and are now in the woods trying to find the bottom of the valley. The problem here is that because there are so many trees, you cannot see the valley's bottom, only the ground under your feet.
Now ask yourself this: how would you find your way down? One sensible approach would be to follow the slope, and where the slope goes downwards, you go. This is the same approach that is taken by a gradient descent algorithm.
To bring it back to our focus, in this forest situation the loss function is the mountain, and to get to a low loss, the algorithm follows the slope, that is, the derivative, of the loss function. When we walk down the mountain, we are updating our location coordinates.
The algorithm updates the parameters of the neural network, as we are seeing in the following diagram:

Gradient descent
Gradient descent requires that the loss function has a derivative with respect to the parameters that we want to optimize. This will work well for most supervised learning problems, but things become more difficult when we want to tackle problems for which there is no obvious derivative.
Gradient descent can also only optimize the parameters, weights, and biases of our model. What it cannot do is optimize how many layers our model has or which activation functions it should use, since there is no way to compute the gradient with respect to model topology.
These settings, which cannot be optimized by gradient descent, are called hyperparameters and are usually set by humans. You just saw how we gradually scale down the loss function, but how do we update the parameters? To this end, we're going to need another method called backpropagation.
Backpropagation allows us to apply gradient descent updates to the parameters of a model. To update the parameters, we need to calculate the derivative of the loss function with respect to the weights and biases.
If you imagine the parameters of our models are like the geo-coordinates in our mountain forest analogy, calculating the loss derivative with respect to a parameter is like checking the mountain slope in the direction north to see whether you should go north or south.
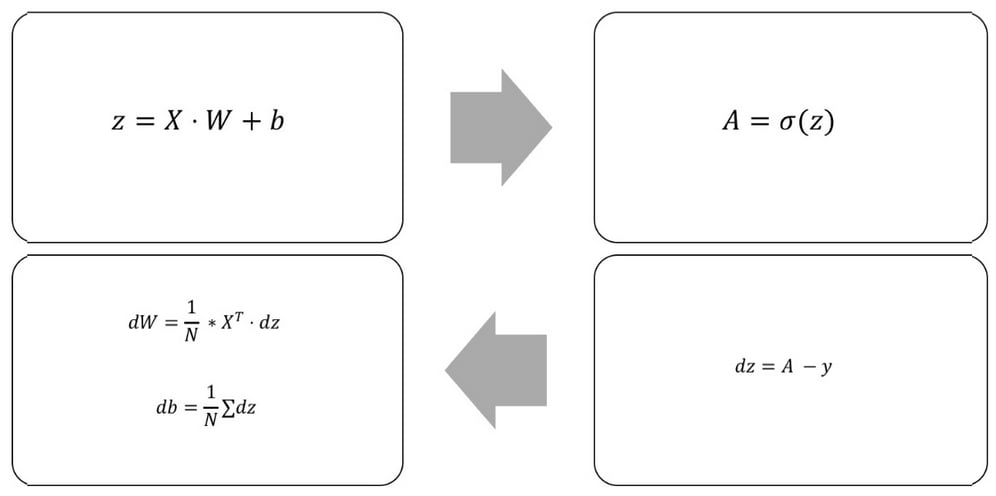
The following diagram shows the forward and backward pass through a logistic regressor:

Forward and backward pass through a logistic regressor
To keep things simple, we refer to the derivative of the loss function to any variable as the d variable. For example, we'll write the derivative of the loss function with respect to the weights as dW.
To calculate the gradient with respect to different parameters of our model, we can make use of the chain rule. You might remember the chain rule as the following:

This is also sometimes written as follows:

The chain rule basically says that if you want to take the derivative through a number of nested functions, you multiply the derivative of the inner function with the derivative of the outer function.
This is useful because neural networks, and our logistic regressor, are nested functions. The input goes through the linear step, a function of input, weights, and biases; and the output of the linear step, z, goes through the activation function.
So, when we compute the loss derivative with respect to weights and biases, we'll first compute the loss derivative with respect to the output of the linear step, z, and use it to compute dW. Within the code, it looks like this:
dz = (A - y)

dW = 1/N * np.dot(X.T,dz)

db = 1/N * np.sum(dz,axis=0,keepdims=True)
Now we have the gradients, how do we improve our model? Going back to our mountain analogy, now that we know that the mountain goes up in the north and east directions, where do we go? To the south and west, of course!
Mathematically speaking, we go in the opposite direction to the gradient. If the gradient is positive with respect to a parameter, that is, the slope is upward, then we reduce the parameter. If it is negative, that is, downward sloping, we increase it. When our slope is steeper, we move our gradient more.
The update rule for a parameter, p, then goes like this:

Here p is a model parameter (either in weight or a bias), dp is the loss derivative with respect to p, and  is the learning rate.
The learning rate is something akin to the gas pedal within a car. It sets by how much we want to apply the gradient updates. It is one of those hyperparameters that we have to set manually, and something we will discuss in the next chapter.
Within the code, our parameter updates look like this:
alpha = 1
W -= alpha * dW
b -= alpha * db
Well done! We've now looked at all the parts that are needed in order to train a neural network. Over the next few steps in this section, we will be training a one-layer neural network, which is also called a logistic regressor.
Firstly, we'll import numpy before we define the data. We can do this by running the following code:
import numpy as np
np.random.seed(1)

X = np.array([[0,1,0],
              [1,0,0],
              [1,1,1],
              [0,1,1]])

y = np.array([[0,1,1,0]]).T
The next step is for us to define the sigmoid activation function and loss function, which we can do with the following code:
def sigmoid(x):
    return 1/(1+np.exp(-x))

def bce_loss(y,y_hat):
    N = y.shape[0]
    loss = -1/N * np.sum((y*np.log(y_hat) + (1 - y)*np.log(1-y_hat)))
    return loss
We'll then randomly initialize our model, which we can achieve with the following code:
W = 2*np.random.random((3,1)) - 1
b = 0
As part of this process, we also need to set some hyperparameters. The first one is alpha, which we will just set to 1 here. Alpha is best understood as the step size. A large alpha means that while our model will train quickly, it might also overshoot the target. A small alpha, in comparison, allows gradient descent to tread more carefully and find small valleys it would otherwise shoot over.
The second one is the number of times we want to run the training process, also called the number of epochs we want to run. We can set the parameters with the following code:
alpha = 1
epochs = 20
Since it is used in the training loop, it's also useful to define the number of samples in our data. We'll also define an empty array in order to keep track of the model's losses over time. To achieve this, we simply run the following:
N = y.shape[0]
losses = []
Now we come to the main training loop:
for i in range(epochs):
    # Forward pass
    z = X.dot(W) + b
    A = sigmoid(z)

    # Calculate loss
    loss = bce_loss(y,A)
    print('Epoch:',i,'Loss:',loss)
    losses.append(loss)

    # Calculate derivatives
    dz = (A - y)
    dW = 1/N * np.dot(X.T,dz)
    db = 1/N * np.sum(dz,axis=0,keepdims=True)

    # Parameter updates
    W -= alpha * dW
    b -= alpha * db
As a result of running the previous code, we would get the following output:
out:
Epoch: 0 Loss: 0.822322582088
Epoch: 1 Loss: 0.722897448125
Epoch: 2 Loss: 0.646837651208
Epoch: 3 Loss: 0.584116122241
Epoch: 4 Loss: 0.530908161024
Epoch: 5 Loss: 0.48523717872
Epoch: 6 Loss: 0.445747750118
Epoch: 7 Loss: 0.411391164148
Epoch: 8 Loss: 0.381326093762
Epoch: 9 Loss: 0.354869998127
Epoch: 10 Loss: 0.331466036109
Epoch: 11 Loss: 0.310657702141
Epoch: 12 Loss: 0.292068863232
Epoch: 13 Loss: 0.275387990352
Epoch: 14 Loss: 0.260355695915
Epoch: 15 Loss: 0.246754868981
Epoch: 16 Loss: 0.234402844624
Epoch: 17 Loss: 0.22314516463
Epoch: 18 Loss: 0.21285058467
Epoch: 19 Loss: 0.203407060401
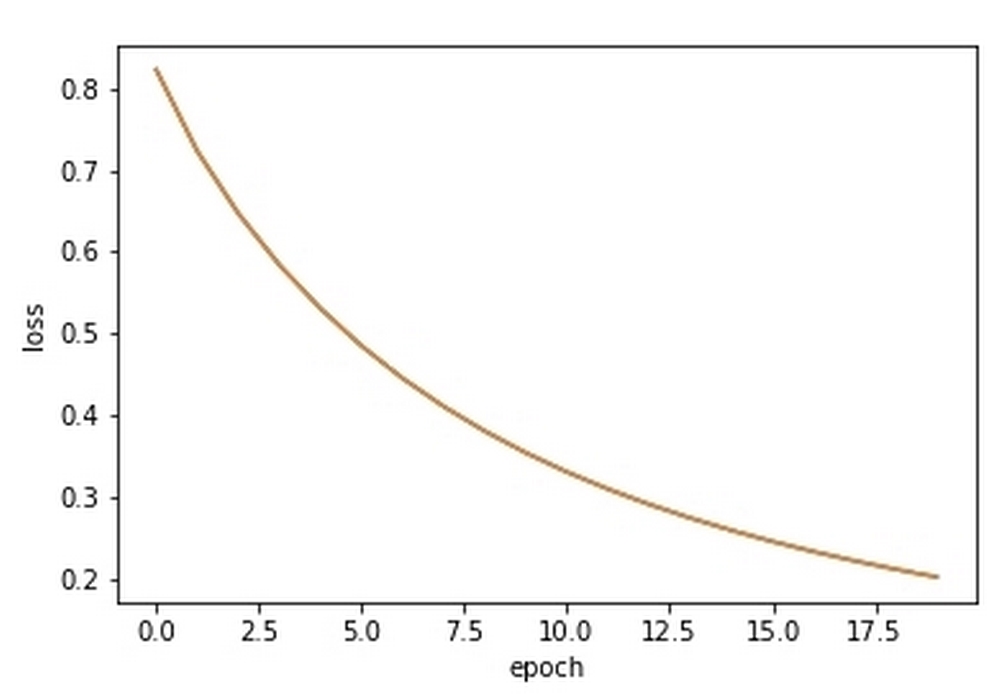
You can see that over the course of the output, the loss steadily decreases, starting at 0.822322582088 and ending at 0.203407060401.
We can plot the loss to a graph in order to give us a better look at it. To do this, we can simply run the following code:
import matplotlib.pyplot as plt
plt.plot(losses)
plt.xlabel('epoch')
plt.ylabel('loss')
plt.show()
This will then output the following chart:

The output of the previous code, showing loss rate improving over time


