
Organizing your work – Keyword Tags
One of the best features in Elements is its ability to sort out hundreds, thousands, or even tens of thousands of images using the tested method of keyword tags.
While viewing a newly imported batch of pictures, select a file by clicking it once and, on the bottom right-hand side of the screen, type in a keyword.
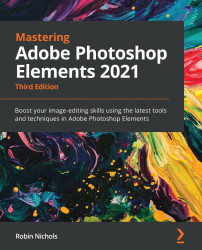
Keyword tagging: You can see that, in the pink highlighted area, I have added the words 'Surfing' and 'Australia'. If I import and add keywords to hundreds of surfing images in the Organizer, all I need to do is click on the Surfing/Australia tags (both highlighted in blue here) to find those images—they can then be placed in an album called Surfing.
I think keywording is one of the most important setup features in this program. Get in the habit of adding a keyword, or keywords, to everything you import into the Organizer and you will be able to search, and find, almost any image weeks, months, and even years later. It's an incredibly efficient and effective system of image retrieval.
Let's say you have got back home after a vacation. Select all the images from the vacation and type the name of the place you visited. If you went to Australia, for example, all images could be keyworded as 'Australia'. But if half that time was spent in the mountains around the town of Katoomba, re-select those images of Katoomba alone and add 'Katoomba' as the keyword. If three days in Australia were spent surfing, select those images only, and add the keyword 'surfing'. This takes only a few minutes and, with a little forethought, you'll quickly be able to keyword all the important events in this album (named Holiday in Australia) so that, months or years later, you can search for Australia, surfing, or cocktails, for example, and Elements will locate those images (almost) instantly.
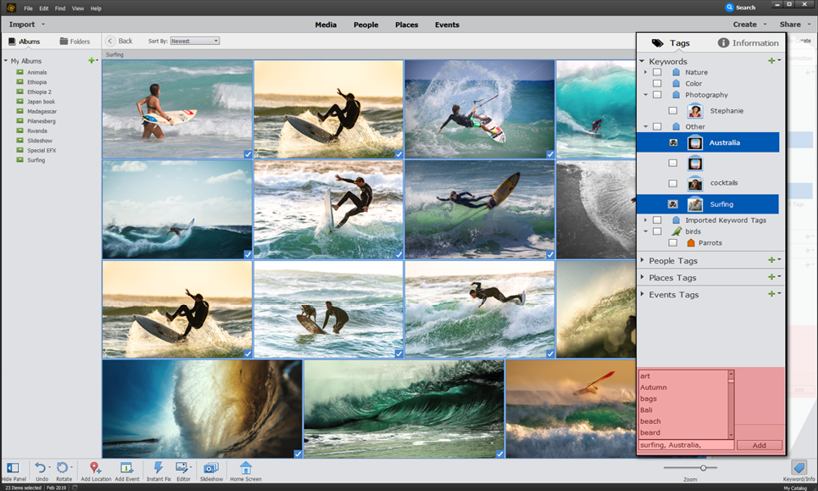
Searching in practice: In the Search field (the blue magnifying glass icon, top right-hand side of the Organizer screen), type in a location and maybe an event using whatever keywords are appropriate (such as Surfing or Australia), and the Organizer will find those images within seconds. It's fast because it only has to sort through its database (which is essentially a text record); not through gigabytes of high-resolution RAW files.

Personalizing Tags: In this screenshot, I right-clicked my Surfing keyword tag in the right-hand bin and chose Edit from the contextual menu. This brings up the Edit Keyword Tag window (above, on the left). You can edit the name of the tag and add comments. Clicking the Edit Icon tab brings up another, larger window, into which you can load a surfing picture to make that group instantly recognizable. It's a cute feature, but it won't really improve your workflow.
Keywording is an easy process, but the real magic only really begins when you try to search for specific images shot on that trip.
Keyword tags are written into the file so that, if I sent a bunch of my (tagged) images to a third party, they would be able to sort them using my attached tags. Elements' tags can be read by a range of other image editing software programs. An album, on the other hand, is a purely Elements-only feature.
If you create a new tag in the right-hand tag bin, you can apply it to any image simply by dragging that tag onto the photo thumbnail. Easy. If you have a hundred images that need the same tag, select all of them first, drag the newly made tag onto any one of the selected thumbnails, and it will automatically apply that tag to all selected images. Very smart!

Tag management: In this screenshot, I have enlarged the pop-out Tags menu to show its various options. There's everything here that you need to fully label everything you bring into Elements. Pay attention to the tagging process and you'll never lose an image again.
Note also that a green + symbol, in the Tags bin, or elsewhere in this application, always points to the ability to create a new feature. In the example here, use it to create a new keyword tag, new category, new sub-category, or to import tags from a file, to save tags to file, or to expand and collapse the tag hierarchy.