
Developing a thesis
When you write a large document such as a thesis, you have two main choices: choose a ready-made template or set up your own document environment. If you have little time and need to start your thesis fast, a template can come to the rescue.
Beware of outdated and questionable templates found somewhere on the internet. Look first at the date and at user opinions, such as in web forums. The age of a template is not a problem in itself, as LaTeX can run it the same way when it’s been written. However, LaTeX developed, and better solutions came up over time. Legacy code may not benefit from it.
Some universities provide their own template. That may be OK because requirements would be met for sure; just check if it can be improved – for example, by replacing obsolete packages with recommended successors.
An excellent source for checking the quality of a template is the guide to obsolete commands and packages in LaTeX2e; people call it l2tabu. You can open the English version by typing texdoc l2tabuen at Command Prompt or at https://texdoc.org/pkg/l2tabuen.
To be clear, the LaTeX base is stable and solid, but there are changes in community-contributed packages.
In the previous recipe, Writing a short text, we took a bottom-up approach and built a document from scratch, adding what we desired. Now, we will go top-down: let’s use and understand a complete template, removing what we don’t need.
As we need to choose a template now, let’s take a real gem. The ClassicThesis package by Prof. André Miede is a thesis template of excellent quality. The design follows the book classic The Elements of Typographic Style by Robert Bringhurst; we will see some particular points later in this recipe. Its implementation is thoughtful and modern. Initially written in 2006, it’s also maintained today and shipped with TeX distributions.
Getting ready
Though the ClassicThesis package may already be installed on your TeX system, named classicthesis.sty, the whole template is an archive of files that should go into your working directory.
Download the ClassicThesis archive from the following Comprehensive TeX Archive Network (CTAN) address: https://ctan.org/pkg/classicthesis.
Instead of fetching single files, choose to download them as a .zip file. Unzip it to where you keep your personal documents in its own directory. This directory will be your thesis directory.
This package provides a ready-made structured filesystem of the main document, style file, settings file, and document parts such as abstract, foreword, and chapters in dedicated files. You can edit all files and fill in your own text.
The ClassicThesis.tex file is the main document. Its filler text is the template’s manual; this allows us to compile it immediately to look at the output design. Also, you can verify that your TeX installation can handle it if you need to install additional packages.
How to do it...
After unzipping, your directory will have this structure:
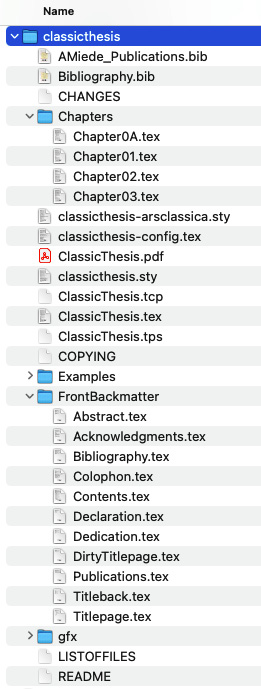
Figure 1.2 – The directory structure of the ClassicThesis template
- Rename or copy the ClassicThesis.tex file and choose your own name, such as MyThesis.tex, but keep it in the same directory.
- Open the main document, MyThesis.tex, and look around to get a feeling of the structure. Compile it for testing at least twice to get correct referencing so that you know that this starting point works.
- You can review and edit the settings in the main file, MyThesis.tex, and in the classicthesis-config.tex configuration file. On the following pages, we will examine that content.
- Open the existing .tex files, such as Abstract.tex and Chapter01.tex, with your editor. Remove the filler text and type in your own text. Add extra chapter files as needed, and include them in the main file, MyThesis.tex, as well. The structure is given; the technical part of the editing is like cloning files and copying lines; all you need to focus on is the actual thesis content now.
Don’t worry if the font or margins don’t please you yet. You can change the layout at any time. Let’s take a closer look now, and then you will know how.
How it works...
We will now look at the functional lines of the main file, MyThesis.tex.
The document preamble starts as follows:
\documentclass[ twoside,openright,titlepage, numbers=noenddot,headinclude, footinclude,cleardoublepage=empty, abstract=on,BCOR=5mm,paper=a4, fontsize=11pt ]{scrreprt}\input{classicthesis-config}
The template is built on the scrreprt KOMA-Script class. KOMA-Script as a LaTeX bundle is described in the first recipe of the current chapter, Writing a short text.
You can change the pre-set options to those you need, such as font size or BCOR binding correction. There are many class options for adjusting the layout. You can read about them in the KOMA-Script manual, such as by running texdoc koma-script at the command line or at https://texdoc.org/pkg/koma-script. In our next recipe, Designing a book, we will discuss some of them in more depth.
Loading of packages and all the remaining settings is done in a single file, classicthesis-config.tex. We will look at it later in this recipe.
The document body starts with the following text:
\begin{document}\frenchspacing\raggedbottom\selectlanguage{american}\pagenumbering{roman}\pagestyle{plain}
The \frenchspacing command means that there’s only a single space following the punctuation after a sentence. LaTeX puts extra space between sentences by default, or if you enter the \nonfrenchspacing command.
The language is set to American English, which is essential for American hyphenation. Actually, you would need the \selectlanguage command only if you need to switch between languages.
We start with Roman page numbers. The plain page style means we have no page headers for now, while page numbers are centered in the page footer.
Then, we see the front matter, which is the part of the document where the formal parts before the actual content go:
\include{FrontBackmatter/DirtyTitlepage}\include{FrontBackmatter/Titlepage}\include{FrontBackmatter/Titleback}\cleardoublepage\include{FrontBackmatter/Dedication}%\cleardoublepage\include{FrontBackmatter/Foreword}\cleardoublepage\include{FrontBackmatter/Abstract}\cleardoublepage\include{FrontBackmatter/Publication}\cleardoublepage\include{FrontBackmatter/Acknowledgments}\cleardoublepage\include{FrontBackmatter/Contents}
Each commonly required part of the front matter has its own file. Just edit the file as needed, comment out using a % sign at the beginning of a line, or remove what you don’t need. The \cleardoublepage command ends a page but also ensures that the next page starts on the right-hand side. This can mean inserting an empty page if necessary – that is, a double-page break. It would not happen if you changed the twoside option to oneside, so you could keep that \cleardoublepage command, which would act like a \clearpage command when the oneside option was set.
Finally, we get the main matter:
\cleardoublepage\pagestyle{scrheadings}\pagenumbering{arabic}\cleardoublepage\part{Some Kind of Manual}\label{pt:manual}\include{Chapters/Chapter01}\cleardoublepage\ctparttext{You can put some informational part preamble text here...}\part{The Showcase}\label{pt:showcase}\include{Chapters/Chapter02}\include{Chapters/Chapter03}
In the main matter, the page style is set to scrheadings, and we use Arabic page numbers. The \pagenumbering command resets the page number to 0.
The thesis is divided into parts. Each one is split into chapters. You can omit the \part lines if your highest sectioning level should be the chapter level.
Each chapter gets its own .tex file in the Chapters subdirectory, so you can easily handle a massive text. Furthermore, you could use the \includeonly command to typeset just selected chapters to speed up writing.
Finally, the main document ends with the back matter:
\appendix\cleardoublepage\part{Appendix}\include{Chapters/Chapter0A}\cleardoublepage\include{FrontBackmatter/Bibliography}\cleardoublepage\include{FrontBackmatter/Declaration}\cleardoublepage\include{FrontBackmatter/Colophon}\end{document}
The \appendix command resets the sectioning counters and changes to alphabetic numbering; the following chapters will be numbered by A, B, and so on. As with the front matter, the appendix parts are divided into several files.
Let’s take a look at the configuration file. Open classicthesis-config.tex. It would take too much space in the book, so let’s just see some sample lines:
\newcommand{\myTitle}{A Classic Thesis Style\xspace}\newcommand{\myName}{Andr\'e Miede\xspace}\newcommand{\myUni}{Put data here\xspace}\newcommand{\myLocation}{Darmstadt\xspace}\newcommand{\myTime}{January 2024\xspace}
Here, you can fill in your own data. Besides being printed on the title page, this data will be used as metadata for the generated PDF document. There are more supported macros at this place, such as \mySubtitle, \myProf, and many more. The \xspace command takes care of proper spacing after such a macro, inserting a space when there’s no punctuation mark following it.
There’s more...
As mentioned, this template contains design decisions inspired by the book The Elements of Typographical Style by Robert Bringhurst. The most notable are as follows:
- It doesn’t use bold fonts – small caps or italics elegantly emphasize what’s important.
- The text body is not very wide, allowing reading comfortably without the eyes jumping too wide from the right back to the left. So, we have wide margins, which can be used for notes.
- The table of contents is not stretched to get right-aligned page numbers. To quote the author: “Is your reader interested in the page number, or does she want to sum the numbers up?” That’s why the page number follows the title.
Explore the classicthesis-config.tex file further to make modifications. As in the previous recipe, we apply document-wide changes within the preamble; this file is the place for doing it.
We will take a look at the selected lines of that configuration file.
Getting a right-justified table of contents
The design is not set in stone; you may adjust a lot. Look at the very beginning of classicthesis-config.tex:
\PassOptionsToPackage{ drafting=true, tocaligned=false, dottedtoc=false, eulerchapternumbers=true, linedheaders=false, floatperchapter=true, eulermath=false, beramono=true, palatino=true, style=classicthesis}{classicthesis}
Here, you can find the options for the actual classicthesis package. For example, if you would like to see the page numbers in the table of contents right aligned, set the dottedtoc option to true. These and further options are documented in the template’s manual available by executing the texdoc classicthesis command or at https://texdoc.org/pkg/classicthesis.
Changing the margins
To fulfill requirements on page margins or implement your layout ideas, you can specify exact page dimensions by loading the geometry package. Here’s an example:
\usepackage[inner=1.5cm,outer=3cm,top=2cm,bottom=2cm, bindingoffset=5mm]{geometry}
Here, you can also provide a value for the space you may lose by the binding and all margins you would like. It’s a good practice to have a visible inner margin set to half the value of the outer one because margins would be added in the middle. For single-sided printing, with oneside options, call the margins left and right.
Place such a line at the end of classicthesis-config.tex so that it will override previously made original settings.
Modifying the layout of captions
In the classicthesis-config.tex file, you can also change the appearance of captions of figures and tables. This is the default setup in that file:
\RequirePackage{caption}\captionsetup{font=small}
Here, the template loads the caption package. The \RequirePackage command is similar to the \usepackage command except that it can be used before the \documentclass command. The caption package provides many features for fine-tuning captions. With this setting, captions have a smaller font than regular text. By adding simple options, you can further adjust the appearance; for example, by adding the option labelfont=it, you would get italic caption labels. Refer to the caption package manual at https://texdoc.org/pkg/caption to learn more.
Note
While the caption package is a general solution working with most classes, including KOMA-Script, the latter now offers extended integrated caption features.
Centering displayed equations
Another option is responsible for the alignment of displayed equations:
\PassOptionsToPackage{fleqn}{amsmath}\usepackage{amsmath}
With ClassicThesis, displayed equations will be left aligned. The fleqn option is switching to this alignment. If you want to restore the default behavior centering the equations, remove that first line that passes the option or comment it out. But keep the second line, which loads the amsmath package, as this is the de facto standard package for typesetting mathematics in LaTeX.
See also
You can find many recipes for content elements in the following chapters for your thesis. Especially for a beautiful thesis, elegant tables are of great value, so you may look at the Designing a legible table recipe in Chapter 4, Creating Tables.
At https://latextemplates.com, you can find a collection of excellent templates, including thesis templates.
Overleaf provides hundreds of thesis templates at https://www.overleaf.com/latex/templates/tagged/thesis, including templates of universities, so check out descriptions and tags for your university’s name.