
Organizing your work – People
Elements' People mode is really all about using face recognition, an algorithm that analyzes images in the background as they are imported into the Organizer for the first time.
If it detects a face in an image, it presents it as a circular thumbnail in the main People window. If it thinks that there are several of the same person in the import, these will be automatically stacked like a deck of cards. You can view the results in the UnNamed panel. Every image will appear with the label Add Name underneath the thumbnail to begin with.
If you recognize the person depicted, click in the Add Name field and type in the name. As soon as you click the check symbol to the right of the field to lock it in, the thumbnail stack disappears.
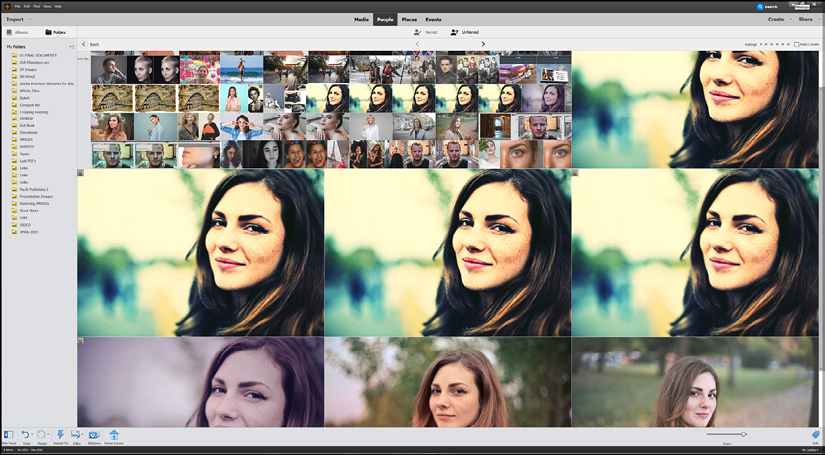
This is the People window—you can let Elements run through your image collection to identify images with people in them automatically. It works really well—but it will also make mistakes, so some curation is usually necessary to get it looking perfect.
Where's it gone? Click into the Named window and there you'll see the newly named stack. Hover the cursor over the stack and you'll see the words Faces or Photos appear. Click Photos to reveal the full image in which the face was detected, or click Faces to reveal just the face or faces in that group.
Elements' People window will find images of your friends—but it also finds every image that looks like a face, including pictures in posters and abstract backgrounds. These can easily be discounted by right-clicking the icon and choosing Don't show Again. As soon as an image gets a proper name, it's automatically moved into the Named tab and stacks with similarly named images. For those of us that prefer to identify our images based on the content, and specifically on the people depicted in the files, you'll find the People feature very handy.
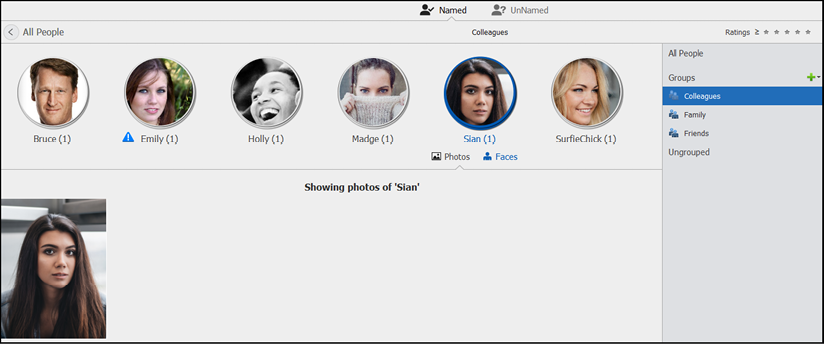
Organizing your people: Like the keywords feature, the People feature, shown in this screenshot, allows you to subdivide your found faces into smaller categories, or groups, as seen on the right-hand side of the screen. Elements starts you off with Colleagues, Family, and Friends but, of course, clicking the green plus (+) symbol allows you to add new group categories when needed.
Like most organizational tools in Elements, you can choose to work simply by adopting just keywords, or maybe the ratings, or you can use a combination of everything covered in this section to create a sophisticated and deep searchable database. The best advice is to make up your mind regarding which way is best for you before you start; that way, you can streamline your workload from day one rather than having to go back over everything that's been imported into the Organizer because you changed your mind about how to organize your images.
Pre-planning will save you a lot of time and effort.
Tips:
You can merge one stack into another simply by click-dragging one file over another. You can further refine the sort process by adding stacks to groups—such as Family. Click the Groups tab on the bottom right-hand side of the main window, and either use one of the default groups, or make a new one by clicking the green + symbol. As with most Elements features, there's no limit to the number of groups you can have.
If you discover an 'inappropriate' face in the stack, and right-click the Faces icon, and choose Not..., or just rename it, it places it out of that stack into its own, new stack. You can also use this pop-out menu to assign that image as a profile photo (this is the default top of the stack). Finally, there's the Don't Show Again command, which hides that image from ever appearing in the people view again.