
Getting up and running on ChromeOS
ChromeOS is the native OS of Chromebox desktops and Chromebook laptops. This means that out of the box you have access to the OS. Much like its mobile device counterpart, Google’s Android OS, ChromeOS requires the creation of or the use of an existing Google Account in order to access the full functionality of the system.
The first time you power on the system, you will be greeted with the Who’s using this Chromebook? screen, as seen in the following figure:
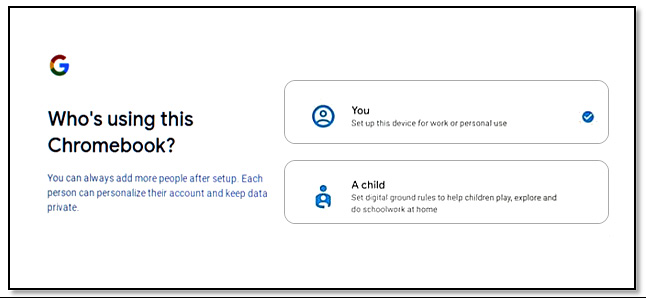
Figure 1.1 – The Who’s using this Chromebook? setup screen
The primary options on this screen provide you with links to set up your personal user account or to set up a restricted account for a child. However, hidden below these options, you’ll find links that will allow you to browse as a guest or perform enterprise enrollment of your device. Browsing as a guest allows you to bypass entering your Google account information by providing you with a limited computing environment. This is ideal for someone who just needs to use the internet on a Chrome device that doesn’t belong to them. Enterprise enrollment is a feature used by organizations that want to have centralized management over multiple devices running ChromeOS. We will discuss enterprise enrollment in more depth in Chapter 9, Google Workspace Admin Console.
Assuming you will be the primary user of the Chrome device, perform the following steps to set up your account:
- On the Who’s using this Chromebook? Screen, select the You button, then press Next.
- You’ll be presented with a Sign into your Chromebook screen. At this point, you will choose to do one of the following options:
- Enter the email address or phone number of your existing Google Account.
- Select the More Options link, which will allow you to create a new account or perform enterprise enrollment. Let’s choose to create a new account.
- On the Create a Google Account screen, enter your first name and last name and press Next.
- You are then prompted to enter some basic information, including your birthday and gender. Enter the required information and press Next.
- On the Choose your Gmail address screen, you will be given several suggestions for potential Gmail addresses. You can either choose one of these addresses for your account or create your own unique email address. After you have chosen or created an email address for your account, press Next.
- Now you’ll be prompted to create a password. In order to ensure that your password isn’t easily guessed, be sure to implement password complexity by using a mixture of upper and lower-case letters, numbers, and special symbols. Once you have a strong password in place, press Next.
- (Optional) You can include a phone number on the Add phone number? screen. Adding a phone number provides you with the following benefits:
- Password recovery if you forget your ChromeOS login
- The ability to receive video calls and messages
- Connectivity to other Google services
- On the Review your account info screen, you have one final chance to verify your Google account’s email address and username. If these settings are correct, then you can click Next.
- Google’s Privacy and Terms policy is then shown. Once you’ve read and agreed to it, you can click the I agree button.
- (Optional) The Sync your Chromebook/Chromebox screen gives the opportunity to sync ChromeOS with your Chrome browser settings from other devices. You can select Accept and continue to perform the sync:
Note
You can bypass this section by selecting the Review sync options following setup checkbox option.
- (Optional) By pressing the More button on the Google Play apps and services screen, you’ll be provided with the terms and conditions for using the Google Play store on your ChromeOS device. This feature will be discussed in more detail in Chapter 3, Exploring Google Apps. You will also have the option to enable the Back up to Google Drive feature, which we’ll dive into in Chapter 5, Recovering from Disasters. Once you’ve viewed the terms and made your selection on backups, click the Accept button to continue.
Note
You can bypass this section by selecting the Review Google Play options following setup checkbox option.
- (Optional) On the Your Google Assistant is ready to help screen, you get the option of enabling Google Assistant to help you with managing ChromeOS and its apps via voice commands. Select the No thanks button to leave this option disabled or the I agree button to activate it:
We will discuss Google Assistant in more detail later in this chapter
- Finally, you’ll arrive at the You are all set! screen. Here you’ll have the option of signing up to receive email communications from Google. Once you’ve made that choice, you can click the Get started button to fully log in to the system and view your ChromeOS desktop.
Now that we have the initial setup on our ChromeOS device taken care of, let’s look at how we can personalize the OS to make it our own.