Book Image

Learn Unity ML-Agents ??? Fundamentals of Unity Machine Learning

Book Image

Learn Unity ML-Agents ??? Fundamentals of Unity Machine Learning

Overview of this book

Unity Machine Learning agents allow researchers and developers to create games and simulations using the Unity Editor, which serves as an environment where intelligent agents can be trained with machine learning methods through a simple-to-use Python API. This book takes you from the basics of Reinforcement and Q Learning to building Deep Recurrent Q-Network agents that cooperate or compete in a multi-agent ecosystem. You will start with the basics of Reinforcement Learning and how to apply it to problems. Then you will learn how to build self-learning advanced neural networks with Python and Keras/TensorFlow. From there you move o n to more advanced training scenarios where you will learn further innovative ways to train your network with A3C, imitation, and curriculum learning models. By the end of the book, you will have learned how to build more complex environments by building a cooperative and competitive multi-agent ecosystem.
Table of Contents (8 chapters)

Academy, Agent, and Brain

In order to demonstrate the concepts of each of the main components (Academy, Agent, and Brain/Decision), we will construct a simple example based on the classic multi-armed bandit problem. The bandit problem is so named because of its similarity to the slot machine that is colloquially known in Vegas as the one armed bandit. It is named as such because the machines are notorious for taking the poor tourist's money who play them. While a traditional slot machine has only one arm, our example will feature four arms or actions a player can take, with each action providing the player with a given reward. Open up Unity to the Simple project we started in the last section:

  1. From the menu, select GameObject | 3D Object | Cube and rename the new object Bandit.
  2. Click the Gear icon beside the Transform component and select Reset from the context menu. This will reset our object to (0,0,0), which works well since it is the center of our scene.
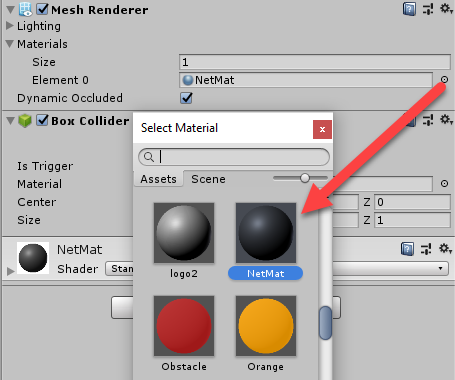
  3. Expand the Materials section on the Mesh Renderer component and click the Target icon. Select the NetMat material, as shown in the following screenshot:
Selecting the NetMat material for the Bandit
  1. Open the Assets/Simple/Scripts folder in the Project window.
  2. Right-click (Command Click on macOS) in a blank area of the window and from the Context menu, select Create | C# Script. Name the script Bandit and replace the code with the following:
      public class Bandit : MonoBehaviour
{
public Material Gold;
public Material Silver;
public Material Bronze;
private MeshRenderer mesh;
private Material reset;

// Use this for initialization
void Start () {
mesh = GetComponent<MeshRenderer>();
reset = mesh.material;
}

public int PullArm(int arm)
{
var reward = 0;
switch (arm)
{
case 1:
mesh.material = Gold;
reward = 3;
break;
case 2:
mesh.material = Bronze;
reward = 1;
break;
case 3:
mesh.material = Bronze;
reward = 1;
break;
case 4:
mesh.material = Silver;
reward = 2;
break;
}
return reward;
}

public void Reset()
{
mesh.material = reset;
}
}
  1. This code just simply implements our four armed bandit. The first part declares the class as Bandit extended from MonoBehaviour. All GameObjects in Unity are extended from MonoBehaviour. Next, we define some public properties that define the material we will use to display the reward value back to us. Then, we have a couple of private fields that are placeholders for the MeshRenderer called mesh and the original Material we call reset.
    We will implement the Start method next, which is a default Unity method that runs when the object starts up. This is where we will set our two private fields based on the object's MeshRenderer. Next comes the PullArm method which is just a simple switch statement that sets the appropriate material and reward. Finally, we will finish up with the Reset method where we just reset the original property.
  2. When you are done entering the code, be sure to save the file and return to Unity.
  3. Drag and drop the Bandit script from the Assets/Simple/Scripts folder in the Project window and drop it on the Bandit object in the Hierarchy window. This will add the Bandit component to the object.
  4. Select the Bandit object in the Hierarchy window and then in the Inspector window click the Target icon and select each of the material slots (Gold, Silver, Bronze), as shown in the following screenshot:
Setting the Gold, Silver and Bronze materials on the Bandit

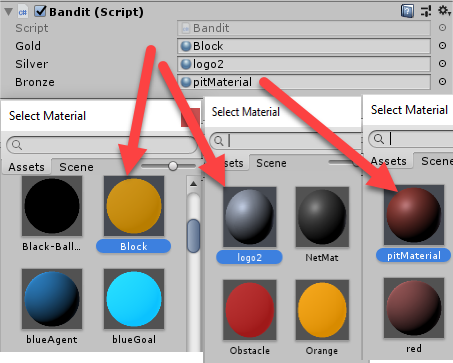
This will set up our Bandit object as a visual placeholder. You could, of course, add the arms and make it look more visually like a multi-armed slot machine, but for our purposes, the current object will work fine. Remember that our Bandit has 4 arms, each with a different reward.

Setting up the Academy

An Academy object and component represents the training environment where we define the training configuration for our agents. You can think of an Academy as the school or classroom in which our agents will be trained. Open up the Unity editor and select the Academy object in the Hierarchy window. Then, follow these steps to configure the Academy component:

  1. Set the properties for the Academy component, as shown in the following screenshot:
Setting the properties on the Academy component of the Academy object
  1. The following is a quick summary of the initial Academy properties we will cover:
    • Max Steps: This limits the number of actions your Academy will let each Agent execute before resetting itself. In our current example, we can leave this at 0, because we are only doing a single step. By setting it to zero, our agent will continue forever until Done is called.
    • Training Configuration: In any ML problem, we often break the problem into a training and test set. This allows us to build an ML or agent model on a training environment or dataset. Then, we can take the trained ML and exercise it on a real dataset using inference. The Training configuration section is where we will configure the environment for training.
    • Infrerence Configuration: Inference is where we infer or exercise our model against a previously unseen environment or dataset. This configuration area is where we set parameters when our ML is running in this type of environment.

The Academy setup is quite straightforward for this simple example. We will get to the more complex options in later chapters, but do feel free to expand the options and look at the properties.

Setting up the Agent

Agents represents the actors that we are training to learn to perform some task or set of task-based commands on some reward. We will cover more about actors, actions, state, and rewards when we talk more about Reinforcement Learning in Chapter 2, The Bandit and Reinforcement Learning. For now, all we need to do is set the Brain the agent will be using. Open up the editor and follow these steps:

  1. Locate the Agent object in the Hierarchy window and select it.
  1. Click the Target icon beside the Brain property on the Simple Agent component and select the Brain object in the scene, as shown in the following screenshot:
Setting the Agent Brain
  1. Click the Target icon on the Simple Agent component and from the context menu select Edit Script. The agent script is what we use to observe the environment and collect observations. In our current example, we always assume that there is no previous observation.
  2. Enter the highlighted code in the CollectObservations method as follows:
      public override void CollectObservations()
{
AddVectorObs(0);
}
  1. CollectObservations is the method called to set what the Agent observes about the environment. This method will be called on every agent step or action. We use AddVectorObs to add a single float value of 0 to the agent's observation collection. At this point, we are not currently using any observations and will assume our bandit provides no visual clues as to what arm to pull.
    The agent will also need to evaluate the rewards and when they are collected. We will need to add four slots, one for each arm to our agent, in order to represent the reward when that arm is pulled.
  2. Enter the following code in the SimpleAgent class:
      public Bandit bandit;
public override void AgentAction(float[] vectorAction,
string textAction)
{
var action = (int)vectorAction[0];
AddReward(bandit.PullArm(action));
Done();
}

public override void AgentReset()
{
bandit.Reset();
}
  1. The code in our AgentStep method just takes the current action and applies that to the Bandit with the PullArm method, passing in the arm to pull. The reward returned from the bandit is added using AddReward. After that, we implement some code in the AgentReset method. This code just resets the Bandit back to its starting state. AgentReset is called when the agent is done, complete, or runs out of steps. Notice how we call the method Done after each step; this is because our bandit is only a single state or action.
  2. Add the following code just below the last section:
      public Academy academy;
public float timeBetweenDecisionsAtInference;
private float timeSinceDecision;

public void FixedUpdate()
{
WaitTimeInference();
}

private void WaitTimeInference()
{
if (!academy.GetIsInference())
{
RequestDecision();
}
else
{
if (timeSinceDecision >= timeBetweenDecisionsAtInference)
{
timeSinceDecision = 0f;
RequestDecision();
}
else
{
timeSinceDecision += Time.fixedDeltaTime;
}
}
}
  1. We need to add the preceding code in order for our brain to wait long enough for it to accept Player decisions. Our first example that we will build will use player input. Don't worry too much about this code, as we only need it to allow for player input. When we develop our Agent Brains, we won't need to put a delay in.
  2. Save the script when you are done editing.
  3. Return to the editor and set the properties on the Simple Agent, as shown in the following screenshot:
Setting the Simple Agent properties

We are almost done. The agent is now able to interpret our actions and execute them on the Bandit. Actions are sent to the agent from the Brain. The Brain is responsible for making decisions and we will cover its setup in the next section.

Setting up the Brain

We have seen the basics of how a Brain functions when we looked at the earlier Unity example. There are a number of different types of brains from Player, Heuristic, Internal, and External. For our simple example, we are going to set up a Player brain. Follow these steps to configure the Brain object to accept input from the player:

  1. Locate the Brain object in the Hierarchy window; it is a child of the Academy.
  2. Select the Brain object and set the Player inputs, as shown in the following screenshot:
Setting the Player inputs on the Brain
  1. Save your scene and project.
  2. Press Play to run the scene. Type any of the keys A, S, D, or F to pull each of the arms from 1 to 4. As you pull the arm, the Bandit will change color based on the reward. This is a very simple game and a human pulling the right arm each time should be a fairly simple exercise.

Now, we have a simple Player brain that lets us test our simple four armed bandit. We could take this a step further and implement a Heuristic brain, but we will leave that as an exercise to the reader. For now though, until we get to the next chapter, you should have enough to run with to get comfortable with some of the basic concepts of ML-Agents.

Exercises

Complete these exercises on your own for additional learning:

  1. Change the materials the agent uses to signal a reward – bonus points if you create a new material.
  2. Add an additional arm to the Bandit.
  3. In our earlier cannon example, we used a Linear Regression ML algorithm to predict the velocity needed for a specific distance. As we saw, our cannon problem could be better fit with another algorithm. Can you pick a better method to do this regression?
Access to Excel can make this fairly simple.
  1. Implement a SimpleDecision script that uses a Heuristic algorithm to always pick the best solution.
You can look at the 3DBall example we looked at earlier. You will need to add the SimpleDecision script to the Brain in order to set a Heuristics brain.