
There are four main types of Blueprint, each one has a specific purpose and is useful in a specific situation. We will learn how to choose the correct one while studying the examples of this guide; however, in the meantime, let's take a look at them in order to understand their differences.
A Level Blueprint is a specialized type of Blueprint that, as the name suggests, acts as a level-wide event graph. A level Blueprint is created by default for each of your levels and can be edited only in the Level Blueprint Editor. This is the only type that cannot be created and there is only one Level Blueprint for each level.
In this Blueprint file we handle the level flow: we can control events, Matinee, and sequences of actions in the form of Function Calls or Flow Control operations.
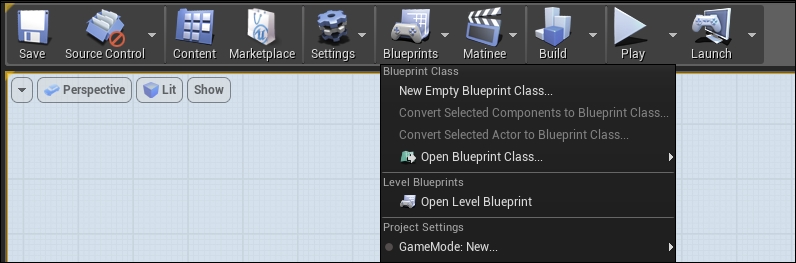
To open the Level Blueprint for the purpose of editing, click on the Blueprints button in the Level Editor toolbar and select Open Level Blueprint, as follows:
A Blueprint class, simply called Blueprint, is the most used type and you will become familiar with it during this guide. This type allows the content creator to easily add functionality on top of any existing gameplay classes. A Blueprint class extends a parent (either a code parent or another Blueprint class) and can be edited with a visual editor. Any Blueprint class that is created in the editor can be found in Content Browser and can be added to the map as an instance, like any other type of Actor.
The following are the most common Parent Classes that are used when creating a new Blueprint:
Actor: It is an object that can be placed or spawned in the world
Pawn: It is an Actor that can be possessed and it receives input from a Controller (which can be a user or an Artificial Intelligence)
Character: It is a Pawn that includes the ability to walk, run, jump, and so on
PlayerController: It is an Actor that is responsible for controlling a Pawn
Game Mode: It defines the game rules, scores, and any aspect of a game type
Data-only Blueprints are basically Blueprint classes without the node graph. They contain all the properties and components that are inherited from its parent and allow the user to tweak properties or set items with variations without needing to find these properties in a big node graph.
A data-only Blueprint doesn't allow you to add new elements; however, it can be converted in a Blueprint class with just one click, if required:

A Blueprint Interface is similar to an interface in general programming. It allows different types of object to share a common information setup. It is a collection of one or more functions (declarations only, no implementations) that can be added to other Blueprints. A Blueprint Interface needs to be added to a Blueprint class in order to work, and a Blueprint class that has implemented an interface can have and use all of its functions.
A Blueprint Interface can be made in the editor; however, it has limitations as it cannot do the following:
Add new variables
Edit graphs
Add components
A good example to understand an interface is that a player, a tree, and a concrete wall are three completely different objects but all of them can receive a projectile shot by a weapon. Instead of creating a different function for all of them, an interface can help us by creating a function called onReceiveDamage that is shared (however, implemented differently) by all of them.