

There are plenty of references available via online blog posts or other books that can walk you through every nuance in the development environment setup and so we will not go into in-depth detail here.
We will start by discussing the core dependencies that you will need in order to use LibGDX effectively. For clarity, we will only be concerned about the desktop platform, specifically targeted for Windows. The steps are as follows:
First, you will need to install the latest Java Development Kit (JDK), which includes tools for developing, debugging, and monitoring Java applications. At the time of this writing, I am using the minimum supported version of Java that works with LibGDX (version 1.5.5), which is JDK version 1.7. You can get the latest installer from Oracle's website at http://www.oracle.com/technetwork/java/javase/downloads/index.html.
After installing the JDK, you can make sure that the environment variable,
JAVA_HOME, is set by opening a Command Prompt window and typing the following in the command line:java –version
If everything is set correctly, you should see something like the following output:
java version "1.7.0_45"
Java(TM) SE Runtime Environment (build 1.7.0_45-b18)
Java HotSpot(TM) Client VM (build 24.45-b08, mixed mode, sharing)
Second, we will need to install and set up an integrated development environment (IDE) in order to develop with LibGDX. Out of the box, LibGDX generates the startup projects for the following IDEs:
IntelliJ IDEA: The community edition is free and can be found at http://www.jetbrains.com/idea/download/. I am using IDEA while writing this book and I am finding that it easily meets my requirements during the development of the BludBourne project.
Eclipse: This is a well-known, free, and actively maintained open source IDE. Eclipse can be found at http://www.eclipse.org/downloads/.
NetBeans: This is another free and actively maintained open source IDE. NetBeans can be found at http://netbeans.org/downloads/index.html.
Third, we will need to download and run the gdx-setup tool, which with a little configuration will generate our project files, platform-specific wrapper class, and our starter classes. You can download the
gdx-setup.jarfile by visiting http://libgdx.badlogicgames.com/download.html and then clicking on the Download Setup App option. Just as a side note, you may get a warning from your browser that the file is unsafe because this is a JAR file, but this is the correct file that is integrated with the new build system (which will be explained in the next section) for LibGDX.
Luckily, LibGDX has a relatively straightforward method for generating the startup classes that you will need so that you can get started. For every game that you create, you will use a tool for LibGDX (gdx-setup) that generates boilerplate code for each of the platform targets that you select, which wrap the main entry point for the game. These classes represent the only platform-specific code that will be created for a LibGDX-based game and interface with the backend modules mentioned earlier in the figure illustrating the core interfaces of LibGDX (Figure 4). For the purposes of this book, we will be focused primarily on the desktop, so we will only be concerned with generating one project targeted for Desktop:
In a Command Prompt window, navigate to where you downloaded the gdx-setup.jar file and run the following command:
java –jar gdx-setup.jar
You should see following UI (Figure 8) when you launch the gdx-setup tool:
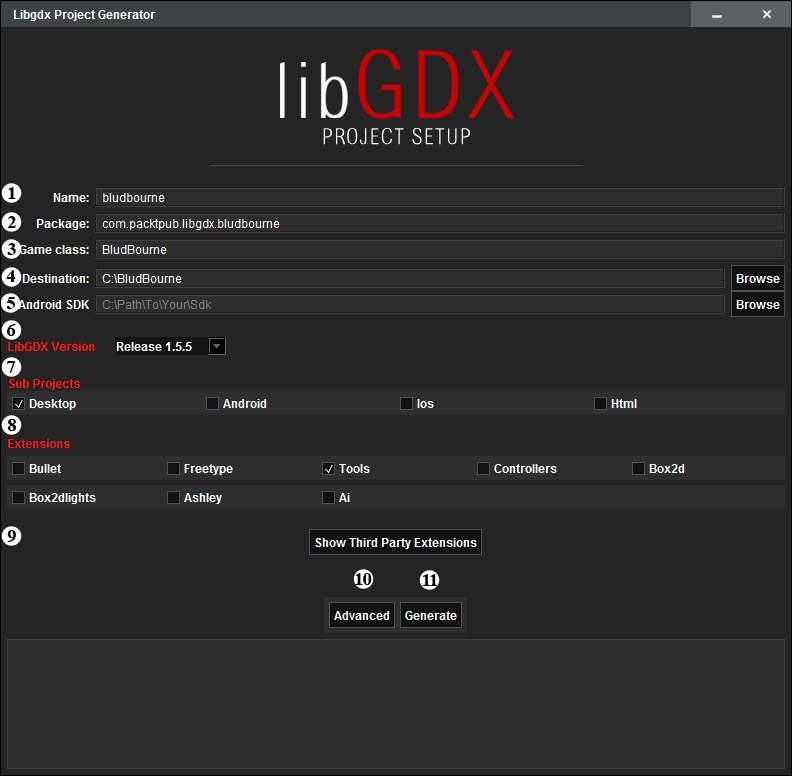
Figure 8
The different settings for your LibGDX project setup are labeled for your convenience as follows:
Name (1): This is typically used for the customer facing name you wish to present for your game. The standard convention is lower case with hyphens representing spaces (for example,
bludbourne-game). This value is not really used by the build system for a desktop deployment target because the desktop target is a self-executable JAR file (or a runnable JAR file) and not a package. This value is used primarily for the mobile platforms, such as Android (substitutes for theapp_namevariable in theAndroidManifest.xmlfile) and iOS (substitutes for theapp.namevariable in theInfo.plist.xmlfile).Package (2): This will define the Java-based package name for your game. The naming convention is described in detail at http://docs.oracle.com/javase/tutorial/java/package/namingpkgs.html.
Generally, the package names start with a reversed Internet domain name and are written as all lower case to avoid conflict with class names (for example,
com.packtpub.libgdx.bludbourne).Game class (3): This is the name of your main class that will implement the
ApplicationListenerinterface that will hook into the LibGDX game lifecycle. This class name should also follow Java conventions, including being a noun and mixed case with the first letter of each internal word capitalized (for example,BludBourneGame).Destination (4): This will be the root directory (relative or absolute path) that the gdx-setup tool will output the generated project into (for example,
C:\BludBourne_Project).Android SDK (5): This will be the directory path where the Android SDK lives on your local system (for example,
C:\Program Files (x86)\Android\android-sdk). If the environment variableANDROID_HOMEis set, then its value will be used to populate this field. We should not be concerned with this property at this time. We will not be targeting Android with our project, so when you uncheck the Android dependency in the Sub Projects option, this box will become greyed out. You can always add this dependency back later though.LibGDX Version (6): At the time of writing this book, this is a hardcoded value that represents the version of LibGDX that the gdx-setup tool was built against. So, in general, if you run this gdx-setup tool with the latest
gdx-setup.jarfile, then you will get the latest release snapshot version of LibGDX. I believe this is a placeholder until a more dynamic method is implemented, which will then populate this drop-down list with more versions.Sub Projects (7): These represent the current deployment targets that LibGDX actively supports with its backend modules. Currently, LibGDX supports Desktop (Windows, Mac OS X, and Linux), Android, iOS, and HTML 5. For the purposes of this book, we only need to have the Desktop option checked.
Extensions (8): These represent third-party support libraries that fall under the LibGDX umbrella, but in general, are not part of the core libraries. These libraries usually are not part of the core because they are either maintained by third parties or have different release schedules. Currently, these extensions are as follows:
Freetype: This generates bitmap fonts on the fly from one TrueType font file
Tools: This is a miscellaneous collection of tools to aid in the development of your game, such as a particle effect editor, a texture packer application, and a bitmap font creator utility
Controllers: This is the gamepad and joystick controller support
Box2DLights: This is a dynamic lighting library for 2D games
For the purposes of this book, we only need to have the Tools option checked as we can always add other support packages later.
Show Third Party Extensions (9): When selected, a table dialog will pop up with a few more third-party libraries that are not part of the LibGDX core. These selections are parsed from an
extensions.xmlfile (found undercom/badlogic/gdx/setup/data). Currently, these extensions are as follows:Advanced (10): The following figure (Figure 9) represents a dialog box that includes a few miscellaneous options for project setup, such as creating IntelliJ IDEA projects, Eclipse projects, or overriding the default dependency repository. For the purposes of this book, we only need to select the IDEA (or Eclipse) project generation option here and click on Save when done:

Figure 9
Generate (11): When all the configuration options are correctly populated, execute the auto-creation process by pressing this button. Your output should look something like the following:
Generating app in C:\BludBourne
Executing 'C:\BludBourne/gradlew.bat clean --no-daemon idea'
To honour the JVM settings for this build a new JVM will be forked. Please consider using the daemon: http://gradle.org/docs/2.2/userguide/gradle_daemon.html.
Configuration on demand is an incubating feature.
:core:clean UP-TO-DATE
:desktop:clean UP-TO-DATE
:ideaModule
:ideaProject
:ideaWorkspace
:idea
:core:ideaModule
:core:idea
:desktop:ideaModule
:desktop:idea

BUILD SUCCESSFUL

Total time: 45.313 secs
Done!
To import in Eclipse: File -> Import -> General -> Exisiting Projects into Workspace
To import to Intellij IDEA: File -> Open -> YourProject.ipr
Tip
Downloading the example code
You can download the example code files for all Packt books you have purchased from your account at http://www.packtpub.com. If you purchased this book elsewhere, you can visit http://www.packtpub.com/support and register to have the files e-mailed directly to you. For the most current version, you can grab the latest snapshot from https://github.com/patrickhoey/BludBourne.