
Once you launch Clip Studio Paint, you will be greeted by the default interface. I have been told many times that new users often get to the default interface and panic. It can be a bit overwhelming at first because there's a lot of palettes and options, but I promise that it's not so scary! With a little bit of exploration, we can break down the default interface and understand what each section is. In the next section, we'll even learn how to customize the interface to suit our own needs. But for now, let's take a look at the default user interface.
The following screenshot shows what you may see when starting up your program for the first time:
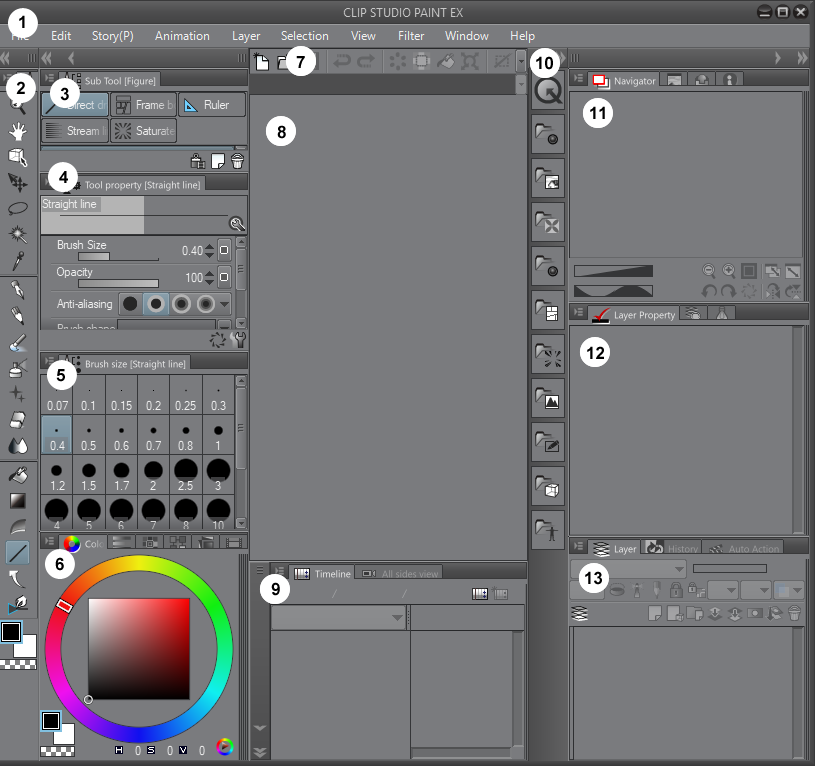
The numbers in the preceding screenshot correlate to the following:
- Menu Bar
- Tool box
- Sub Tool palette
- Tool Property palette
- Brush Size palette
- Color Palette
- Command Bar
- Canvas display
- Timeline palette
- Quick Access/Materials Library
- Navigator/Sub view palette
- Layer Property palette
- Layer/History/Auto action palette
Now, let's break down what each of these parts of the program does.
The Menu Bar is where you will find many of your options, such as creating and saving files, program preferences, viewing preferences, and more.
The Tool Box holds all of the various tools that we'll be using to create our comics and illustrations. In the top of the Tool Box are tools such as the magnifying glass, hand tool, and selection tools. Below those are drawing tools, such as the pencil, pen, brush, decoration, eraser, and blending tools. In the bottom third of the toolbox are tools such as the fill tool, gradient tool, line and ruler tools, text tools, and correct line tools. The final part of the toolbox displays our current foreground and background color selections, as well as a transparent color selection. We'll be discussing all of these tools as we continue through this book, so don't worry if you don't know what all of them do just yet.
The Sub Tool palette contains options for each of the tools in the Tool Box, and it changes depending on which tool we currently have selected.
For example, clicking on the Pencil tool in the toolbox will bring up a variety of different tools in the Sub Tool palette, like what is shown in the following screenshot:
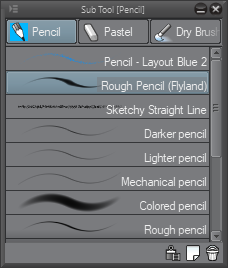
At the top of this palette are the different categories of tools under the Pencil category. Our currently displayed category is shown in blue. In the central area of the palette are the different types of pencil tools. The tools displayed in your Sub Tools may be different than what is shown in the preceding screenshot.
The Tool Property palette displays options for the currently selected tool. Each tool can be customized to meet our individual needs, but let's look at the default properties for the Darker pencil, as shown in the following screenshot:
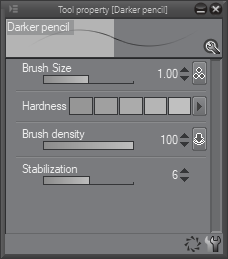
We will explore this palette in detail in Chapter 4, Pencilling: Layer Properties.
The Brush Size palette allows us to quickly change the size of our brush by selecting one of the preset brush sizes from the icons shown.
The Color Palette offers us several options for choosing and mixing colors, all of which we'll explore later on in Chapter 16, Color Palettes.
The Command Bar is a powerhouse in Clip Studio Paint, even though it doesn't look like much. This little piece of the interface gives us quick access to frequently used functions, such as creating a new file, saving, undoing, and even exporting files. The best thing is that it's completely customizable, too! We'll learn how to customize the Command Bar in Chapter 2, Preferences, Shortcuts, and Other Commands.
When there is a drawing or file currently open in Clip Studio Paint, it will be displayed in the Canvas display in the center of the program.
The Timeline palette is used when making animations in Clip Studio Paint. It also contains a tab called All Sides View, which is used when working with 3D model elements.
The Quick Access and Material Library has a lot going on, but it's an extremely useful part of the Clip Studio Paint software. The Quick Access window gives us access to more frequently used actions, much like the Command Bar. Quick Access can also be customized, but unlike the Command Bar, it has two sets inside of it. This allows for more flexibility, as Set 1 could be used for functions such as save and undo, while Set 2 could be set up with the most used tools or other commands to make tasks like coloring easier. We'll explore Quick Access more in Chapter 2, Preferences, Shortcuts, and Other Commands.
This part of the software also contains the Materials Library. Materials can be everything from comic frame templates to word balloons to photographs, to special brush designs, to 3D models. There's a huge variety of items contained in the Materials Library. We'll learn more about 3D models in Chapter 7, Using 3D Figures and Objects, and more about the Materials Library in Chapter 8, Vector Layers and the Material Palette.
The Navigator palette contains several tabs inside of it, each with a different function. The Navigator shows the currently active file, along with a red rectangle that outlines the currently viewed section of the canvas. This is useful when working zoomed in on a page or illustration. Also in this palette is the Sub View palette, which can be used to display reference images and more. We'll discuss more about the Sub View in Chapter 5, Erasers, Selections, and the Subview Palette. The Item Bank tab displays any 3D objects that are currently being used in the open file. Finally, in this palette, we have the Information tab, which shows the percentage of system and application resources currently being used and also the X and Y coordinates of the current position of the cursor.
Beneath the Navigator palette is the Layer Property palette, which also has a few tabs inside of it. The Layer Property tab gives us the options available for the currently active layer. We'll be discussing layers and layer properties in more detail in Chapter 4, Pencilling – Layer Properties and the Brush Properties. Also in this palette is the Search Layer, which allows us to filter out layers and find layers easily depending on certain parameters. This is a very handy tool for files with lots of layers. Finally, in this palette is the Animation Cels tab. When making animations, this tab will display our animation cels.
The final part of our interface is the Layers palette, which also has several tabs in it. The first tab is the Layers tab, which shows all the layers in our currently active file. We also have the History tab, which allows us to see a list of actions performed on the currently active file and step backwards in time to easily undo unwanted changes to the file. Finally, we have the Auto action tab. Auto actions are recorded sets of processes that can then be carried out by the press of one button. We'll discuss Auto actions in detail in Chapter 13, Auto Actions and Your Workflow.
Now that we have a better grasp of the default parts of the interface, we can learn how to move elements of the program around and customize it to suit our needs. Read on to learn more!