

This section will explain the basic functions of the WebGL API. We will first understand buffer objects. A WebGL application has two sections: JavaScript control code and shader functions. We will explain the WebGL API functions used in the control code as well as cover the code of a simple shader.
To render WebGL 3D content, we need an HTML canvas element. The following HTML code establishes a canvas object that will be used to render 3D content:
<canvas id="squareWithDrawArrays" style="border: none;" width="500" height="500"></canvas>
The first thing we do here is obtain a reference to the canvas. We store it in a variable called canvas. We pass the canvas object to our function initGL. This function sets up the WebGL context:
var canvas = document.getElementById("squareWithDrawArrays");
initGL(canvas)
In the initGL function, we obtain a WebGL context for a canvas by requesting the context named webgl from the canvas. If this fails, we try the names experimental-webgl, webkit-3d, and moz-webgl. If all the names fail, we display an alert to let the user know that the browser does not have WebGL support. We try different names because different browsers use different names for their WebGL implementation. This is shown in the following code:
functioninitGL(canvas) {

  var names = ["webgl", "experimental-webgl", "webkit-3d", "moz-webgl"];

  for (var i = 0; i<names.length; ++i) {
    try {
      gl = canvas.getContext(names[i]);
    }
    catch (e) { }
    if (gl) {
      break;
    }
  }
  if (gl == null) {
    alert("Could not initialise WebGL");
    return null;
  }
  gl.viewportWidth = canvas.width;
  gl.viewportHeight = canvas.height;
}A vertex buffer object (VBO) provides methods for uploading vertex attributes (position, color, depth) directly to the video device for rendering. VBOs offer substantial performance gains because the data resides in the video device memory rather than the system memory, so it can be rendered directly by the video device. Buffer objects can be created using the
createBuffer() function:
vertexBuffer = gl.createBuffer();
This only creates the object's name and the reference to the object. To actually create the object itself, you must bind it to the context.
The bindBuffer() function is invoked to tell on which of the buffer objects the subsequent functions will operate on. This function is called as follows:
gl.bindBuffer(gl.ARRAY_BUFFER, vertexBuffer);
The target hint can be ARRAY_BUFFER (vertex buffers).
There are many allocated buffer objects. We need to specify which buffer object we want to apply the next set of operations on. The bindBuffer() function is used to make a particular buffer object the current array buffer object or the current element array buffer object so that the subsequent operations are applied on that buffer object. The first time the buffer object's name is bound by calling the bindBuffer() function, the buffer object is allocated with the appropriate default state, and if the allocation is successful, this allocated object is bound as the current array buffer object or the current element array buffer object for the rendering context.
However, the actual memory is only allocated when we invoke the gl.bufferData() API call:
gl.bufferData(gl.ARRAY_BUFFER, new Float32Array(vertices), gl.STATIC_DRAW);
The third parameter in the bufferData API call specifies how to use the buffer object. The following table explains the different enum values and their usages. In our book, we will use the gl.STATIC_DRAW value, but in cases where you might need to animate individual vertices, you will use the gl.DYNAMIC_DRAW value:
Note
The gl.bufferData() API call does not take reference of the buffer object as a parameter. We do not pass the object reference because operations are performed on the current array buffer object or the current element array buffer object.
We can unbind buffer objects using a
bindBuffer() function call by specifying null as the buffer object parameter:
vertices = [
             3.0,  3.0,  0.0, //Vertex 0
            -3.0,  3.0,  0.0, //Vertex 1
             3.0, -3.0,  0.0, //Vertex 2
            -3.0, -3.0,  0.0  //Vertex 3
];
gl.bindBuffer(gl.ARRAY_BUFFER, null);// Deactivate the current buffer
vertexBuffer = gl.createBuffer();//Create  a reference to the buffer object
gl.bindBuffer(gl.ARRAY_BUFFER, vertexBuffer);//Make the buffer the current active buffer for memory allocation(Subsequent command)
gl.bufferData(gl.ARRAY_BUFFER, new Float32Array(vertices), gl.STATIC_DRAW);//Allocate memory for the buffer object.Similar to vertex buffer objects, we have index buffer objects to store the indices in the GPU memory. The following code creates a vertex array and an index array. It then creates the corresponding vertex buffer object and index buffer objects:
vertices = [
             3.0,  3.0,  0.0, //Vertex 0
            -3.0,  3.0,  0.0, //Vertex 1
             3.0, -3.0,  0.0, //Vertex 2
            -3.0, -3.0,  0.0  //Vertex 3
];
indices = [0,2,3,0,3,1];
indexBuffer = gl.createBuffer();// Create a reference to the buffer
gl.bindBuffer(gl.ELEMENT_ARRAY_BUFFER, indexBuffer);// make the Index buffer the active buffer notice gl.ELEMENT_ARRAY_BUFFER for index buffers.
gl.bufferData(gl.ELEMENT_ARRAY_BUFFER, new Uint16Array(indices), gl.STATIC_DRAW);// Alocate memory for the index buffer
gl.bindBuffer(gl.ELEMENT_ARRAY_BUFFER, null);A WebGL program is divided in two components; the control code and the shader program. The control code is executed in the system's CPU while the shader code is executed in the system's GPU. Since the control code binds data to the GPU's memory, it is available for processing in the shader.
The vertex shader is a programmable unit that operates on incoming vertex values and their associated data (normal, color, and so on). The vertex processor usually performs graphic operations such as the following:
Vertex transformation
Normal transformation and normalization
Texture coordinate generation
Texture coordinate transformation
Lighting
Color material application
The following code is the most basic vertex shader code. In this example, we have provided two inputs to the shader from the control code:
Attributes: Per-vertex data supplied using vertex arrays
Uniforms: Constant data used by the vertex shader
The aVertexPosition attribute holds the vertex position and the mvMatrix and pMatrix uniforms hold the ModelView and the projection matrices respectively, as shown in the following code snippet:
<scriptid="shader-vs" type="x-shader/x-vertex">
  attribute vec3 aVertexPosition;

  uniform mat4 mvMatrix;
  uniform mat4 pMatrix;

  void main(void) {
    gl_Position = pMatrix * mvMatrix * vec4(aVertexPosition, 1.0);
  }
</script>
In the preceding code, we first applied a ModelView transformation on a single vector/vertex. We then applied the projection transformation and set the result to the varying gl_Position vector. The varying gl_Position variable is declared automatically. The gl_Position variable contains the transformed vertex of the object. It is called the per-vertex operation, since this code is executed for each vertex in the scene. We will discuss shortly how we pass the vertex position (attribute) and transformation matrix (uniform) to the vertex shader from the control code.
After the vertex shader has worked on vertex attributes (such as position), the next phase is the primitive assembly stage. In the primitive assembly stage, primitive objects such as lines and triangles are clipped and culled. If a primitive object lies partly outside the view frustum (the 3D region that is visible on the screen), then it is clipped; if it lies completely outside, then it is culled. The next phase is rasterization. In this phase, all primitives are converted to two-dimensional fragments, also called pixels. These fragments are then processed by the fragment shader.
A fragment shader performs the following functions:
Operations on interpolated values
Texture access
Texture application
Fog
Color sum
The following listed code is the most basic fragment shader. In this code, we simply apply a constant color value to each fragment of our scene:
<scriptid="shader-fs" type="x-shader/x-fragment">
  precisionmediump float;

  void main(void) {
    gl_FragColor = vec4(1.0, 1.0, 1.0, 1.0);
  }
</script>
The gl_FragColor variable is declared automatically and the color for each fragment is set. For the purpose of making this shader extremely simple, we did not load any data to the shader; we generally passed these values to the fragment shader. The values are as follows:
Shader variables can be qualified as uniform, attribute, varying, and constant.
Attribute-qualified variables are used for data that is passed to shaders frequently. Since every vertex has different attributes, we generally use this qualifier for vertex data. Now in our case (square example), each vertex has a different position, hence, we qualify the aVertexPosition vector as the attribute. If each vertex had a different color value, we would have qualified another vector aVertexColor as an attribute.
The following line of code qualifies a vector as an attribute in the vertex shader code:
attribute vec3 aVertexPosition;
The following code gets the reference/index of the shader variable. The variables (attributes) that are declared in the shaders are initialized in the main control code. In order to initialize them, we need to get a reference to them in the control code. The getAttribLocation function does just that, as shown in the following snippet:
function initShaders() {

  shaderProgram.vertexPositionAttribute = gl.getAttribLocation(shaderProgram, "aVertexPosition");// getting the reference to the attribute aVertexPosition from the flow code

}
Only floating point scalars, floating point vectors, or matrices can be qualified as an attribute.
The uniform qualifier, just like the attribute qualifier, is used to pass data to the shaders. But the uniform value should not change per fragment/primitive operation. A primitive can have many vertices, hence, a uniform cannot be used to qualify per vertex data. However, a primitive might have the same transformation that can be applied to all vertices, hence, the transformation matrix is stored in a variable qualified as a uniform.
The uniform qualified variable cannot be modified inside the shader. Also, vertex shaders and fragment shaders have a shared global namespace for uniforms, so, uniforms of the same name will be the same in vertex and fragment shaders. All data types and arrays of all data types are supported for uniform qualified variables.
Let's take a look at how we load uniform data to shaders.
The following lines of code qualify a matrix as a uniform in the fragment shader code:
uniform mat4 mvMatrix;
uniform mat4 pMatrix;
The following is the code to get the reference of the shader uniform variable:
function initShaders() {
…………………………………
………………………
  shaderProgram.pMatrixUniform = gl.getUniformLocation(shaderProgram, "uPMatrix");
  shaderProgram.mvMatrixUniform = gl.getUniformLocation(shaderProgram, "uMVMatrix");
……………………………
……………………………

}
The following is the code to load data to a uniform:
function setMatrixUniforms() {
  gl.uniformMatrix4fv(shaderProgram.pMatrixUniform, false, pMatrix);
  gl.uniformMatrix4fv(shaderProgram.mvMatrixUniform, false, mvMatrix);
}
Please note that we chose to qualify the transformation matrix as a uniform because we know that the transformation matrix will not change for one particular primitive rendering operation.
The varying qualifier is the only way a vertex shader can communicate results to a fragment shader. These variables form the dynamic interface between vertex and fragment shaders. Let's consider a case where each vertex of a primitive, such as a triangle, has a different color and we add light to our scene. Lights might change the color at each vertex. Now, in our vertex shader, we will calculate the new color value of each vertex and share the new color value to the fragment shader using a varying qualified vector; the fragment shader interpolates the color between vertices and sets the color of each fragment/pixel. A vertex shader writes to a varying variable and that value is read in the fragment shader.
Shaders exist as independent programs. The following code retrieves the source of these programs by simple JavaScript functions such as getDocumentElementById. Then, the three WebGL functions, createShader, shaderSource, and compileShader, initialize and compile the shaders, as shown in the following code snippet:
function createShader(gl, id) {
  var shaderScript = document.getElementById(id);
  if (!shaderScript) {
    return null;
  }

  var str = "";
  var k = shaderScript.firstChild;
  while (k) {
    if (k.nodeType == 3) {
      str += k.textContent;
    }
    k = k.nextSibling;
  }

  var shader;
  if (shaderScript.type == "x-shader/x-fragment") {
    shader = gl.createShader(gl.FRAGMENT_SHADER);
  } else if (shaderScript.type == "x-shader/x-vertex") {
      shader = gl.createShader(gl.VERTEX_SHADER);
  } else {
  return null;
  }

  gl.shaderSource(shader, str);
  gl.compileShader(shader);

  if (!gl.getShaderParameter(shader, gl.COMPILE_STATUS)) {
    return null;
  }

  return shader;
}

function initShaders() {
  var fragmentShader = createShader(gl, "shader-fs");
  var vertexShader = createShader(gl, "shader-vs");
  shaderProgram = gl.createProgram();
  gl.attachShader(shaderProgram, vertexShader);
  gl.attachShader(shaderProgram, fragmentShader);
  gl.linkProgram(shaderProgram);
  if (!gl.getProgramParameter(shaderProgram, gl.LINK_STATUS)) {
    alert("Shaders cannot be initialized");
  }
  gl.useProgram(shaderProgram);
  shaderProgram.vertexPositionAttribute = gl.getAttribLocation(shaderProgram, "aVertexPosition");
  gl.enableVertexAttribArray(shaderProgram.vertexPositionAttribute);
  shaderProgram.pMatrixUniform = gl.getUniformLocation(shaderProgram, "uPMatrix");
  shaderProgram.mvMatrixUniform = gl.getUniformLocation(shaderProgram, "uMVMatrix");
}
The createShader() function parses our HTML document tree; it then loads the shader code in the string variable before assigning it to context for compiling. The parent function initShaders() first creates the program object and then attaches shaders to the program object. The final step is linking. Our two different shaders need to work together. The link step verifies that they actually match up. If the vertex shader passes data on to the fragment shader, the link step makes sure that the fragment shader actually accepts that input. The two shader sources are compiled into a program, which is passed to the useProgram() function to be used. The last few lines of the function get references/indexes to the attribute and uniform variables so that we can later associate attributes to the buffer objects.
We know how to allocate a buffer object and have understood how to get a reference to the shader attribute. Now, we need to associate the buffer object to the vertex shader attribute, so that the following shader code knows where to load its data from. The first line of the following code makes the buffer that we need to associate as the current buffer. The second line associates the current buffer (squareVertexPositionBuffer) with the shader attribute (shaderProgram.vertexPositionAttribute):
gl.bindBuffer(gl.ARRAY_BUFFER, squareVertexPositionBuffer);
gl.vertexAttribPointer(shaderProgram.vertexPositionAttribute, squareVertexPositionBuffer.itemSize, gl.FLOAT, false, 0, 0);
The parameters of the function glVertexAttribPointer are defined as follows:
void glVertexAttribPointer(Index,Size,Type,Norm,Stride,Offset)
The parameters of the function glVertexAttribPointer() are explained as follows:
Index: This parameter specifies the reference to the vertex.Size: This parameter specifies the number of components specified in the vertex. Valid values are 1 to 4.Type: This parameter specifies the data format. Valid values areBYTE,UNSIGNED_BYTE,FLOAT,SHORT,UNSIGNED_SHORT, andFIXED.Norm: This parameter is used to indicate whether the non-floating data format type should be normalized when converted to a floating point value. Use the valuefalse.Stride: The components of the vertex attribute specified by size are stored sequentially for each vertex. TheStrideparameter specifies the delta between data for vertex index I and vertex (I + 1). IfStrideis 0, the attribute data for all vertices is stored sequentially. IfStrideis >0, then we use the stride value as the pitch to get vertex data for the next index.Offset: This is the byte position of the first element of each attribute array in the buffer. This parameter is used to create interleaved arrays.
We need to understand two drawing functions that we will use frequently. One of them is the drawArray() function:
gl.drawArrays(Mode, Offset, Count)
The parameters of the
drawArray() function are explained as follows:
Mode: This relates to the primitives you would like to render. Valid values arePOINTS,LINES,LINE_STRIP,LINE_LOOP,TRIANGLES,TRIANGLE_STRIP, andTRIANGLE_FAN.Offset: This is the starting vertex index in the enabled vertex array.Count: This is the number of indices to be drawn.
The Mode parameter needs further explanation. When drawing 3D primitives/models, we pass the vertices array. While drawing, the interconnection of vertices is decided by the Mode parameter. The following diagram shows the array of vertices in the actively bound buffer:

The drawArrays() function will treat the vertices of the preceding diagram based on the Mode parameter. If you want to draw a wire mesh, you will use the LINE_XXXX mode values. If you want to draw solid geometries, you will use the TRIANGLE_XXXX mode values.
We have listed the drawArrays function call with different mode values, as follows:
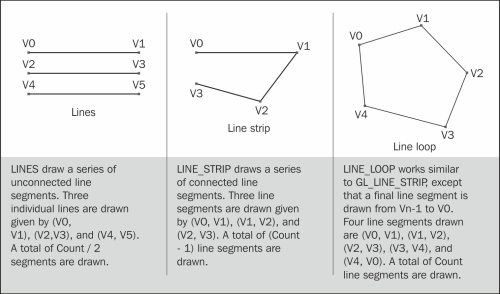
gl.drawArrays(gl.LINES, 0, vertexPositionBuffer.numItems);
gl.drawArrays(gl.LINE_STRIP, 0, vertexPositionBuffer.numItems);
gl.drawArrays(gl.LINE_LOOP, 0, vertexPositionBuffer.numItems);
The following diagram shows how WebGL will draw the same set of vertices with the LINE_XXX option:
The following code shows the different parameters passed to the drawArrays function to draw geometries:
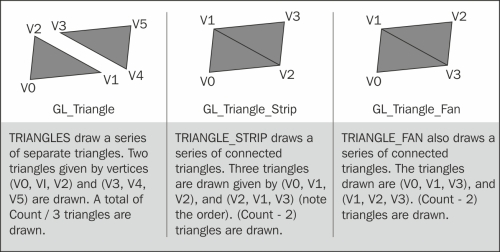
gl.drawArrays(gl.TRIANGLES, 0, vertexPositionBuffer.numItems);
gl.drawArrays(gl.TRIANGLE_STRIP, 0, vertexPositionBuffer.numItems);
gl.drawArrays(gl.TRIANGLE_LOOP, 0, vertexPositionBuffer.numItems);
The following diagram shows how WebGL will draw the same set of vertices with the TRIANGLE_XXX option:
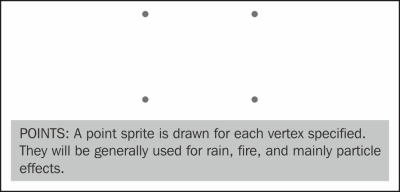
The following function shows the usage of drawArrays with the gl.POINTS mode value:
gl.drawArrays(gl.POINTS, 0, vertexPositionBuffer.numItems);
The following diagram shows how WebGL will draw the same set of vertices with the POINTS option:
The drawArrays function is effective when we have simple geometry; for complex geometry, we use the drawElements function call:
gl.drawElements(Mode, Count, Type, Offset)
The drawElements function uses the index buffer object and the drawArrays function uses the vertex buffer object to read the data. The parameters of the drawElements function are explained as follows:
Mode: This is similar to thedrawArraysfunction.Count: This specifies the number of indices to draw.Type: This specifies the type of element indices stored in indices. Valid values areUNSIGNED_BYTE,UNSIGNED_SHORT, andUNSIGNED_INT.Offset: This is the starting vertex index in the enabled vertex array.