
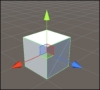
Transform tools in Unity allow us to interact with the Scene view, edit terrain, move objects, and make modifications. There are five buttons that make up the transform tools, as shown in the following screenshot; they are located in the top-left corner of the Unity Interface:

The first button is the Hand tool or View Tool ( ). When this tool is selected, our cursor in the Scene view turns to a hand. This lets us know what mode we are in. With this tool selected, we can scroll with our mouse to zoom in and out of the scene. If you click on the left mouse button, you are able to pan around the scene. With the right mouse button clicked, you are able to look around based on the current position of your cursor.
If you hold down the Alt key on a PC or Option key on a Mac and click on the left mouse button, you can orbit around the current area. Pressing that same key and the right mouse button allows you to zoom in and out of the scene.
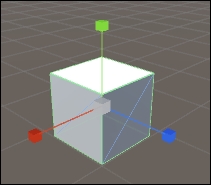
The second button is the Translate tool ( ) and is in the shape of a quad arrow. When an object selected and then click on the translate tool, the object will have three gizmos, one for each axis. Clicking and dragging any of these gizmos moves the object along the respective access, as shown in the following screenshot:
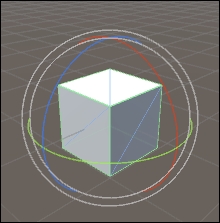
The third transform tool is the Rotate tool ( ), which looks like two rotating arrows. This tool allows us to rotate an object along any axis (x, y, or z). Instead of line and arrow gizmos, this tool is instantiated with three colored rings, one for each axis. Clicking a ring and dragging it rotates the object along that axis, as shown in the following screenshot:
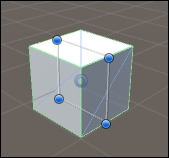
The fourth transform tool is the Scale tool ( ), which is represented with line and block gizmos. Like the other transform tools, there is one gizmo for each axis. Clicking and dragging one of these gizmos increases or decreases the object along the selected axis. For example, you can make a cube wider, narrower, taller, or shorter. If you want to maintain aspect ratio, you can click on the center square instead of the red, blue, or green square. Now, when you click-and-drag, your object will grow or shrink in perfect aspect ratio, as shown in the following screenshot:
The final transform tool is the Rect tool ( ) and is represented by a rectangle with intersecting points. The Rect tool can be used to move, resize, and rotate an object in the Scene view. So, this is a versatile tool that also has corresponding properties that you can edit directly using the Inspector view. Take a look at the following screenshot: