

Creating a tenant
Now that we have our licensing in place, we need to create a tenant. This recipe will run you through the steps to create your new Microsoft 365/Intune/Azure tenant.
A tenant can be used across the full Microsoft platform, so it will apply to Microsoft 365, Azure, and Intune. If you have Active Directory set up currently, you can synchronize your users/groups/devices into Entra ID to give your users a hybrid identity (you need to ensure they do not have a .local suffix for this to succeed).
You can synchronize multiple Active Directory forests into a single Entra tenant, but you cannot synchronize one on-premises AD domain/forest into multiple Entra tenants.
A tenant can be configured with a custom domain name rather than the .onmicrosoft.com one, which is automatically configured when you create your new tenant. Within a tenant, you can have multiple Azure subscriptions but only one Intune configuration. There is also no built-in functionality to copy or migrate devices and settings between tenants using Intune.
Getting ready
If you would rather follow this book using a demo tenant, head over to the Microsoft 365 Developer Program, where you will be able to grab a free developer tenant with licenses to cover most aspects we will be covering here: https://developer.microsoft.com/en-us/microsoft-365/dev-program.
Important note
The licenses do not include Windows Enterprise, so you will not be able to test the chapters on Autopatch and Remediations.
How to do it…
To create your live tenant, first, you need to obtain your licenses. These can be purchased from any VAR or directly from Microsoft. If you are using a developer tenant, Steps 1 and 2 can be skipped:
- For this book, we are going to grab a Microsoft 365 Business Premium trial license (Microsoft 365 E3 and E5 require an annual purchase); the screen will look as follows:
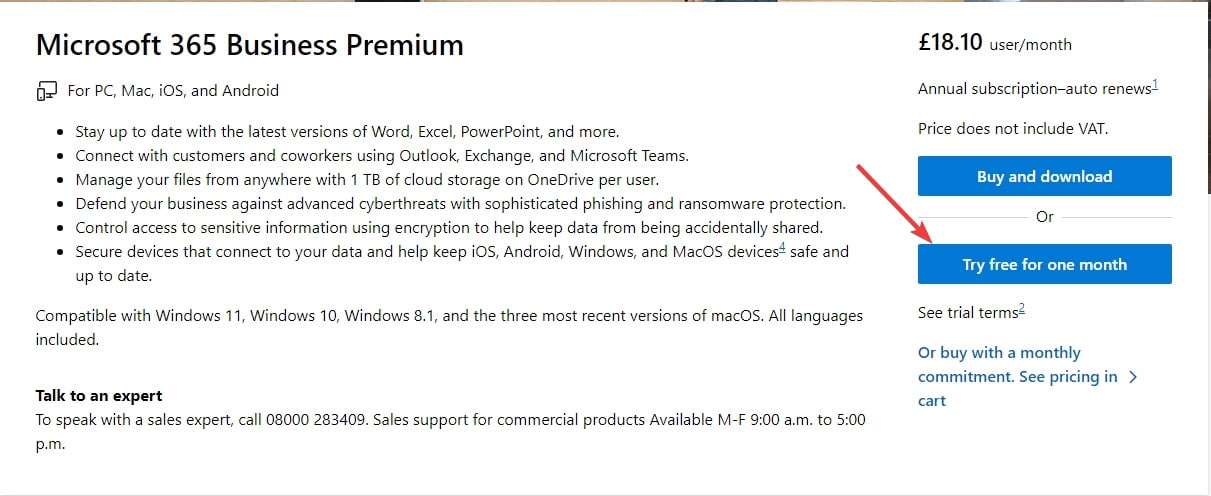
Figure 1.1 – Microsoft licensing page
After clicking the Try free for 1 month button, enter an email address to use for the tenancy. If it does not exist, it will create it for you, so long as it is on a Microsoft domain (outlook.com, for example).
You will also be required to verify your identity, so make sure you enter a valid telephone number.
- Once completed, you will be taken to the Microsoft 365 admin center, where you can double-check your licenses in the Licenses menu under Billing.
That is all we need to do within the Microsoft 365 admin center. Now, we must navigate to https://entra.microsoft.com and log in with the same account that was licensed when we set up the tenant.
Before moving on to the next recipe, from here on, we are going to include the PowerShell and JSON code (where possible) to complete the steps both in the GUI and from a command line.
Microsoft Graph is the technology that is used underneath most Microsoft products to handle all of the commands that are sent via the web interface. Fortunately, it includes a powerful API that we can use to automate these using PowerShell.
To use the command-line scripts, you will need to install the Microsoft Graph PowerShell module and connect to Graph (we are going to set up a connection with full access so that you can reuse the connection at all stages). For this, use your preferred code editor (VS Code is a good choice and is platform agnostic) or use the built-in PowerShell ISE on a Windows device:
- First, load up the PowerShell console and install, then import, the module:
Install-Module -Name Microsoft.Graph.Authentication -Scope CurrentUser -Repository PSGallery -Force
- Now, import the newly installed module:
import-module microsoft.graph.authentication
- Finally, we need to connect:
Connect-MgGraph -Scopes RoleAssignmentSchedule.ReadWrite.Directory, Domain.Read.All, Domain.ReadWrite.All, Directory.Read.All, Policy.ReadWrite.ConditionalAccess, DeviceManagementApps.ReadWrite.All, DeviceManagementConfiguration.ReadWrite.All, DeviceManagementManagedDevices.ReadWrite.All, openid, profile, email, offline_access, Policy.ReadWrite.PermissionGrant,RoleManagement.ReadWrite.Directory, Policy.ReadWrite.DeviceConfiguration, DeviceLocalCredential.Read.All, DeviceManagementManagedDevices.PrivilegedOperations.All, DeviceManagementServiceConfig.ReadWrite.All, Policy.Read.All, DeviceManagementRBAC.ReadWrite.All
After pressing Enter, you will be prompted to log in with your new credentials and then approve the permissions for your tenant by checking the Consent on behalf of your organization box and then clicking Accept.
We now have a working tenant and a Microsoft Graph connection that we can use in the following recipes and chapters.