
Keeping the Linux systems updated
Spend some time perusing the Common Vulnerabilities and Exposures database, and you’ll soon see why it’s so important to keep your systems updated. Yes, indeed, you’ll even find that there have been security flaws with our beloved Linux, as you can see here:
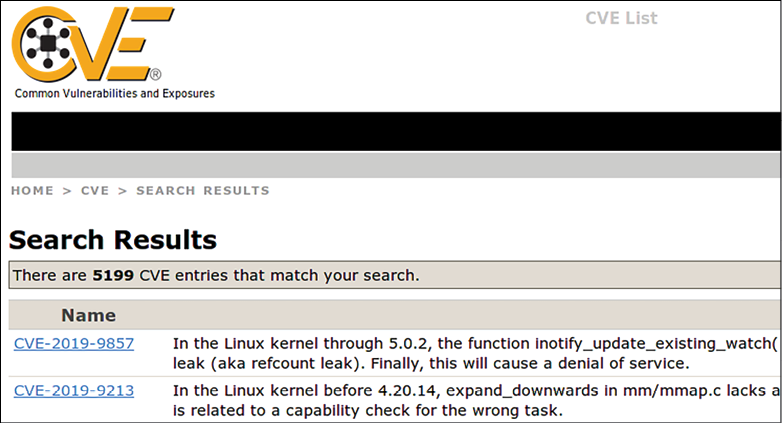
Figure 1.15: Common Vulnerabilities and Exposures
Updating a Linux system only requires one or two simple commands, and it’s generally faster and less painful than updating a Windows system.
You can find the Common Vulnerabilities and Exposures database here:
https://cve.mitre.org/
All of you conscientious, dedicated Linux administrators will definitely want to become familiar with this site.
Next, let’s look at updating the Debian-based systems, which include Ubuntu.
Updating Debian-based systems
Let’s take a look at how to update Debian-based systems:
- On Debian and its many children, including Ubuntu, run two commands, as shown here:
sudo apt update sudo apt dist-upgrade - Occasionally, you’ll also need to remove some old packages that are no longer needed. How will you know? Easy. When you log in to the system, a message will appear on the command line. To remove these old packages, just run this command:
sudo apt auto-remove
Next, we will configure auto updates for Ubuntu.
Configuring auto updates for Ubuntu
When you first install Ubuntu 22.04, automatic updates are turned on by default. To verify that, you’ll first check the status of the unattended-upgrades service, like so:
donnie@ubuntu2204-packt:~$ systemctl status unattended-upgrades
● unattended-upgrades.service - Unattended Upgrades Shutdown
     Loaded: loaded (/lib/systemd/system/unattended-upgrades.service; enabled; vendor preset: enabled)
     Active: active (running) since Sat 2022-10-08 19:25:54 UTC; 52min ago
. . .
. . .
donnie@ubuntu2204-packt:~$
Then, look in the /etc/apt/apt.conf.d/20auto-upgrades file. If auto-updating is enabled, you’ll see this:
APT::Periodic::Update-Package-Lists "1";
APT::Periodic::Unattended-Upgrade "1";
I must confess, though, that I have mixed feelings about this. I mean, it’s nice that the security updates get installed without me having to do anything, but a lot of those updates require that the system be rebooted before they can take effect. By default, Ubuntu systems don’t automatically reboot after an update is installed. If you keep it that way, you’ll see a message about it when you log into the system. But if you prefer, you can set Ubuntu to automatically reboot after it automatically updates itself. Here’s how to do it:
- Go into the
/etc/apt/apt.conf.ddirectory and open the50unattended-upgradesfile in your favorite text editor. In the vicinity of line 67, you’ll see a line that says://Unattended-Upgrade::Automatic-Reboot "false"; - Uncomment the line by removing the leading slashes, and change
falsetotrue, like so:Unattended-Upgrade::Automatic-Reboot "true"; - With this new configuration, Ubuntu will now reboot itself immediately after the automatic update process has completed. If you’d rather have the machine reboot at a specific time, scroll down to about line 103, where you’ll see this:
//Unattended-Upgrade::Automatic-Reboot-Time "02:00"; - Since this line is commented out with its pair of leading slashes, it currently has no effect. To have the machine reboot at 2:00 A.M., just uncomment this line. To have it reboot at, say, 10:00 P.M., uncomment the line and change the time to
22:00, like so:Unattended-Upgrade::Automatic-Reboot-Time "22:00";
Of course, there’s that old, basic precept that thou shalt not install system updates on a production system without first testing them on a test system. Any operating system vendor can occasionally supply you with problematic updates, and that has included Ubuntu. (I know what you’re saying: Preach it, Donnie.) Ubuntu’s automatic update feature is in direct opposition to that basic precept. If automatic updates have been enabled, disabling them is quite easy, if you choose to do so.
- To disable automatic updates, just go into the
/etc/apt/apt.conf.ddirectory and open the20auto-upgradesfile in your favorite text editor. Here’s what you’ll see:APT::Periodic::Update-Package-Lists "1"; APT::Periodic::Unattended-Upgrade "1"; - Change the parameter for that second line to
0, so that the file will now look like this:APT::Periodic::Update-Package-Lists "1"; APT::Periodic::Unattended-Upgrade "0";
Now, the system will still check for updates and show a message on the login screen when any are available, but it won’t automatically install them. And of course, it should go without saying that you need to check your systems on a regular basis to see if updates are available. If you do prefer to leave automatic updates enabled, be sure to either enable automatic rebooting or to log in to the system at least a couple of times a week to see if it needs to be rebooted.
- If you want to see if there are any security-related updates available, but don’t want to see any non-security updates, use the
unattended-upgradecommand, like so:sudo unattended-upgrade --dry-run -d - To manually install the security-related updates without installing non-security updates, just run:
sudo unattended-upgrade -d
If you’re running some form of desktop Ubuntu on a workstation that gets shut down after every use, you can enable the automatic updates if you like, but there’s no need to enable automatic reboots.
Also, if you’re running a non-Ubuntu flavor of Debian, which would include Raspbian for the Raspberry Pi, you can give it the same functionality as Ubuntu by installing the unattended-upgrades package. Just run this command:
sudo apt install unattended-upgrades
You can also use the apt command to install only the security updates, but it would require piping the apt output into a convoluted set of text filters in order to mask the non-security updates. Using the unattended-upgrade command is much easier.
I said before that we should always test updates on a test system before we install them on a production system, and that certainly does hold true for corporate servers. But what do we do when we have a whole bunch of IoT devices that we need to keep updated, especially if these devices are all over the place out in the field and in consumer devices?
In the wonderful world of IoT, the ARM CPU versions of Ubuntu, Raspbian, and Debian are the most popular Linux distros for use on the various Pi devices, including the ubiquitous Raspberry Pi. If you have lots of IoT devices in the field and in consumer devices, you might not have direct control over them once they’ve been deployed or sold. They still need to be kept updated, so setting up unattended updates with automatic rebooting would certainly be advantageous. But keep in mind that in the world of IoT, we have to be concerned about safety as well as security. So, for example, if you have devices that are set up as some sort of critical, safety-related industrial controller, then you most likely don’t want the device to automatically reboot after doing automatic updates. But if you’re a television vendor who installs Linux on smart televisions, then definitely set them up to automatically update and to automatically reboot themselves after an update.
Next, let’s look at updating the RHEL 7 systems.
Updating Red Hat 7-based systems
With Red Hat-based systems, which include CentOS and Oracle Linux, there’s no automatic update mechanism that you can set up during installation. So, with the default configuration, you’ll need to perform updates yourself:
- To update a Red Hat 7-based system, just run this one command:
sudo yum upgrade - Sometimes, you might just want to see if there are any security-related updates that are ready to be installed. Do that by running this command:
sudo yum updateinfo list updates security - If any security updates are available, you’ll see them at the end of the command output. On the system that I just tested, there was only one security update available, which looks like this:
FEDORA-EPEL-2019-d661b588d2 Low/Sec. nagios-common-4.4.3-1.el7.x86_64 updateinfo list done - If the only thing you want to install is the security updates, run this command:
sudo yum upgrade --security - Now, let’s say that you need a CentOS system to automatically update itself. You’re in luck because there’s a package for that. Install and enable it, and start it by running these two commands:
sudo yum install yum-cron sudo systemctl enable --now yum-cron - To configure it, go into the
/etc/yumdirectory, and edit theyum-cron.conffile. At the top of the file, you’ll see this:[commands] # What kind of update to use: # default = yum upgrade # security = yum --security upgrade # security-severity:Critical = yum --sec-severity=Critical upgrade # minimal = yum --bugfix update-minimal # minimal-security = yum --security update-minimal # minimal-security-severity:Critical = --sec-severity=Critical update-minimal update_cmd = default
This lists the various types of upgrades we can do. The last line shows that we’re set to update everything.
- Let’s say that you only want security updates to get applied automatically. Just change the last line to the following:
update_cmd = security - On lines 15 and 20, you’ll see this:
download_updates = yes apply_updates = no - This indicates that by default,
yum-cronis only set to automatically download updates, but not to install them. - If you want the updates to get automatically installed, change the
apply_updatesparameter toyes.Note that unlike Ubuntu, there’s no setting to make the system automatically reboot itself after an update.
- Finally, let’s look at the mail settings for
yum-cron, which you’ll find on lines 48 through 57 of theyum-cron.conffile, as shown here:[email] # The address to send email messages from. # NOTE: 'localhost' will be replaced with the value of system_name. email_from = root@localhost # List of addresses to send messages to. email_to = root # Name of the host to connect to to send email messages. email_host = localhostAs you can see, the
email_to =line is set to send messages to the root user account. If you want to receive messages on your own account, just change it here.
- To see the messages, you’ll need to install a mail reader program, if one isn’t already installed. (It hasn’t been installed if you chose Minimal installation when you installed the operating system.) Your best bet is to install
mutt, like so:sudo yum install mutt - When you open
muttand look at a message, you’ll see something like this:
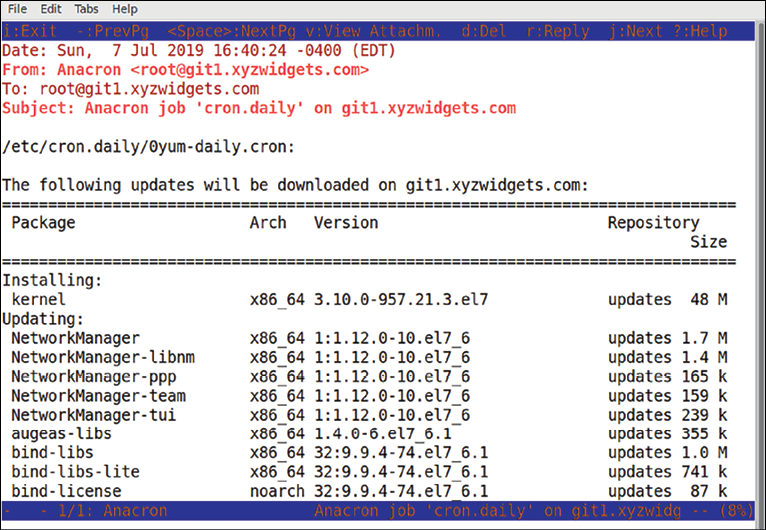
Figure 1.16: Mutt mail client
- As with all operating systems, certain updates will require that the system be restarted. And how do you know when the system needs to be restarted? With the
needs-restartingcommand, of course. First, though, you need to make sure thatneeds-restartingis installed on your system. Do that with this command:sudo yum install yum-utils
Once the package is installed, there are three ways to use needs-restarting. If you just run the command without any option switches, you’ll see the services that need to be restarted and the packages that require you to reboot the machine. You can also use the -s or -r options, as shown here:
|
Command |
Explanation |
|
|
This shows the services that need to be restarted, and the reasons why the system might need to be rebooted. |
|
|
This only shows the services that need to be restarted. |
|
|
This only shows the reasons why the system needs to be rebooted. |
Next, we will be updating Red Hat 8/9-based systems.
Updating Red Hat 8/9-based systems
The old yum utility has been around for practically forever, and it’s been a good, hard-working utility. But it does have its occasional quirks, and at times it can be excruciatingly slow. But, not to worry. Our heroes at Red Hat have finally done something about that, by replacing yum with dnf. So, when you work with your AlmaLinux 8/9 virtual machines, you’ll use dnf instead of yum. Let’s see how to do this:
- For the most part, you use
dnfthe same way that you’d useyum, with the same arguments and options. For example, to do a system upgrade, just do:sudo dnf upgrade - The main functional difference between
yumanddnfis thatdnfhas a different automatic update mechanism. Instead of installing theyum-cronpackage, you’ll now install thednf-automaticpackage, like so:sudo dnf install dnf-automatic - In the
/etc/dnfdirectory, you’ll see theautomatic.conffile, which you’ll configure the same way as you did theyum-cron.conffile for CentOS 7. Instead of working as acronjob, as the oldyum-crondid,dnf-automaticworks with asystemdtimer. When you first installdnf-automatic, the timer is disabled. Enable it and start it by running this command:sudo systemctl enable --now dnf-automatic.timer - Verify that it’s running with this command:
sudo systemctl status dnf-automatic.timer - If it started successfully, you should see something like this when you check the status:
[donnie@redhat-8 ~]$ sudo systemctl status dnf-automatic.timer
 dnf-automatic.timer - dnf-automatic timer
   Loaded: loaded (/usr/lib/systemd/system/dnf-automatic.timer; enabled; vendor preset: disabled)
   Active: active (waiting) since Sun 2019-07-07 19:17:14 EDT; 13s ago
  Trigger: Sun 2019-07-07 19:54:49 EDT; 37min left
Jul 07 19:17:14 redhat-8 systemd[1]: Started dnf-automatic timer.
[donnie@redhat-8 ~]$
To determine if a system needs to be restarted, just install the yum-utils package and run the needs-restarting command, the same as you did for CentOS 7. (For some reason, the Red Hat developers never bothered to change the package name to dnf-utils.)
For more details about dnf-automatic, just type:
man dnf-automatic
And that’s all there is to it.
Automatic updating sounds like a good thing, right? Well, it is in some circumstances. On my own personal Linux workstations, I always like to turn it off. That’s because it drives me crazy whenever I want to install a package, and the machine tells me that I have to wait until the update process finishes. In an enterprise, it might also be desirable to disable automatic updates in some cases, so that administrators can have more control over the update process.
There are special considerations about doing updates in an enterprise environment. Let’s look at them next.
Managing updates in an enterprise
When you first install any Linux distro, it will be configured to access its own package repositories. This allows the user to install software packages and updates directly from these normal distro repositories. This is great for home or small business use, but not so great for the enterprise.
In an enterprise setting, there are two additional considerations:
- You want to restrict what packages the end users are allowed to install.
- You always want to test updates on a separate test network before allowing them to be installed on a production network.
For these reasons, enterprises will often set up their own repository servers that only have approved packages and approved updates. All other machines on the network will be configured to pull their packages and updates from them, rather than from the normal distro repository. (We won’t go into how to set up on-premises repository servers here, because that topic is better suited for a Linux administration book.)
Ubuntu has always been one of the more innovative Linux distros, but it’s also had more than its fair share of quality-control problems. In its early days, there was at least one Ubuntu update that completely broke the operating system, requiring the user to re-install the operating system. So, yeah, in any mission-critical environment, test those updates before putting them into production.
I think that that’s about it for our introductory chapter. Let’s wrap things up in a summary, shall we?