Every project, however big or small, needs a clear plan for what it is and how it will be built. The larger the project, the more work should be put into the beginning phase of preparing for development. It is no surprise that enterprise-level development should also require a great deal of preliminary work before actual development begins. Whether you are working for a company or are a company providing a solution to a client, you should have a clear plan of what needs to be done. There is a lot of flexibility here based on factors such as cost, lack of developers, and deadlines. Prepare as much as possible and try to stick to the timelines that are set to keep you on track to completion. Remember that too little planning could come back to haunt you later.
Developers should be given as much information as possible to help them understand what they are building. If your developers are not provided with enough documentation, blueprints, and other materials, then they will be left to make assumptions on their own, assumptions that later on are found in the testing and Quality Assurance (QA) phases of development as bugs in your application. When this happens, you may discover that a particular feature needs to be rebuilt, requiring major foundational changes that will take a great deal of time to refactor. If we think about something other than programming for a moment, such as building a house, we all know a foundation needs to be built before a team can frame the house. In turn, that foundation needs to be completed before a team can build the roof, wire up the electrics, install plumbing, and so on. You can't start building a roof without a frame, and you can't build a frame without a foundation to put it on.
Let's discuss how to gather requirements for your project.
Requirements gathering
Gathering requirements is important to help document the build process and to allow both parties, the developer and the owner of the software, to reference it at any time during development. This ability is essential in order to ensure things stay on track until completion and are also completed on time. There should be an initial brainstorming phase to get a feel for the scope of the project. One good trick is to have all the stakeholders get together and debate the needs of the system, while you record any key points raised during the debate and include them in your requirements findings. You should always start by asking questions, and you should ask alternate questions for different sets of people. After you have spoken to stakeholders, move on to directors, project managers, developers, and employees, known as end users. Interview as many different types of users as possible. For extremely large entities, you could create a questionnaire, distribute that questionnaire to a number of users, and then come to a conclusion based on the results.
If there is a legacy system currently in place, even if it's a manual versus digital process of some kind, you should try and get a feel for how it works and identify any pain points within that process. My favorite tactic is User Observation, where I watch a user as they go through the flow of an everyday task and then try to identify things that may slow them down. The next thing I would do is try Role Playing , which is a method where you jump in and use the system as a user would perform a task. You could also ask two different kinds of users to swap positions and ask them what was easy or hard about doing the other person's task or what they think could improve the workflow. There must be bottlenecks of some kind or else there wouldn't be a need to build something better. These are things that bog down your everyday tasks and end up costing the company a lot of money in terms of time and resources. You need to keep an eye open and identify the pain points that your client could not identify themselves or they will have a difficult time communicating with you. Your client won't always know the best solution to a problem, and they may not even know a particular problem is even a problem until you reveal a way to improve that process for them.
Research and discovery
Find out whether this will be an internal, partner, or public project. If it is a partner project, you may have certain limitations based on the partner's specific needs. This is when we get into the difference between business requirements and functional requirements. Functional requirements are things such as determining what hosting plan and server to live on, a backend framework, a frontend framework, and a set of pages. Business requirements, on the other hand, encompass the vision, goals, and objectives of the business as a whole. They are specific to the needs of the organization or the partners they are working with. The structure of a set of web pages or API endpoints may be defined by the business model of that company versus some other logical reason that may otherwise be chosen. Do your stakeholders have any goals, suggestions, or requests that you need to consider? Here are 15 common questions that can help you formulate your set of questions. You shouldn't limit yourself to just these questions alone; use them for brainstorming:
- Do you have business-specific requirements?
- Why do you need a new system?
- What does your current system prevent you from doing; are there any bottlenecks?
- What new features would you like to add; do you need any improvements?
- What old features would you like to keep or remove?
- Who will you interact with in the system; what types of users and roles?
- Will you need reporting, email messaging, or any other kind of notification system?
- Will the system connect with any third-party or partner systems in any way?
- What kind of traffic or load on the server are we predicting?
- When does this new system need to be operational?
- What kind of budget have you allocated toward completing this project?
- Will data need to be migrated from the old system to the new system?
- How will development be divided up among the development team members?
- What skills does the development team have; what are the team's strengths and weaknesses?
- How should the User Interface (UI) flow work; should it be multipage or single page?
Decision making
From the common questions listed previously, you can formulate dozens, if not hundreds, of other questions to fit your unique set of needs. Then, these questions can be grouped into several categories of development, each category with a unique set of requirements and guidelines. You will want to focus heavily on usability, data migration, performance, security, scalability, and reliability. It's good to know this information beforehand so that you can choose the best direction that your development should move forward with.
These will be decisions such as what frontend framework you will choose, who you will go to for hosting, whether you will be building your own servers or renting space at a data center in the cloud, and how your server will be configured. There are countless possibilities to consider. When it comes to the UI, there is a number of questions that need to be asked regarding form field layout, form field validation (server side and client side or both), placeholders, labeling placement, and the flow from start to finish. Flow here refers to whether the user should complete part or all of a form before proceeding and/or whether those parts should be included in a separate form.
Keep in mind that when it comes to form field validation, Django will only validate your data on the server side. Your project does not need both server- and client-side form field validation. However, a healthy website will implement both. So, when a postback error occurs, anomalies will emerge, such as not displaying your form or the field errors that are present, if your form is not visible when the page first loads, for example, when a user needs to scroll down really far on the page or perform several actions before the form becomes visible to the user. Client-side form field validation solves this problem by checking for data to be valid before it is sent to the server, known as data integrity. This validation also reduces work for the server to process and provides for event handling, letting you write functions to help you format HTML and CSS on your page. When it comes to decision making, you can choose whether or not field validation will take place on the client side or the server side, or both. If client-side validation will take place, then you can choose what tools will be used, which are usually JavaScript based.
For example, take input attributes such as required, minlength, and maxlength, which can exist in your HTML. These are usually generated by Django when rendering form fields that have specific field arguments set, such as the following example. We will discuss rendering forms in detail in Chapter 5, Django Forms:
# Demo Code
<input type="text" name="field" id="field-id" class="form-input" maxlength="150" minlength="5" required="">
Most browsers will natively restrict a user from submitting a form if these attributes are present and the data does not satisfy them. All browsers will handle and style these error states differently from one another as well, like Mac versus Windows or Chrome versus Safari. The reason for this is that they are developed by separate entities competing against each other in the market and as a result have different branding. This difference hinders the ability of Django to serve up a postback displaying the error message that was defined in your code for that field. If for some reason the user is able to submit a form with invalid data, the postback may not display the form if, as I mentioned previously, the form is hidden from sight on page load. This is why your project may require both client- and server-side form validation.
Handling error state messages between your server-side code where you define your form fields and your client-side implementation can be tricky as well, meaning you have to store the same error message in two different locations within your source code: one for server-side validation and one for client-side validation. Over time, and with many different developers, this will get very messy, especially when someone remembers to change one but not the other when edits, additions, or deletions are made to these messages. If you have a strict need to make sure they are both worded exactly the same, it might be necessary to create a data dictionary that your source files could access, allowing you to put all your error messages in one spot. How you do that will take some thinking. This file will also need to be accessible via both Python and JavaScript.
Visualization and interpretation
When it comes to the actual design of how the UI will look, there is a number of factors involved. Large corporations may have specific branding guidelines that they mandate for marketing and other legal reasons that can restrict the overall design of your frontend. Sometimes, these corporations will have an in-house creative and marketing department or they may outsource to a third-party creative company to mock up a set of Illustrator or Photoshop documents to assist your frontend developers in doing their jobs. For smaller projects, you are free to design something yourself, but that often takes up time and developers often experience a type of writer's block when tasked with actually designing something versus building something.
One big misconception about frontend developers is that everyone automatically assumes they are designers, which is not always the case. Similar to how a construction worker reads blueprints to build a house, someone else usually drafts the blueprints for them. For this reason, you can use open source templates and boilerplates in the form of HTML, CSS/SCSS, or even JavaScript from online suppliers such as Envato Market, formerly known as ThemeForest (https://themeforest.net/), or Nicepage (https://nicepage.com/html-templates). I have resorted to using design templates from sources such as these in my own Django projects before. Each of these templates and template providers is different. Some are free, while others can be used for a price, and usage licenses vary. Independent research will have to be done on your part before deciding whether any of these sources can work for you. These design templates may also require a bit of digging around in order to make sure they fit in your project nicely, but they can still save a lot of time and provide a stylish-looking site that may be far better than what someone who lacks a creative eye for designing something from nothing could create for you.
Many of these HTML, CSS, and JavaScript templates may resort to the use of the Node Package Manager (NPM) for you to build source files into production-ready files. Similar to PyPI, NPM is used to store and distribute JavaScript libraries that are used in development. They rely on Node.js to run them. There are even pip packages that you can use within your Django project to help you build source files using an NPM package. I will discuss managing pip packages and dependencies further in Chapter 2, Project Configuration. There is a number of Python packages that can help you transpile SCSS, auto-prefix, bundle, and minify files. I have played around with a lot of different Python packages and out of them, I have found only a select few resorting to the use of NPM to do the heavy lifting at the end of the day. This means, as a requirement for your project, your developers may need to have NPM installed on their machine or even on their server depending on how you want to use Node.js. For the examples in this book, I will gravitate toward Python packages as much as possible and you are free to integrate these into your project as you see fit. I'll try to avoid going into code examples pertaining to NPM packages, but I encourage you to use the packages in your development environments.
Tip
The latest and most stable version of Node.js and NPM can be found here: https://nodejs.org/en/download/. For Windows users, there is an easy-to-use installer file that will install both Node.js and NPM for you.
You can find the Gulp installation guide here: https://gulpjs.com/docs/en/getting-started/quick-start/. Gulp requires that the Gulp Command-Line Utility (CLI) is installed first, then install Gulp itself. Gulp is considered a task runner and helps to automate a vast majority of development tasks, such as SCSS transpiling, CSS linting, vendor prefixing, minification, and bundling; ECMAScript compiling; and other code linting.
Designing doesn't mean how the project should look; the process should also focus on how it will work or rather the nuts and bolts of the engine. When it comes to designing a project, use as many diagrams as possible to visualize each process. Visualization can be broken down into two main categories: Behavioral Diagraming and Structural Diagraming. Once you have created a set of diagrams, those can be used for collaboration with your stakeholders to ensure that you have everything needed. Your developers will also use these as blueprints for what they will be building.
There are many different diagram types in the Unified Modeling Language (UML), as listed here:
- Activity diagram
- Class diagram
- Communication diagram
- Component diagram
- Composite diagram
- Deployment diagram
- Entity relationship diagram
- Flowchart
- Interaction diagram
- Object diagram
- Package diagram
- Profile diagram
- Sequence diagram
- State diagram
- Timing diagram
- Use case diagram
Discussing each of these diagrams in depth can be rather lengthy. In the following subsections, we will discuss only six of the most commonly used diagrams today and how they can help you build a project of any size and type.
Class diagrams
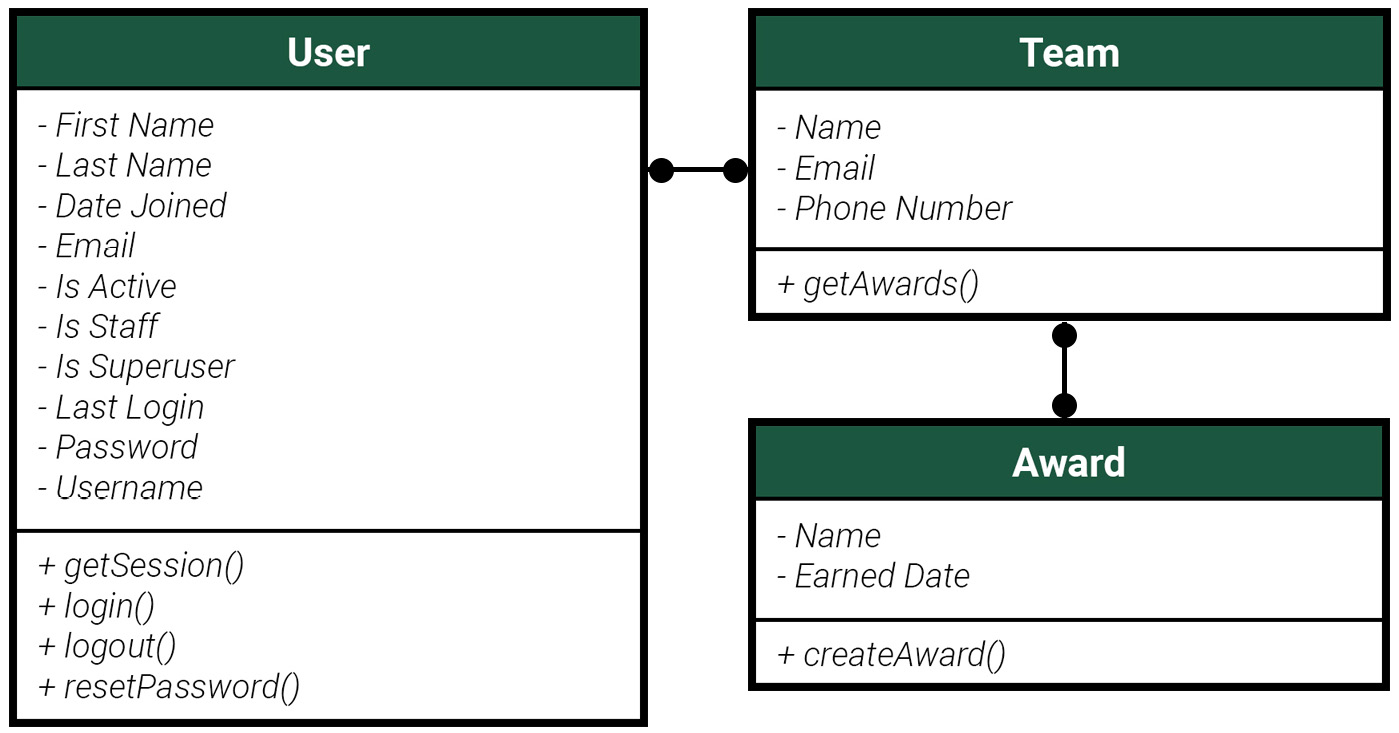
A class diagram is used to illustrate the different classes or components of a system and how they relate to each other. A class is best known as a group of objects with shared or similar roles within your system. Similar to an Entity Relationship Diagram (ERD), class diagrams depict the objects that would be tables in a database, the interactions that could take place, and any other main elements of your system. This diagram is usually structured in a way where the top compartment is the class name, the middle compartment contains all the attributes, also known as the fields, and the bottom compartment shows any functions or actions that could take place.
The following figure shows the relationship between a user, team, and award. The class diagram shows how a team can have a collection of users and a team may also have a collection of awards issued to them. In this example, awards are given to teams and not individual users themselves. A Team model object can have a function called getAwards(), where it will get a collection of all the awards that the team has earned:
Figure 1.2 – Class diagram
Deployment diagrams
A deployment diagram is used for high-level planning. This is how developers will collaborate and code will be updated between different environments. Network engineers will use the diagram to map out physical nodes that will be used within their configuration. Developers will use it to have a better understanding of how code will update between different environments and where they may need to push or pull that code to and from when updates need to be made. The primary components of a deployment diagram include artifacts, devices, and nodes:
- An artifact is a digital asset, such as a file or an executable script of some kind.
- A device is a node that represents a computational resource, such as the application server or the domain server.
- A node is a physical entity that executes a component, subsystem, or process. Nodes can comprise a physical hardware component or a virtual, cloud-based component.
Entity relationship diagrams
An ERD visualizes the relationships between objects within your system. It's best used for mapping how different tables are linked within a database and is sometimes called an entity relationship model after modeling relationships in a database. These are used by your backend to help create the structure of the database and what fields should be included. On the other hand, these can be created by accessing existing databases to help map the current structure of a system and help you to see how best to rebuild it. It's like accessing blueprints of an existing building. Auto-generating these can mean they are so accurate that they even tell you about renovations done to that building after those initial blueprints were first drafted.
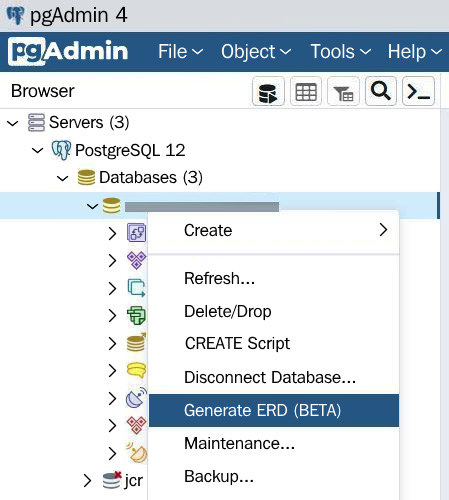
There are many ways to automatically generate an ERD. I'll share with you two of my favorite ways to go about doing that, assuming you already have a Django project up and running when reading and following along with this chapter. If not, I explain how to start a Django project from scratch as well as how to install the pgAdmin tool in the next chapter, Chapter 2, Project Configuration. The first way is with pgAdmin, which is a popular database tool used by Django developers today for working with PostgreSQL databases. This is very easy if you are using the most recent version of pgAdmin; older versions do not have this feature. The current version of pgAdmin, as of the time of writing this book, is v5.6. Just right-click on the database for which you want to generate a diagram and click Generate ERD.
Figure 1.3 – Generate ERD with pgAdmin
The second way is using a popular command-line tool called Graph Models. You can find this in a pip package called django-extensions. This is the example where I have provided a Django app called chapter_1 with the code provided with this book for people who are already familiar with Django. You can run these examples in your existing project. For people new to Django, it is recommended to skip to the next subsection of this chapter, titled Flowcharts, and then come back and practice using this package after you have worked through the examples provided in Chapter 2, Project Configuration, to configure your project for the very first time.
To install the django-extensions package on an existing Django project, follow these steps:
- Run the following command:
PS C:\Your_Project_Folder> pip install django-extensions
- In your
settings.py file, add this app to your INSTALLED_APPS variable:# /becoming_a_django_entdev/settings.py
INSTALLED_APPS = (
...
'django_extensions',
...
)
- You will also need to install a diagram generator that will draw the diagram for you. This is done using the
pydotplus pip package:PS C:\Your_Project_Folder> pip install pydotplus
- Now, you can run the following command to generate all of the tables:
PS C:\Your_Project_Folder> python manage.py graph_models -a -o diagrams/chapter_1/all_models.png
Specific models can be targeted, or a set of models can be targeted, separated by a comma with no spaces. In the following example, we are targeting the User, Team, and Award models:
PS C:\Your_Project_Folder> python manage.py graph_models -a -I User,Team,Award -o diagrams/chapter_1/team_models.png
The following diagram was auto-generated by running the last command, generating the User, Team, and Award models and their relationships with one another:
Figure 1.4 – ERD from Graph Models
For a complete breakdown of how to use the Graph Models plugin, go to https://django-extensions.readthedocs.io/en/latest/graph_models.html.
Note
For Windows users, you will also need to install the GraphViz application on your computer for the graph_models command to work. Also, select Add Graphviz to the system PATH for all or current users when performing the install: https://graphviz.org/download/.
There is also an installer for Linux, Mac, and Solaris operating systems. GraphViz may also be required to generate these diagrams on those operating systems. If you are experiencing errors running the preceding commands on Linux, Mac, or Solaris, try installing GraphViz on your system.
Next, let's discuss flowcharts and what they are used for.
Flowcharts
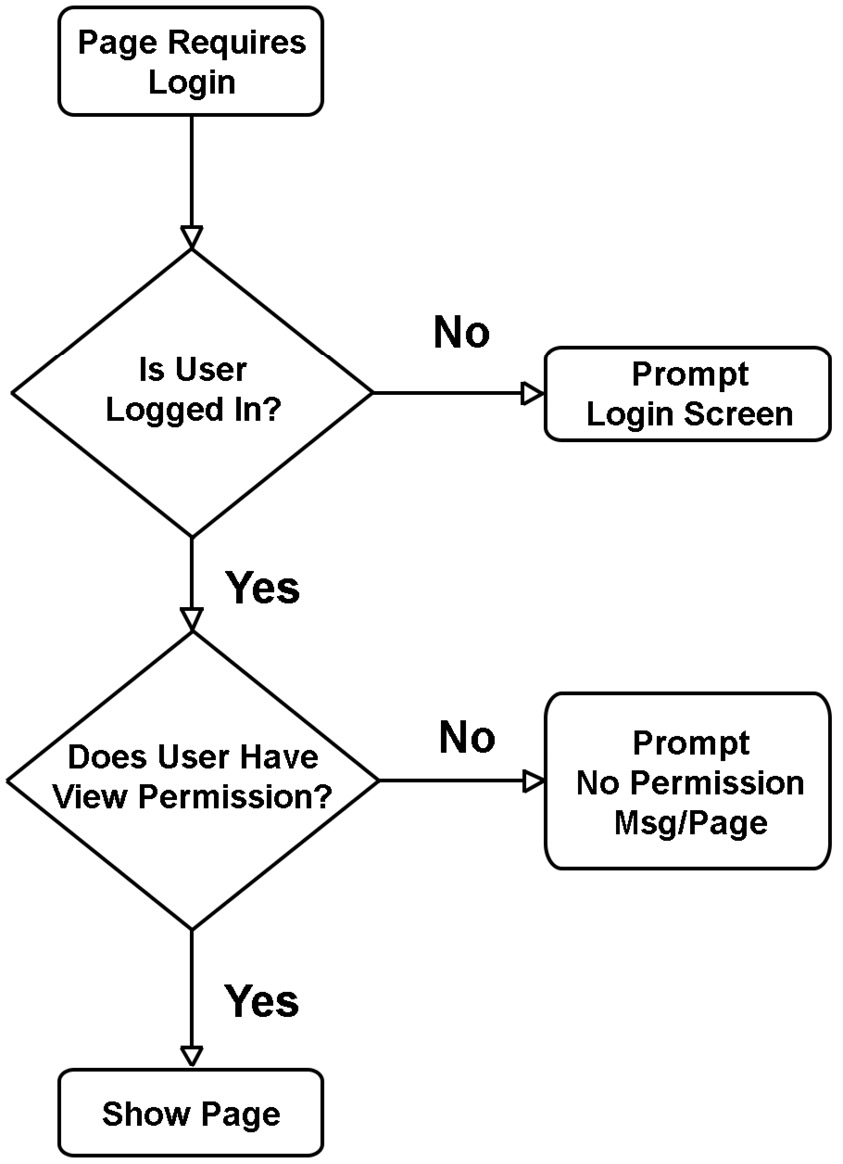
Flowcharts represent the flow of data within the system. They provide a step-by-step approach to solving a particular problem or task. These diagrams are used by developers to gain an understanding of what rules apply when writing code. Rules can include logic such as data validation scenarios before proceeding to the next step. Flowcharts can be simple to fairly complex, and often provide decisions the user can make along the way. This diagram type depicts a user's possible interactions within a particular flow or set of flows.
If you have a single page that has a form broken down into many parts that the user must complete before navigating to a new page, a flowchart can be a handy tool for your frontend developer or even your designer to understand how a user will proceed from one step to another within the form and one page to another within the larger flow of the site. The diagrams can be broken down into smaller, more granular or defined flows as needed.
The following diagram is a small example to show the flow of a user as they log into a system. Does a page require a user to be logged in? If so, a decision must be made: is the user logged in? If no, prompt the login screen; if yes, a new decision must be made: does the user have permission to view the page?
Figure 1.5 – Flowchart
State diagrams
A state diagram shows the behavior of objects within a system. The diagram shows possible conditions or states that something can be in at any given time, such as depicting whether a user is either logged in or logged out; an order is either received, processing, or out for delivery, or an order is fulfilled or returned. These are great for showing a particular shift in behavior versus decisions that can be made. They may even depict certain triggers that cause a state to change as an operation moves through its life cycle toward completion.
Use case diagrams
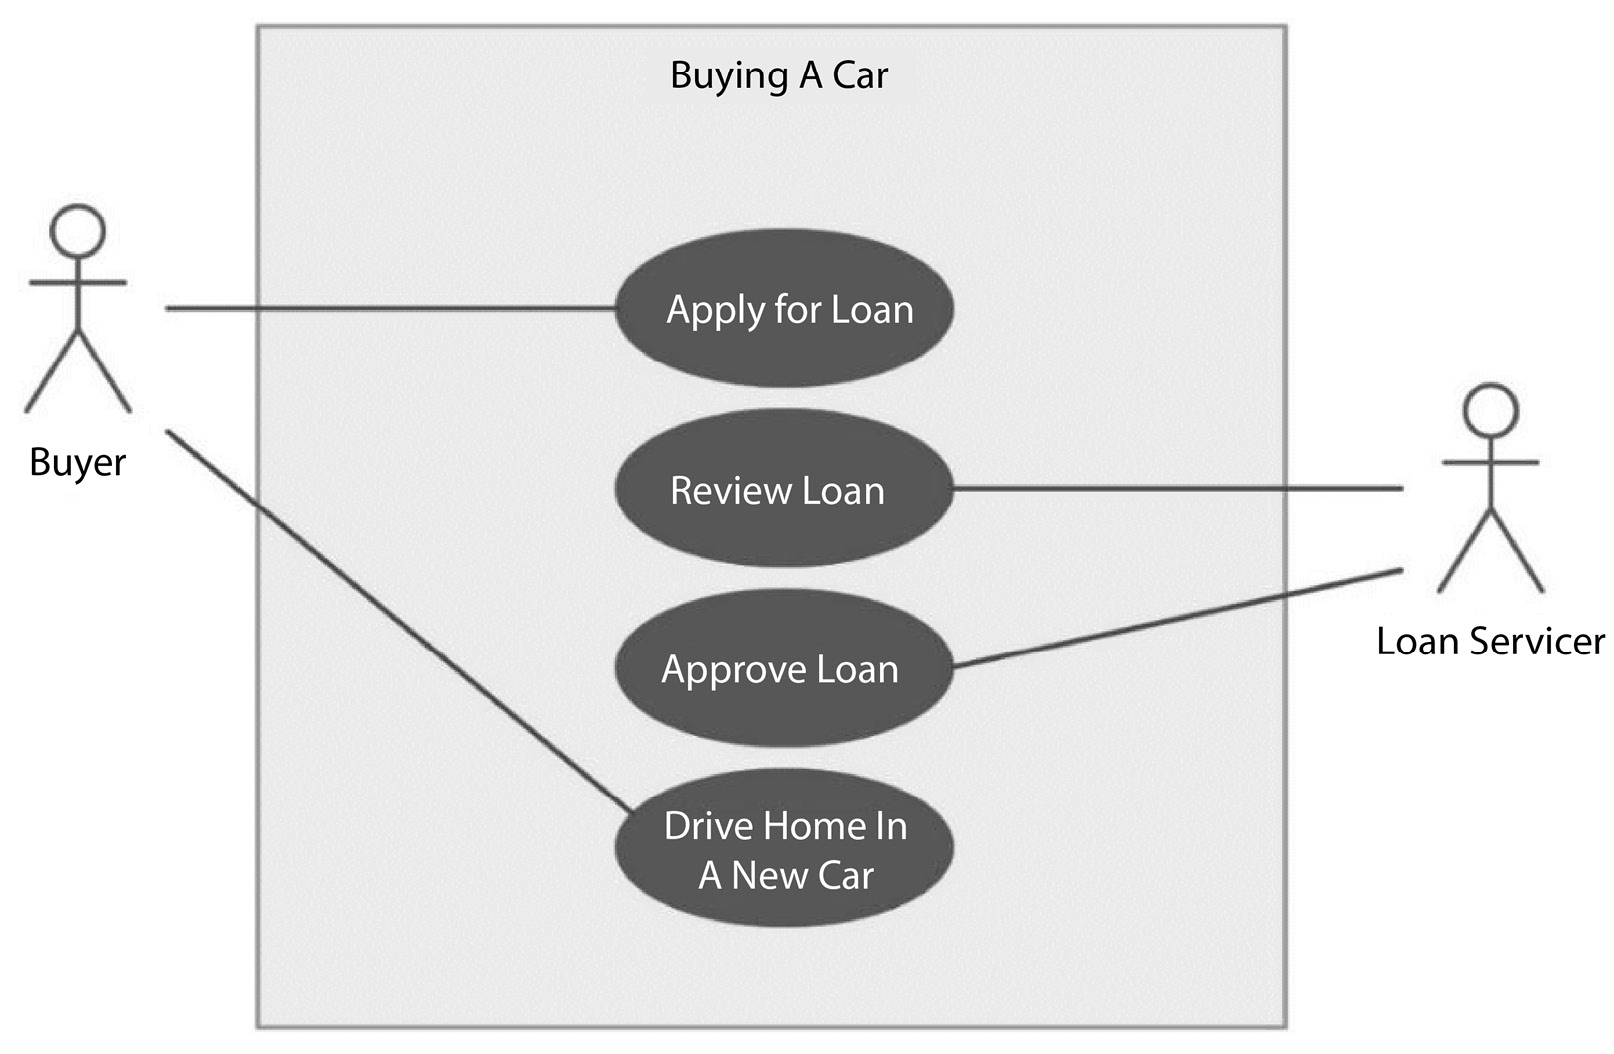
A use case diagram represents the behavior of a user and the system. These are fairly similar to a flowchart but often focus on the bigger picture. These are used by teams such as the creative department, stakeholders, project managers, and directors, to help understand the concept of what this particular flow or use case will do.
Figure 1.6 – Use case diagram
At this point, we have gone over common ways people plan for and design web applications today. Use these concepts to plan for your project the best that you can. In the next section, we'll discuss hosting your application as well as different deployment methodologies.


 Free Chapter