

Hosting and deployment
All websites and apps need a physical location for all of their files to live in; this is also known as web hosting. Web hosting is a service that provides the physical hardware for files to live in and where information is processed. A hosting plan provides a solution consisting of an operating system, such as Linux, and includes the actual hardware of the networking system. Servers will come with a web server of some kind installed for you, such as NGINX or the Apache web server.
A web server, otherwise known as a Hypertext Transfer Protocol (HTTP) server, is software that will send and receive HTTP requests, which are basically messages sent over the internet. Web servers can be thought of as software that runs on the operating system using HTTP, which is a standard network protocol used to distribute your website or application over the internet. With the HTTP that all browsers use today, a user can access your site when they navigate to your domain through the browser's address bar. Web servers help you with load balancing and caching and serve as your reverse proxy server, which makes your files available to the rest of the world via the internet. Hosting services will often provide you with options to scale up when your site experiences an increase in user traffic and data access, where you need more processing power or storage space.
Huge projects tend to gravitate toward services such as Amazon Web Services (AWS) or Microsoft Azure and even Heroku. These are cloud-based hosting services, meaning your sites' files will live on physical hardware that is likely shared with other clients. However, options to have a dedicated and far more secure server space are available for a price from any of these providers. Hosting plans also provide advanced options that give you the ability to install and configure your own operating system and/or your own web server. NGINX is the preferred choice when working with Django projects because the web server has a reputation for performing far better than an Apache installation and can handle far more HTTP requests per second. When thinking of performance, it is of no surprise that many Django projects use NGINX for their web server. If you do need to configure your very own web server, you can start with the official NGINX installation manual, found here: https://www.nginx.com/resources/wiki/start/topics/tutorials/install/. The Apache web server will also work with Django and is desirable because it is far easier to install than an NGINX installation. If Apache is the route you need to go down, start by reading the official Django documentation on working with the Apache web server here: https://docs.djangoproject.com/en/4.0/howto/deployment/wsgi/modwsgi/.
Creating and configuring a Heroku plan
For the examples provided in this book, I will be using the free plans that Heroku offers because of the service's ease of use, zero-cost features, and growing popularity. Heroku is known as a Platform as a Service (PaaS), meaning that it enables developers to build, run, and deploy websites and apps entirely in the cloud. You can be up and running in a matter of minutes with this option, which can cut down the cost of hiring teams of network engineers to run a system for you. To follow along with this exercise, go to the Heroku website and sign up for a free account at https://www.heroku.com/. Then, once you have verified your email address and logged into your account, navigate to your dashboard at https://dashboard.heroku.com/apps and click on New | Create New App, then fill in the page, as depicted here:
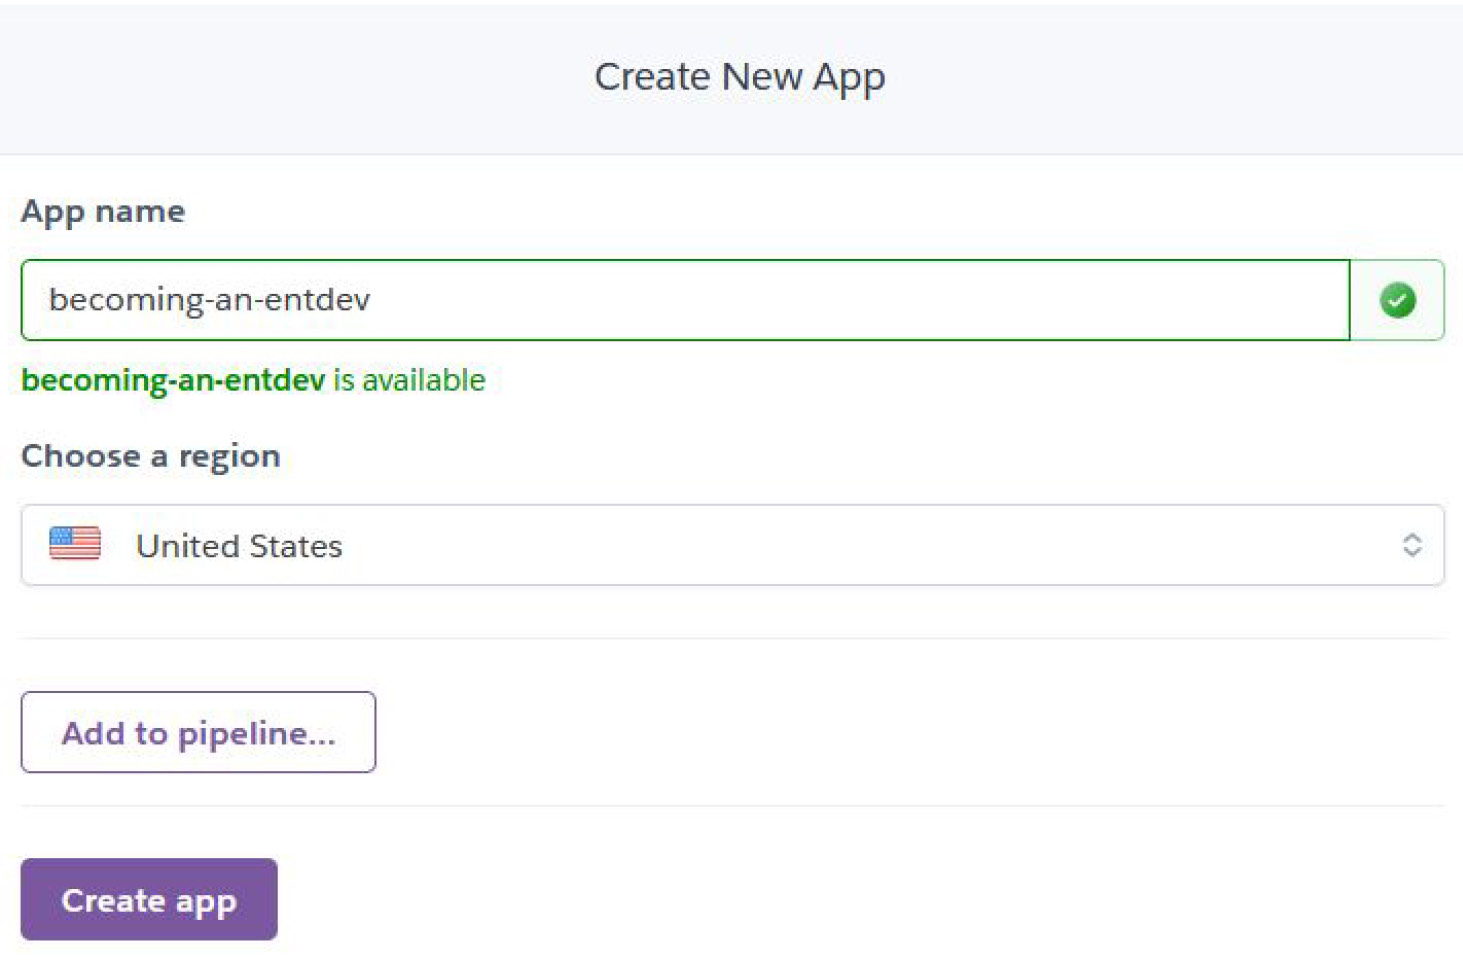
Figure 1.7 – Creating a new Heroku app
Enter a name for this app. The name is for internal use only and does not need to be exact. Keep in mind that since the app name must be unique within all Heroku apps, you will need to choose a different name from the name provided in this demonstration, becoming-an-entdev. Also, don't worry about pipelines just yet. We can always add them later if we need or want to. We will go over pipelines later, in the Advanced deployment subsection of this chapter. You may want to change your region to one closer to you if the United States is not your closest region.
Since we are building a Django project, we will need to select the Python buildpack. A buildpack is Heroku's way of using scripts to automatically build and compile various kinds of apps on Heroku. From the dashboard of your Heroku app that you just created, scroll down to the Buildpacks section and select Add Buildpack. The following screenshot depicts the popup that should appear next:

Figure 1.8 – Heroku buildpack choices
You may add any buildpack that is relevant to the needs of your project, but for anything related to this book, python is the only buildpack needed. If you choose any other buildpack, additional configuration steps may be required that have not been provided in this book, so use with caution.
Next, we'll discuss environments, which in this context refers to the testing and development stages, where we will present code running in action at different stages of development. Environments can be used in other contexts, such as a web server or operating system. Environment can have many meanings in the world of programming and generally refers to a configuration, setup, or structure of something that you are working with, on, or in.
Configuring Heroku environments
A Heroku app, in its most basic form, will consist of at least two environments, the first being a production environment, where your site or app will be accessed by the public and its users, and the second being your local machine, which is the computer where you and your development team will do all of your coding and where you will run the site locally. Heroku will default to using Heroku Git when an app is created, where it uses the Heroku CLI to commit changes from your local machine to your production environment. On your Heroku accounts dashboard at https://dashboard.heroku.com/apps, click the Deploy tab to see the choices shown in the following screenshot:

Figure 1.9 – Heroku deployment methods
Using the Heroku CLI
You will need to install the Heroku CLI on Mac, Windows, or Linux, by downloading the appropriate installer found here: https://devcenter.heroku.com/articles/heroku-cli#download-and-install.
For Windows users, remember to select the checkbox labeled Set PATH to heroku when you are prompted to do so during your install.
Next, navigate to the folder where you want your project to live on your local machine, and then open a new terminal or command-line window within that directory. You will need to log into Heroku using the following command:
PS C:\Projects\Packt\Repo> heroku login
Remember, you will need to log in any time you open a new terminal or command-line window and perform tasks. It will prompt you to open a new browser tab to log in. Once you have done so, you should see a message such as the following:
heroku: Press any key to open up the browser to login or q to exit:
Opening browser to https://cli-auth.heroku.com/auth/cli/browser/03be4a46-28f4-479a-bc10-8bd1bdcdd12b?requestor={{ ... }}
Logging in... done
Logged in as {{ [email protected] }}
PS C:\Projects\Packt\Repo>
If you see the preceding message, then you have successfully logged into your account and may begin using the Heroku commands.
Tip
In Windows, an easy way to run PowerShell as an administrator is to navigate to the folder that you wish to run commands from within the File Explorer window and then click File | Open Windows PowerShell | Open Windows PowerShell as administrator. This will start the command line in that directory, reducing the steps needed to navigate to it by typing a series of change directory commands.
Clicking the options in Figure 1.10 will open the command line in the following directory:
PS C:\Projects\Packt\Repo>
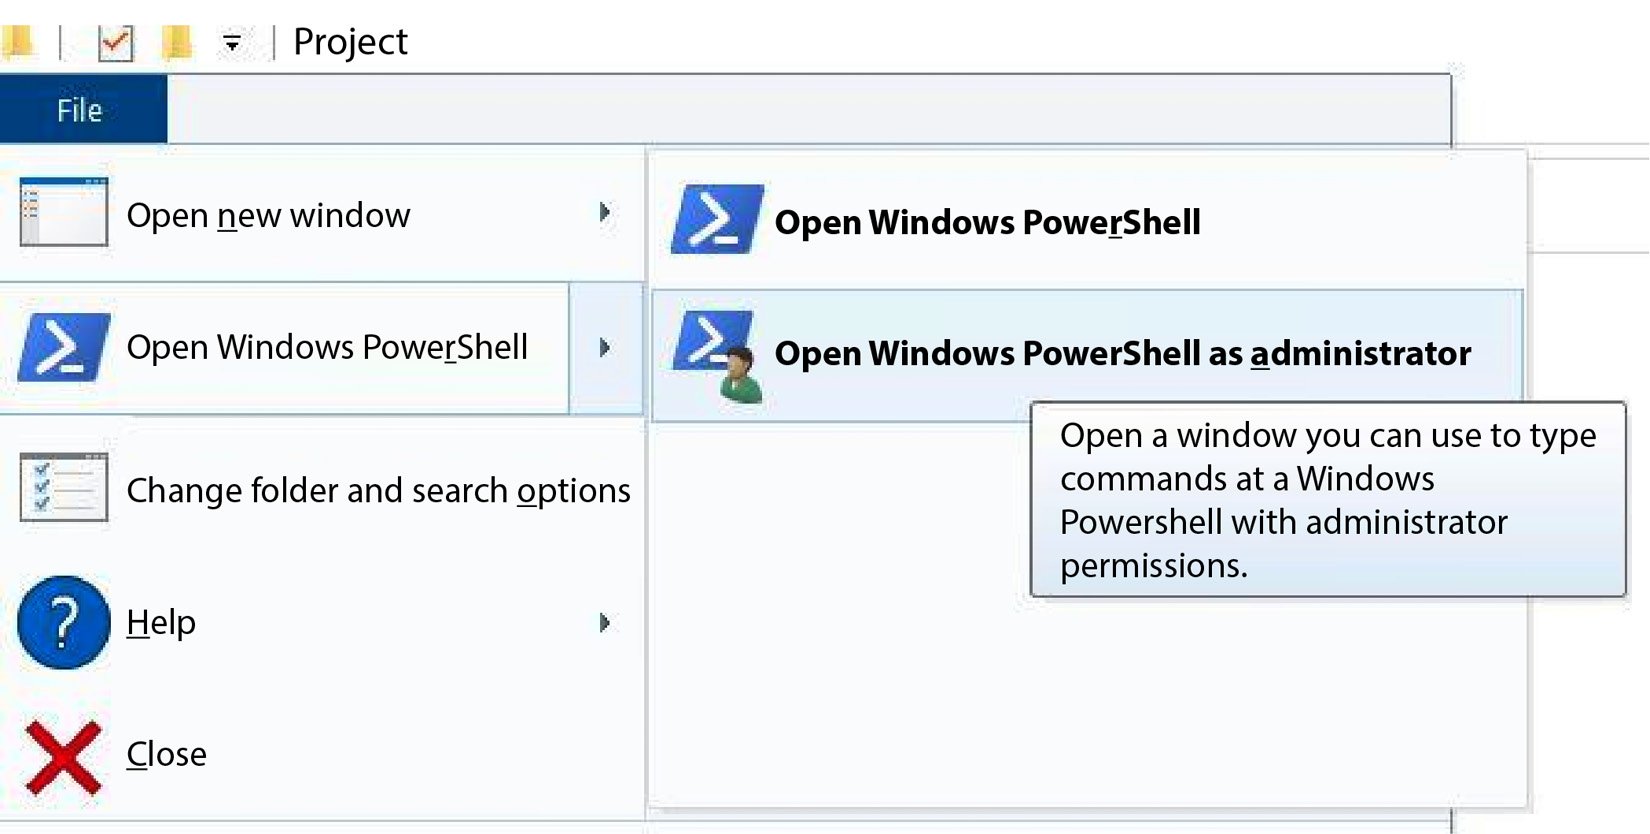
Figure 1.10 – Open Windows PowerShell as administrator
Next, let's initialize our local Git repository for the first time.
Initializing a Git repository and commiting changes
To say you are initializing a Git repository on your local machine means that you are generating a .git folder in the directory of your choice. The configuration files found in the .git folder are responsible for establishing a line of communication between your local repository and the remote repository. The remote repository we are going to link to is the location of the Heroku app.
Follow these steps to configure your Git settings:
- Execute the following commands to first log into your Heroku account and then initialize a local Git repository linking your local repository with your Heroku app:
PS C:\Projects\Packt\Repo> heroku login
PS C:\Projects\Packt\Repo> git init
PS C:\Projects\Packt\Repo> heroku git:remote -a {{ your_project_name }}
This directory is where your Django project's source code files will live. In Chapter 2, Project Configuration, we will explain how to create your first Django project. For now, we just need to perform our first commit in order to establish a proper line of communication with each remote environment. In order for Heroku to accept a commit, the Heroku system needs to detect that it is a valid app that is being committed. Certain files must exist in order to pass this test. The first file is not necessarily required but I am suggesting you include it anyway; this is a README file. A README.md file uses Markdown language, which is a lightweight markup language used to store information such as your build processes or instructions for how a developer can get up and running for the first time. It's commonly used on the web to allow for the quick and easy formatting of plain text to keep important notes that can be viewed with many different web-based text editors today. When this file is viewed in the web browser, it is viewed, formatted, and styled in an easy-to-read format.
- To do this, create a file by running the following
touchcommand from the root of your local repository:PS C:\Projects\Packt\Repo> touch README.md
For a complete guide on how to use Markdown language to style your README documents, visit https://guides.github.com/features/mastering-markdown/.
Tip
Windows users will likely have to install touch-cli via NPM, if you haven't already done so. You need to do this before you can use the preceding touch command. Alternatively, you can right-click and select New | Text Document within your File Explorer, using your mouse instead.
To install touch-cli, run the following command using the -g attribute to denote that this is a global package for your development machine and not local to this project only:
PS C:\Projects\Packt\Repo> npm install touch-cli -g
- Go ahead and add what you like to your README file and get ready to make your first commit to your Heroku Git repository.
We will also need to create one more file in order to perform a successful commit on Heroku, that being a requirements.txt file. Otherwise, Heroku will give you an error when it sees that this file does not exist. The error message will read App not compatible with buildpack. This error suggests that you did not include the Python buildpack for your Heroku app as noted at the beginning of this section, but it also means that the requirements.txt file does not exist in the root of your repository. These files can both remain blank for now if you desire, but the requirements.txt file must at least exist.
- Run the following command to create your
requirements.txtfile from the root of your local repository:PS C:\Projects\Packt\Repo> touch requirements.txt
- To perform your commit, just run these commands:
PS C:\Projects\Packt\Repo> git add .
PS C:\Projects\Packt\Repo> git commit -am "Created Blank README and Requirements Files"
PS C:\Projects\Packt\Repo> git push heroku main
The -am option performs the action of staging all modified files that are being tracked and allows us to add a personal commit message at the same time.
Next, we will clone an existing Heroku repository.
Cloning an existing Heroku Git repository
If you have already performed the steps in the previous subsection, where you have an existing repository for your project, you now need another developer to clone a copy of it to begin working. The next two commands will be needed. Don't forget to log in first if you have not already done so:
PS C:\Projects\Packt\Repo> heroku login
PS C:\Projects\Packt\Repo> git init
PS C:\Projects\Packt\Repo> heroku git:remote -a {{ your_project_name }}
Then, run this command to clone the repository:
PS C:\Projects\Packt\Repo> heroku git:clone -a {{ your_project_name }}
To run any standard Git command, such as push or pull, use the following command, changing pull to push as needed:
PS C:\Projects\Packt\Repo> git pull heroku main
Managing environments in Heroku
It's generally unwise to manage large projects with only two basic environments: standard production and local environments. The purpose of having many environments in your Software Development Life Cycle (SDLC) is to provide an application to your client with as few bugs as possible at the time of delivery. Use those environments to filter out as many bugs as possible in the process. Each environment or team that tests the application from beginning to end acts as a filter, weeding out different problems along the way.
You can implement as many or as few environments in your deployment strategies as you see fit. Most projects include at least a development and staging environment in addition to the first two baseline environments: production and local. Development would be used by your developers as a way to do their own testing, just for the sake of running their project on something other than their own computer for the first time to see what the project does. Common build problems are spotted here that would otherwise just waste the time of a team testing for data and flow bugs. Then, when the developer is happy with how the code runs in the development environment, it can be pushed to a staging environment. Here, a different testing team can review the app, going through the flow and searching for ways to intentionally break the system. Then, when they are happy, the code can get pushed to your production environment. Theoretically, no bugs should exist in this environment; however, this is not a perfect world and so we just want our primary goal to be having as few bugs as possible when the project gets to production.
Open your terminal or command-line window and navigate to the directory of your repository on your local machine. You can run the two commands shown in the following code block to create a development and staging environment for your app. If you haven't already done so, make sure you are logged into your Heroku account:
PS C:\Projects\Packt\Repo> heroku login
PS C:\Projects\Packt\Repo> heroku create --remote development
PS C:\Projects\Packt\Repo> heroku create --remote staging
You should see the following message, indicating the operation was a success:
Creating app... done,pure-atoll-19670
https://pure-atoll-19670.herokuapp.com/ | https://git.heroku.com/pure-atoll-19670.git
Basically, what you are doing in this process is creating a new Heroku app that this environment lives in. That is done automatically for you.
Now, we can take the same two files we created earlier, README.md and requirements.txt, which should still be in your folder, and push them to development and staging. We can rest assured at this point of the SDLC that all three environments are exactly the same. We ensure this by executing the following two commands, pushing our code to those environments:
PS C:\Projects\Packt\Repo> git push development main
PS C:\Projects\Packt\Repo> git push staging main
Let's discuss using custom third-party repositories, such as GitHub, next.
Custom repositories
You are not limited to using just Heroku to store your files; you are welcome to use a cloud-based repository hosting service, such as GitHub or Bitbucket, to store them. There are a lot of reasons to decide on using a custom repository in addition to the repository location Heroku offers you. Many people just like to keep things organized and since they already have an account with another repository, they may want to keep all of their projects together. If you do make the decision to use something such as GitHub to store your project files, you would choose the GitHub | Connect to GitHub button, as shown in Figure 1.9, found earlier under the Configuring Heroku environments subsection of this chapter. Keep in mind that if you want to create additional environments, you should still have performed all of the steps prior to this section first. Each environment will be linked to a Git remote of that repository within your GitHub account.
When you choose to connect through GitHub, you will be prompted with a pop-up window in your browser that will ask you to log into your GitHub account. In this example, from within my GitHub account, I created a private repository named becoming-an-entdev. In your Heroku account, link your GitHub repository to this Heroku app by searching for the name of the repository that you created. Click Connect and if everything was a success, you should see this section change, containing a message reading Connected to Your Repo Location.
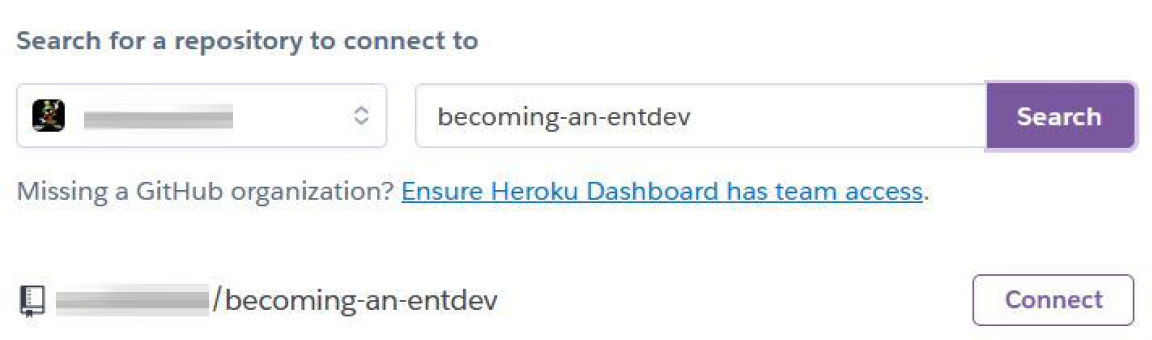
Figure 1.11 – Linking an external GitHub repository to Heroku
Automatic deployment
Next, you can choose to enable automatic deployment every time a change has been detected to a specific branch of the repository you linked to your Heroku app. In the following section, on the same page in your Heroku dashboard, select the branch from the following dropdown and click Enable Automatic Deploys:

Figure 1.12 – Automatic deployment
There is an option to work with Continuous Integration (CI) tools, which are also helpful for large-scale projects. Simply enable the checkbox labeled Wait for CI to pass before deploy if you need your CI tools to pass their tests before allowing deployment. CI and delivery can get inherently complex to talk about, but they are used to automate the integration of all contributors' work, such as running test scripts or build processes. Heroku's CI does this in regular intervals, sometimes multiple times a day.
If your automatic deployment was successfully linked to your GitHub repository, you will see a new webhook for that repo. A webhook is a fancy term in web development used to describe a signal that is sent to a listener on another system when some kind of event or trigger occurs. For example, when you push changes to your GitHub repository, a signal is sent to Heroku triggering a script to grab all the latest changes and merge them into the Heroku app automatically. Webhooks are sometimes referred to as reverse APIs because they just send a signal; there is no request to send the signal followed by a response, as is the default behavior of any standard API request. You can find webhooks in your settings for your repository within your GitHub account. If you are using a different service, just look for something similar to a webhook or reverse API.
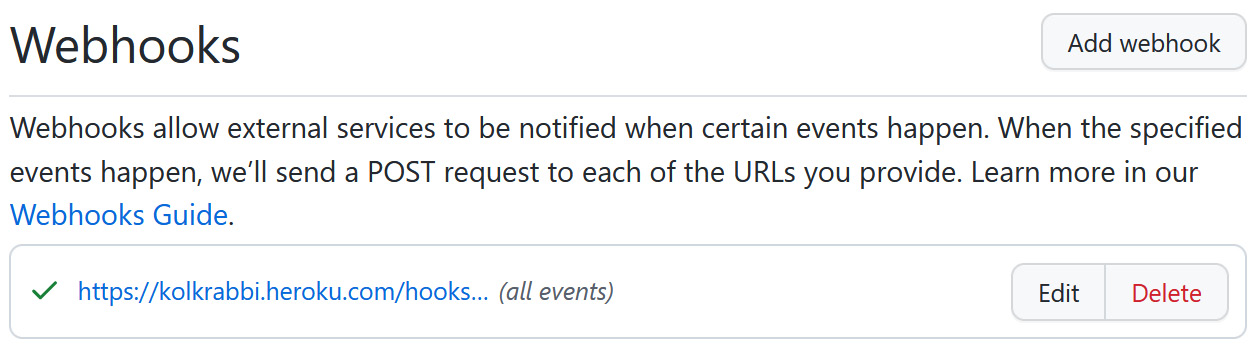
Figure 1.13 – GitHub Heroku webhook
Configuring remotes
Now that you have a GitHub repository that is created and linked to your production Heroku app and you have also wired up automatic deployments, you will need to specify in your local Git repository your remotes for linking your local repository to the production environment. Start by creating a git-production remote linked to your GitHub repository by using the Git URL provided in your account. You may name this anything you want.
Follow these steps to configure your remotes:
- Run this command to create your remotes:
PS C:\Projects\Packt\Repo> git remote add git-production https://github.com/{{ your_username }}/becoming-an-entdev.git
The preceding command is run only if you have already run the git init command to create your local repository first.
- Next, create a
mainbranch for this remote:PS C:\Projects\Packt\Repo> git branch -M main
I am naming the branch main to remain consistent with the branches on the Heroku apps.
- Now, you can push your first two files to this remote branch by running the following command. If you have made new changes to these files, remember to stage and commit them before the push:
PS C:\Projects\Packt\Repo> git push -u git-production main
- Now that we have the main repository to work with in production, we need to include the other environments, called development and staging. While Heroku separates environments into completely separate apps, you can either create new branches on
git-productionand call them development and staging or go into your GitHub account and create completely new repositories to link these to. For this book, we will separate them into completely new repositories for demonstration and practice. I went ahead and created two new repositories in my personal GitHub account calledbecoming-an-entdev-devandbecoming-an-entdev-staging. - We will link them using the following example commands:
- For the development environment, use the following:
PS C:\Projects\Packt\Repo> git remote add git-development https://github.com/{{ your_username }}/becoming-an-entdev-dev.git PS C:\Projects\Packt\Repo> git branch -M main PS C:\Projects\Packt\Repo> git push -u git-development main - For the staging environment, use the following:
PS C:\Projects\Packt\Repo> git remote add git-staging https://github.com/{{ your_username }}/becoming-an-entdev-staging.git
PS C:\Projects\Packt\Repo> git branch -M main
PS C:\Projects\Packt\Repo> git push -u git-staging main
- For the development environment, use the following:
Next, we will configure our Git branches.
Configuring branches
All of the remotes in the examples provided have a branch named main that serves as the parent to all of the children branches and forks created when moving forward; some people also call this master. For working locally, you'll want to create local branches that are set up to track one of your remote branches. Tracking, in Git terminology, simply means a local branch is mapped to a remote repository or branch located somewhere else.
Similar to how we ran the git branch -M main command previously, which we did for the sake of creating the main branch to be used for the remote version only, locally, we will run the following command to add a new local branch to our Git config file that helps track or map it to the environment we set:
PS C:\Projects\Packt\Repo> git branch production git-production/main
PS C:\Projects\Packt\Repo> git branch development git-development/main
PS C:\Projects\Packt\Repo> git branch staging git-staging/main
If you are using something such as Sourcetree as a GUI for interacting with Git repositories, you should see something as in the following screenshot on the left sidebar of the app:
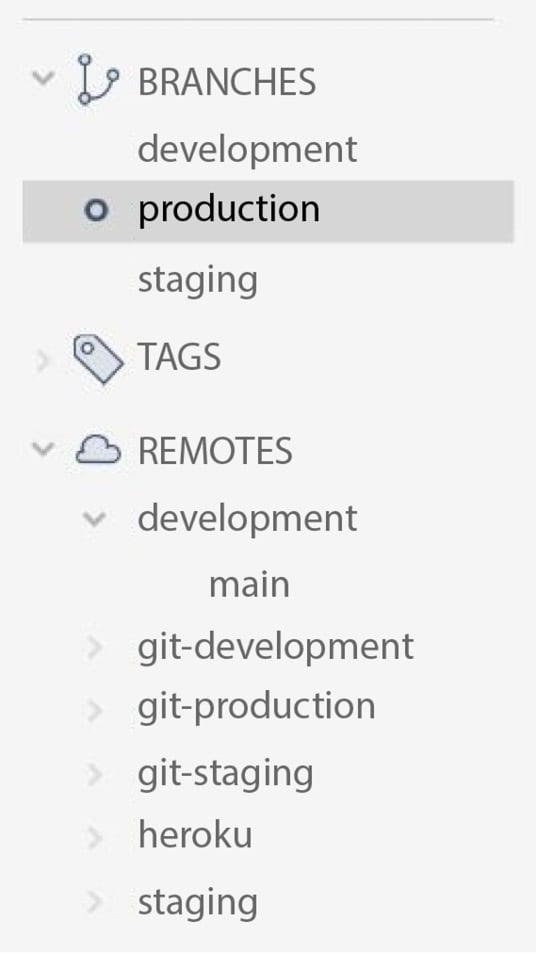
Figure 1.14 – Sourcetree sidebar – branches and remotes
The default name given by Heroku to reference the production environment of the app that you are working with is heroku. If you were to expand all of the remote repositories in the list, you would see that they all have a main branch, as depicted in the preceding screenshot under the repository named development. Now, from one single folder on your hard drive, you can navigate to and from all of these environments, also known as versions of your app, to work as needed.
Some simple and helpful commands are provided here:
- Switch branches with the following:
PS C:\Projects\Packt\Repo> git checkout development
This command switches to the development remote.
- Stage everything and include a message to commit changes with the following:
PS C:\Projects\Packt\Repo> git commit -am "Added notes to README File"
- Push code specifying a HEAD location with the following:
PS C:\Projects\Packt\Repo> git push development main
If you run into an error stating error: src refspec main does not match any when you try to run the preceding command, try the following command instead:
PS C:\Projects\Packt\Repo> git push development HEAD:main
Up to now, each remote repository we created only consisted of one branch. Your team will need other branches, which for the most part will branch off of the main branch when they are created. Other times, you may want to branch off a child branch for a number of reasons. Many people may even prefer one repository where each environment is a different branch. I won't go into all the different methodologies for organizing and using a specific Git workflow because this subject is so complex. You would have to adopt something that best fits your needs, but a good start would be to review this guide or anything on the subject of Git workflows: https://backlog.com/git-tutorial/branching-workflows/.
You may need to separate branches by feature. My favorite approach is to give each developer their own branch named after themselves, which they can use to commit all of their daily work to at the end of each day. Later, a designated person can then merge all pull requests into the main branch at designated intervals throughout the SDLC. One option can be to store all these branches in your development environment and then, in your staging and production environments, you can leave just one branch, called the main branch. Then, when it comes time to push or pull something from development into staging, just push those changes into the main branch on staging. The choices are nearly infinite and there is no definitive right or wrong way to go about this.
You could create branches on your other environments if you wanted to. Just keep an eye on versions of your app getting out of sync with one another. The idea is that as long as it makes sense and it doesn't create a lot of wasted time and headaches when merging, you are on the right path. In any strategy, it's usually wise to pull the main branch into a current working branch as often as possible while a developer works, in order to keep code in sync with other developers who have already merged their code into main. That developer could work out conflicts they know are specific to them on their machine, saving time later when working on other merge conflicts that could arise when it comes time to push this working branch into main. It's very easy to fall behind the changes that other developers are contributing, and merging your code into main later could prove to be difficult with the number of code conflicts that can result.
Advanced deployment
Of course, not everything has to be fully automated. A much smaller team or project can get by when they dedicate a single person to merge branches manually, edit code conflicts, and perform a final build of all the asset files before pushing to a test or production environment. If your team is building enterprise-level software, then you most certainly have the need to automate this step of production as much as possible. Since there are so many ways this can be done, the rest of this lies beyond the scope of this book. You may even hire a dedicated person or team of people whose only job is to build and manage deployment strategies, write build scripts, process pull requests, work through code conflicts, and test for bugs.
Build scripts can be used to compile ES6 to JavaScript or even transpile SCSS to CSS, where a smaller team may do this manually when merging branches. Test scripts can help you run test cases. You can test every method or class and even get to a granular level by testing specific data that is inputted into the system. Look into writing and running Node.js and Python build scripts on deployment based on your project's own needs.
Two more things for you to explore are pipelines and containers, which add additional layers of enhancements to a project. We will discuss them next.
Pipelines
A pipeline in software development is commonly known as a series of objects that are linked together where the output of one functions as the input of the other. This is best described as linking your development environment to your staging environment and then linking your staging environment to your production environment. There are a lot of tools that can be inserted here that can help with reviewing your code every step of the way. Services such as Heroku and GitHub offer ways to allow your developers to create pull requests, which comprise a method of submitting your code to a shared development project. The method even provides ways to create tickets, which are used to track and manage bugs or issues found in your application. They can be assigned to one or many people, and a status can be assigned to them providing team leaders or project managers with a method of knowing what is done and what is being worked on.
If you did decide to follow along with this chapter and use Heroku, their service offers many different ways to work with and configure pipelines. They can get very complex if you need them to be. One really cool feature of how Heroku manages pipelines is that a brand-new review app will automatically be created when a developer creates a pull request. A pull request is a way of submitting a request to merge code into a shared project. The request is sent to a reviewer who will merge the code and approve or deny the changes. If the reviewer has trouble resolving conflicts found in the merging of the code, they may reject the code and send it back to the developer to revise. This gives the reviewer a very easy way to launch the app with the code contained in the pull request to see whether it works or not.
In other words, you can run whatever version, or whatever state the app is in, with that pull request without affecting your current development, staging, or production environments in any way. When a new app is created via a Pull request, that new app does not show up on your main dashboard, but instead is considered a review app of the environment or Heroku app that you are reviewing. Heroku will also automatically deploy changes to the main branch of the environment that is next in line in your pipeline queue, whenever a reviewer has approved changes included in a particular pull request.
Containers
A virtual environment in Python is best described as a way to encapsulate all of the packages or dependencies that your project relies on. What is known as a container, or containerization, is a step above, in that it encapsulates the entire operating system, your Django project, its own virtual environment, and all of its packages and dependencies. Docker containers are used to create images that are exact replicas of their production environments and are used by developers in every stage of development during the app's development life cycle. The benefit of doing this is that no matter what operating system your developers are working on, they will all virtually be running the same setup and should face little to no issues.
In my experience, the phrase "it works on my computer" is often used among developers. This isn't a genuine issue often, but it does happen where a project on a Windows machine will act differently from the same project running on a Mac or Linux machine and vice versa. Containers let your developers continue to use the operating systems that they have become the most comfortable and familiar with during their careers. They ensure consistency among every moving part in development.
Another benefit of using containers is that they can help to get a brand-new developer or new hire to the team to get their project to run locally for the first time in as little time as possible. A container repository is similar to a traditional repository but is used to store a collection of container images. These can be completely different projects or a collection of different versions or environments of the same app. Either way, a container repository is used to store and distribute these images to developers who need them. If you predict many developers will come and go throughout the life cycle of your project, I highly recommend taking the time to build a container image for your team.
If you are using Heroku along with this book, choose the Container Registry | Use Heroku CLI button, as shown in Figure 1.9, found earlier in the Configuring Heroku environments section of this chapter. From here, you can integrate your container image into your deployment. The image can include any add-ons and app variables and even work with your pipelines and review apps. Heroku and Docker also work together with third-party CI services, such as Codefresh, CodeShip, and CircleCI. There is quite a bit more configuration that will need to be done to use these third-party services, but you can review their documentation to help you get started.
Domain Name System
When an environment or a review app is created, Heroku will generate a new URL based on the name of the app that you created. Since Heroku's system is set up to use the name of your app as a subdomain of its URL structure, the name of your app must be unique. For example, the main project on Heroku for this book is named becoming-an-entdev and generates the URL https://becoming-an-entdev.herokuapp.com/. The development app created for this book automatically generates the URL https://mighty-sea-09431.herokuapp.com/, and the staging environment generates the URL https://pure-atoll-19670.herokuapp.com/. mighty-sea-09431 and pure-atoll-19670 are the names of the apps that were automatically created by Heroku when those environments were created.
The final step in the app configuration is to link the Heroku URL to a Domain Name System (DNS), which is best described as a public phone book of websites that links the URL names to individual IP addresses like names to phone numbers. While Heroku may generate a URL for your app that looks like https://pure-atoll-19670.herokuapp.com/, it still produces a numeric IP address that you can use to register to your site when someone goes to www.your-domain.com. You will have to link your app to this phone book registry so that the public can get to your website or API using your domain name and not the URL provided by Heroku.
Popular registrars, such as Domain.com, Bluehost, GoDaddy, and Namecheap, allow you to register a domain name, which will look like www.your-domain.com or http://www.your-domain.custom.tld/, where .tld refers to any of the over 1,500 Top-Level Domains (TLD) that are available to choose from today, such as .edu, .gov, or .food, to name a few. Some TLDs are restricted to certain entities and may not be available to everyone. There are two ways you can link your Heroku app to a DNS. The first way is to use domain forwarding. You'll need to work with your domain registrar to set up forwarding in your app. Domain forwarding will point www.your-domain.com to your Heroku app location where the user will no longer see your domain in the browser's address bar. Instead, they will see becoming-an-entdev.herokuapp.com in the address bar. If you want the user to continue to see www.your-domain.com in their browser's address bar, along with your site as the body content, you'll need to set up forwarding with masking as an option instead. Masking will keep your domain in the address bar but will also mask Search Engine Optimization (SEO), such as your title, description, and keywords, embedded in the <head> of your document.
Forwarding with masking is generally considered bad in terms of SEO, which is ways to improve the visibility of your site in search results on search engines such as Google, Bing, and Yahoo. It's usually difficult or more complex for a search engine to link information from one site via an IP address and map it to your physical domain, and generally, you will get a lower search rating because of that. It may be that search engines are working to improve upon this in the future or at least working to not penalize websites for using forwards and redirects. For now, you should not consider this if SEO is a big requirement for your project.
The alternative to using domain forwarding would be to map your domain to the system's nameservers that deliver your app. Whichever you are using, you need to first make your Heroku app available to the domain of your choice if it is anything other than the standard Heroku domain. Start by adding your domain to your app in Heroku by running the following command. Make sure to log in first if you haven't already done so:
PS C:\Projects\Packt\Repo> heroku login
PS C:\Projects\Packt\Repo> heroku domains:add www.your-domain.com --app becoming-an-entdev
To use subdomains to act as your different environments, run the next two commands:
PS C:\Projects\Packt\Repo> heroku domains:add dev.your-domain.com --app mighty-sea-09431
PS C:\Projects\Packt\Repo> heroku domains:add staging.your-domain.com --app pure-atoll-19670
Here, we append the --app attribute setting and specify the app we want to link to. Since we created different environments, we need to include this specification or we will get an error. The dev and staging subdomains are used in the preceding commands as the environment-specific domains of our site. If the command is successful, it will print out your DNS target, but you can always run this command to list all of the domains, and it will also print out your DNS target for you:
PS C:\Projects\Packt\Repo> heroku domains --app {{ your_project_name }}
=== {{ your_project_name }} Heroku Domain
{{ your_project_name }}.herokuapp.com
=== {{ your_project_name }} Custom Domains
Domain Name DNS Record Type DNS Target SNI Endpoint
www.your-domain.com CNAME {{ randomly_generated_name }}.herokudns.com undefined
You will then need to use the DNS target that was provided to configure your DNS records within your registrar's account for your domain. If you're using domain forwarding, many registrars have an option to create a forward and will ask you a few questions. For manually mapping your domain to your nameserver, this is usually done by editing A-Record in your DNS settings by providing a name of @ and giving it a value of the DNS target that was provided previously.
You can even set up a custom subdomain for different projects, departments, and versions of your app or environments, such as dev.your-domain.com or staging.your-domain.com. Subdomains can be linked by creating a new CNAME-Record with the names dev or staging and giving the records the value of the DNS target that was provided in the examples previously for their respective apps. For registrars that won't accept a value that is not a numeric IP address, you will have to use something such as Cloudflare, which is a web infrastructure and security company, to sit in the middle and act as your nameserver. It acts as a content delivery network and your nameserver, which you can then configure in your registrar using the nameserver settings provided by Cloudflare. Nameserver records are known as NS-Record within the DNS settings of your registrar.