
There are many essential components of Drupal. The basic components that we'll cover in this chapter are Nodes (content), Regions (areas of a page), Blocks (information placed in a specific region), Themes (describing how content is displayed), and Modules (adding new capabilities to a site). There are other essential components such as Users (providing individual accounts on a site), Filters (to filter user-generated content such as removing unwanted markup), and Comments (added to nodes by multiple users), but they are out of scope for this discussion (though may be touched upon in relevant sections throughout the book).
Most content in Drupal is stored in the form of nodes. In general, if you are new to the concept, you can begin by thinking of a node as what would normally be thought of as a blog, post, or article in more static sites. The reality is that nodes can be far more complex yet flexible than this and may be extended in novel ways, as we'll explore throughout this book:
All nodes have an associated node type. This can be defined by a module such as the built-in page and blog types, contributed image, or video node types. In addition, using Content Construction Kit (CCK), you may define your own custom types and store specific information based on the needs of your site. We will explore this soon.
The basic node will have a title and a body. In general, the body will store the text, although it can be used to display multimedia in line with the text. Modules may allow other types of data known as fields, which may display a set type of multimedia in a specific place in the content, for instance. In addition, some modules such as Image attach may allow multimedia or other data to be attached to any node type.
Nodes are usually displayed in one of these three ways: as teasers, as full pages, and in views. There may be other ways of displaying node content, especially when writing custom code, but we will explore these options, which should suffice in most of the cases.
Teasers are generally smaller or shorter versions of the full content. For instance, a teaser might display the first paragraph or two with a thumbnail. On a basic default Drupal installation, once you have created some nodes, you will see an example of teasers on the front page of the site. By theming, developers may alter how a teaser is displayed.
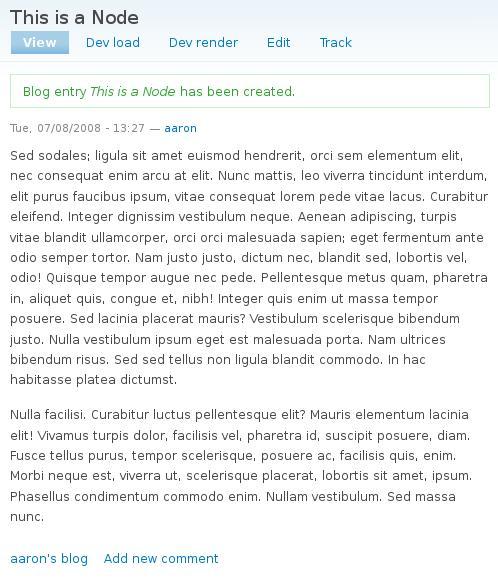
All nodes may be viewed in full at their respective node pages, usually accessed by clicking on the title of a teaser. By default, this will display all the data stored in a node, although that may be overridden or altered in any of several ways.
Note
The URL for the default node page view will always be at /node/[nid], replacing [nid] with the node's unique identification number. This URL may be overridden manually or with other modules such as by using the URL path settings section of the node submission page or automatically using the Pathauto module. But it will still always be accessible using /node/[nid], for example at http://www.example.com/node/225 or http://www.example.com/?q=node/225 (if not using clean URLs).
Throughout this book, when displaying a URL, we'll assume you have enabled clean URLs on your site. If you have not, you would need to prepend ?q= to a URL. For example, /admin/build/modules would be ?q=admin/build/modules. In both cases, that would be local to your site such as http://www.example.com/admin/build/modules or http://www.example.com/?q=admin/build/modules. To enable clean URLs on your site, browse to Administer | Site configuration | Clean URLs at /admin/settings/clean-urls or ?q=admin/settings/clean-urls.
The Views module (touched upon later in this chapter) opens up many new ways of displaying information from nodes. Views may display nodes as teasers, full views, or slide shows, or may take specific parts of the data and display them in a list or
a table. There are many other ways a view can display content and we will explore the more common methods in this book.
A page is divided into several regions, each of which can be used to display content using blocks. By default, the main content of a page is displayed in the content region.For instance, the node content when displaying a node's page or the listing of recently published and promoted nodes on the front page. The left sidebar on a default Drupal installation is another region, as are the header, footer, and right sidebar.
Note
Custom regions are easily added to a theme by modifying that theme's .info file. For instance, you might specify regions[content_top] = content top to create that new region. Note that this is different than in Drupal 5, where new regions were defined in a now deprecated mytheme_regions function. We'll explore theming in more detail throughout the book.
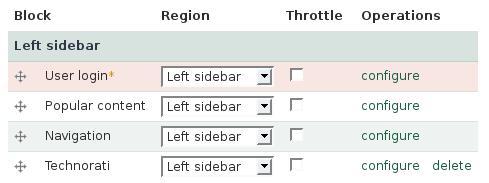
You may determine what content will be displayed in what regions on the Blocks administration page by browsing to Administer | Site Building | Blocks (at /admin/build/block). Active blocks are shown here grouped by region, with the remainder shown in the Disabled section of the page.
After setting a block into a region, you can further determine its placement in the region by dragging and dropping it. Finally, by clicking on the configure link next to a block, you may change block-specific settings such as controlling what pages a block will be displayed on, or changing the block's title:
Drupal and installed modules will define many useful blocks of information such as a listing of users who are currently online (Who's Online), or the main Navigation menu. You may create custom blocks (using the Add block tab on the Blocks administration page) where you can add static text or even a short PHP script (assuming you've enabled the PHP filter module) for something dynamic. Using the Views module, you may also create blocks listing nodes that are filtered and sorted by your own criteria.
Most developers will want to format the content of their site in a manner that is different from what comes out-of-the-box. We will cover some of these methods in detail throughout the book. This is referred to as "theming", and many Drupal developers specialize as themers.
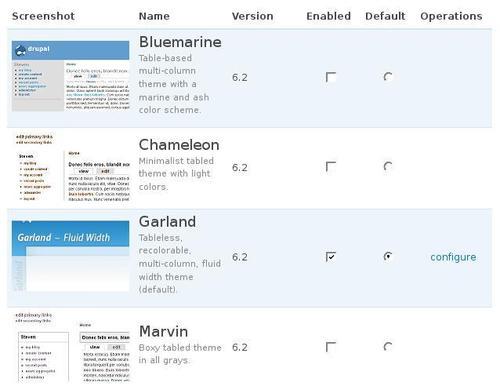
As an administrator, you may have noticed the theme section of the site. At Administer | Site building | Themes (at /admin/build/themes), you will see several themes that are available. These may be themes that are included with Drupal, contributed themes available from Drupal.org or other sources, and/or custom themes created specifically for the site:
It is this third possibility of custom themes that will be of most interest to us during the course of this book. So we will need to know the basics of overriding a theme. If you are interested in learning the theming techniques that will be covered, you
should probably have a custom theme to play with. For most of the examples in this book, we'll modify a copy of the Garland theme that comes shipped with Drupal and is enabled by default.
We will make much use of the various contributed modules throughout this book. Some of these modules, such as Image and Embedded Media Field, are specialized enough to be covered in their relevant sections. Others, such as the Content and Views modules, are essential throughout several sections. We will examine them in this chapter and explore them in more detail as needed later.
One of the strengths of Drupal is its expandability using contributed modules, and no single book could fully cover more than what many might consider the most essential, let alone the hundreds of currently available modules. This is especially so because new modules are constantly being added and old modules updated.
The modules presented in this book have been selected based on their relevance to the required tasks, their code stability, and high level of support and maintenance. All of these modules are used in production to power sites that may be small or large, and have sometimes dozens or hundreds of volunteers actively troubleshooting and maintaining them.
As you continue to explore the world of Drupal, make certain to continuously examine the available contributed modules. You can find nearly all of them at http://drupal.org/project. You can further find ongoing discussions of the development and use of the modules at http://groups.drupal.org/ in various discussion groups.
Note
You may also be interested in visiting the third-party site Drupal Modules at http://drupalmodules.com. This site allows user reviews and ratings, allowing you to read feedback about a module before choosing to install it. Such a metric, though not failsafe, can be useful when considering the hundreds of currently available modules.