
Android applications are typically developed in Java. However, at times, there could be requirements for the development of C/C++ code or for reusing an existing C/C++ library in Android. For example, if you are looking to develop for cross-platform deployment, then there is no better option than choosing C/C++ as the development language. The code in this book is written in C/C++ to meet cross-platform requirements. This recipe will provide a demo to communicate with C/C++ code from an Android Java application. You will learn how to call the C/C++ method from Java using Java Native Interface (JNI).
JNI creates a bridge between Java and native code via JNI interfaces. The Android NDK provides all the necessary tools such as libraries, source files, and compilers to help in building native code. It is believed that the development of the native code is faster, compared to Java code. Therefore, native development is better for memory management, performance, and cross-platform development.
In our first recipe, you will learn to program C/C++ code in the Android Java application. In this recipe, we will create a UI TextView control in the Android framework and display its contents as a string message sent from the C/C++ code. Java communicates with C/C++ through static/shared libraries, the NDK uses JNI and provides a means to develop these libraries under a Java environment.
As a prerequisite for NDK development, you must add Android NDK into the PATH environment variable, so that the NDK APIs are directly accessible from the command-line terminal.
Follow these steps to create an Android application with JNI support:
Create a New Android application project by going to New | Android Application Project.
Set Application Name as
HelloNativeDev, Project Name asCookbookNativeDev, and Package Name ascom.cookbookgles. You can provide the names as per your choice—there is no restriction: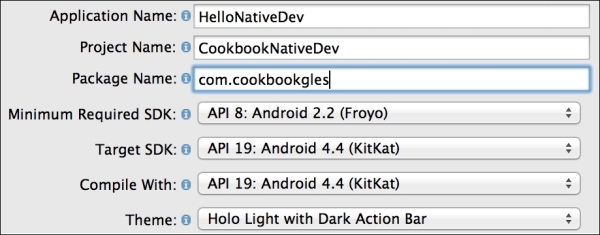
Accept the default settings and click on Next until the Create Activity page appears. Select Blank Activity from the given options and click on Next.
On the last Blank Activity page, change Activity Name to
NativeDevActivity, and click on Finish. This will create the project solution, as shown here:
The project solution contains various files and folders in it. Each of these has a specific role and responsibility, which is shown in the preceding image.
Go to
src|com.cookbookgles|NativeDevActivity.javaand replace the code with the following code snippet. Compile and execute the program. This will generate the necessary classes, which will be used by JNI:package com.cookbookgles; import android.os.Bundle; import android.widget.TextView; import android.app.Activity; public class NativeDevActivity extends Activity { static { //Comment #1 // "jniNativeDev.dll" in Windows. System.loadLibrary("jniNativeDev"); } //Comment #2 // Native method that returns a Java String // to be displayed on the TextView public native String getMessage(); @Override public void onCreate(Bundle savedInstanceState) { super.onCreate(savedInstanceState); //Comment #3 // Create a TextView widget. TextView textView = new TextView(this); //Comment #4 // Retrieve the text from native method // getMessage() and set as text to be displayed textView.setText(getMessage()); setContentView(textView); } }Add a new folder named
JNIin the project solution. This folder will contain all the C/C++ files. Create another new folderincludeinsideJNI. This will be used for header files. AddHelloCookbookJNI.handHelloCookbookJNI.cunderincludeandJNIfolders, respectively. Add the following code:HelloCookbookJNI.h:#ifndef _Included_com_cookbook_JNIActivity #define _Included_com_cookbook_JNIActivity #include <jni.h> JNIEXPORT jstring JNICALL Java_com_cookbookgles_ NativeDevActivity_getMessage(JNIEnv *, jobject); #endif
HelloCookbookJNI.c:#include "include/HelloCookbookJNI.h" JNIEXPORT jstring JNICALL Java_com_cookbookgles_ NativeDevActivity_getMessage(JNIEnv *env, jobject thisObj){ return (*env)->NewStringUTF(env, "Hello from Cookbook native code."); }
The JNI function syntax is as follows:
JNIEXPORT <return type> JNICALL <static function name> (JNIEnv *, jobject);
The function name under JNI contains the complete hierarchical path of the location where it is defined in the project. The rules are as follows:
The function name should be prefixed by
Java_Starting from the package name (
com.cookbookgles), each hierarchical folder and filename must be concatenatedEach concatenation must contain an underscore (
_) between two consecutive names
For example:
com.cookbookgles -> NativeDevActivity.java -> getMessage()
The name of the function will be defined as follows:
Java_com_cookbookgles_NativeDevActivity_getMessage
The full signature and name are given here:
JNIEXPORT jstring JNICALL Java_com_cookbookgles_NativeDevActivity_getMessage (JNIEnv *, jobject);
This process can be automated using the javah tool. For more information, refer to the There more … section):
Add
Android.mkunder JNI. Add the following code:// Android.mk LOCAL_PATH := $(call my-dir) include $(CLEAR_VARS) LOCAL_MODULE := JNINativeDev LOCAL_SRC_FILES := HelloCookbookJNI.c include $(BUILD_SHARED_LIBRARY)
The native code build process uses
Android.mkfor compilation of files. This makefile instructs the NDK compiler list of all the files that need to be compiled. It also maintains the order of files in which they need to be compiled.LOCAL_PATHis a predefined variable. It sets the path of the build system to the path of the current working directory. In other words, it is used to locate source files in the development tree It is specified with the current directory path using$(call my-dir).The
include $(CLEAR_VARS)helps the build system to remove any previous existing variables. It makes sure that no system or local variables are used from other modules. Such a multiple declaration of the same variable across different makefiles can confuse the build system. This command cleans all the local predefined variables, such asLOCAL_PATH,LOCAL_MODULE, andLOCAL_SRC_FILES.LOCAL_MODULEis a system variable that contains the name of the library exported by JNI. On successful compilation of the native code, JNI will generate a library with the name specified inLOCAL_MODULE. In the current recipe, it isJNINativeDev.so.LOCAL_SRC_FILEhelps the JNI compiler understand which files need to undergo compilation.include $(BUILD_SHARED_LIBRARY)helps the compiler build the library into a dynamic form (for example,.dllon Windows or.soon Linux). These libraries can also be built into static form usinginclude $(BUILD_STATIC_LIBRARY). This recipe uses the shared library.
Open a command-line terminal. Go to the current
JNIfolder path and executendk-build. This command, with the help ofAndroid.mk, compiles the source files and generates the shared library calledJNINativeDev.soin theCookbookNativeDev\libs\armeabifolder path: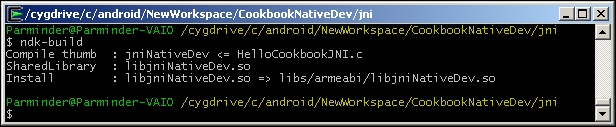
Inside
NativeDevActivity.java, you need to load the library before using it:System.loadLibrary("jniNativeDev");Connect your physical Android device to the system and execute the Android project with Ctrl + F11. This will display the following output on the screen. You can access the first example in the sample code folder
simpleJNI: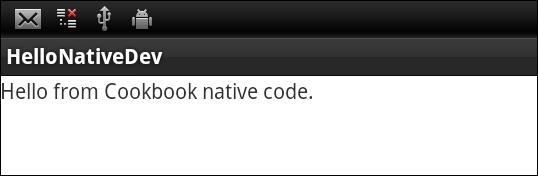
The regular Java code needs to know how to call the native C code. This is done by declaring functions in Java files where each function's signature is prefixed with a native keyword. The definition of these functions is defined in C/C++ source files. These functions need to redeclare in the header files, which must be located in the JNI folder. These declarations are in a special syntax rule that the ndk build understands. The functions are finally made available to Java in the form of shared or static libraries. You need to call this shared/static library within the Java code to use these exported functions.
In this recipe, you learned the convention to produce the JNI function's native method signatures. While working on large projects, sometimes, it is cumbersome to make such changes as the code could be significantly large. Additionally, the chances of human errors are also substantially high.
Alternately, the javah tool can be used to automate this process. It generates the C header and source files that are needed to implement native methods. It reads a Java class file and creates a C-language header file in the current working directory. The generated header and source files are used by C programs to reference an object's instance variables from the native source code. A detailed description of the usage of this tool is beyond the scope of this book. However, I highly recommend that you refer to the See also section for more information on this.
You can learn JNI programming (JNI specification) in detail from http://docs.oracle.com/javase/7/docs/technotes/guides/jni/spec/jniTOC.html
The javah tool reference is available at http://docs.oracle.com/javase/7/docs/technotes/tools/windows/javah.html