

Workspaces and preferences
How you lay out your workspaces and develop that creative workflow will assist you in being more focused and efficient. Workspaces allow you to have the most common tools for the intended task while reducing unnecessary clutter.
Once you have greater control of your workflow management, you can then continue to make refined adjustments through the software's Preferences panel. This will give you the professional level of control that you will inevitably seek as you become more and more confident with the advanced options in Illustrator.
Workspaces
Illustrator currently offers the user nine different workspaces (plus Touch if your screen allows for it). These are merely a redistribution and/or visibility of the panels that would best be suited for the intended task. This allows the graphical user interface (GUI) to be reconfigured for the job you are performing or what feels most comfortable to you as the user. It also allows for the creation of custom spaces, if you would like to set up a unique environment that is best suited for you.
Workspaces can be selected in the Application bar located at the top right of the software's interface, as shown here:
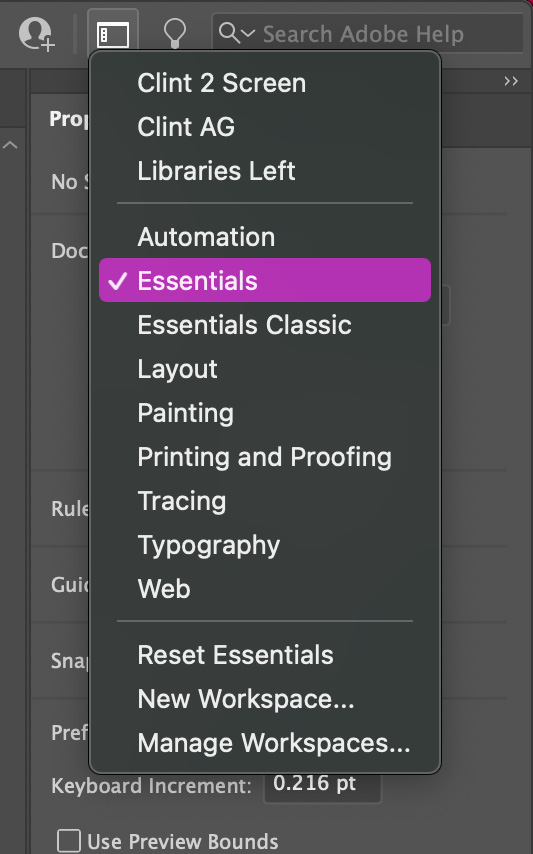
Figure 1.3 – Workspace menu
As you can see in Figure 1.3, the Workspace menu has quite a few choices available. Essentials and Essentials Classic are great general-use layouts, but Illustrator also offers several workspaces for more specific tasks. Let's have a quick review of each one and what it offers:
- Automation: This offers up the panels you would like when doing repetitive work. The Actions panel allows for a series of prerecorded steps, while the Variables panel allows the use of data files (
.cvsor.xml) to replace the content with a document. - Essentials: This is the default view Illustrator opens with and simplifies the GUI to just three key panels: Properties, Layers, and Libraries.
- Essentials Classic: The previous default view that Illustrator used to open with and offers a good variety of the most common panels.
- Layout: This workspace is for those times when accuracy is crucial. The Transform and Align panels appear at the top right of the interface. It also allows access to multiple panels for object attributes, such as Fills, Strokes, and Gradients, as well as several panels for modifying the typography within the document.
- Painting: This offers the panels you would likely want for a painting project, including Brushes, Color, and Navigator.
- Printing and Proofing: If you are taking your document to the press, you may want to utilize this workspace. The key panel in this group is Separations Preview. It allows you to see your overprint preview by dividing your CMYK color space.
- Tracing: This allows you to image trace a raster image and adjust it for improved quality.
- Typography: Again, as the name would imply, you will find all the panels needed to make advanced adjustments to text.
- Web: This workspace has several familiar panels while adding the CSS Properties panel for those working with web content.
As well as these workspaces, customized workspaces can be saved and will appear at the top of the menu too.
Custom workspaces
To save a custom workspace, follow these steps:
- After creating a new document, open all the desired panels and place them where you would like them to be.
- Go up to the Switch Workspace button located at the top right of the Application bar and select New Workspace….
- Enter a custom name for your new workspace.
- You should now find this and any additional custom workspaces at the top of the list when returning to the Switch Workspace button or when using the Window > Workspace menu.
For those unfamiliar with arranging their own workspace, let's review the concept of the dock. Illustrator panels and panel groups can be collected in long vertical arrangements known as docks. To dock a panel, you will select it from the Windows menu at the top of the screen. Once it is open, it is considered a floating panel. To add it to an existing dock, you will need to grab it from the tab that includes the panel's name. This will be located at the top of the panel. You can then drag it over either a dock or a panel group to place it there.
Figure 1.4 shows what it would look like if you were about to add it to an existing panel group (left image), add it to an existing dock but outside a panel group (center image), and the result of adding it to an existing dock but outside a panel group (right image):
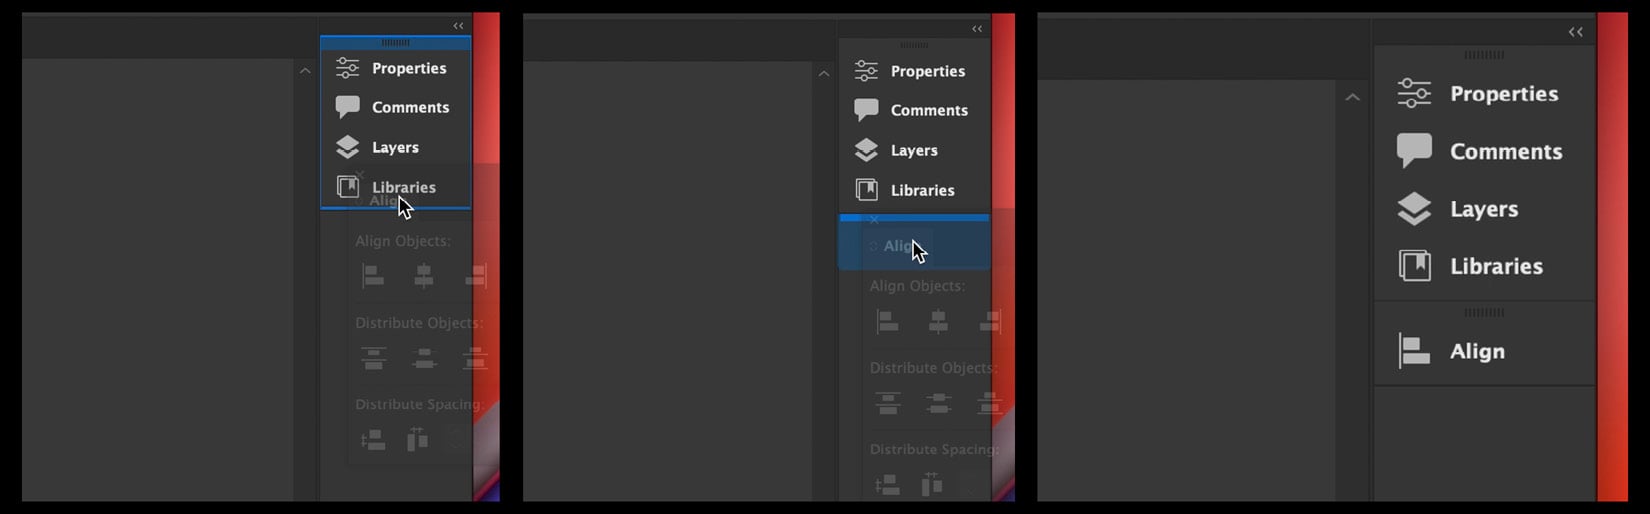
Figure 1.4 – Docking a panel
Custom workspaces are a great way to make Illustrator work for your intended purposes. I like to create custom workspaces for my multiple screen set-ups and third-party software. They are easy to create and remove, so don't be afraid to treat them as temporary aids to your workflow.
Custom preferences
Using the Ctrl/Command + K shortcut will bring up your preferences in several pieces of Adobe software (including Illustrator) and is an excellent place to start customizing Illustrator for your specific usage. From here, you can decide how many levels of Undo will get recorded, attach to a scratch disk, and set the time intervals between automatic recovery saves.
An excellent example of this is the Scale Strokes & Effects command located under the General section of this menu. I usually check this item so that the scaling of an object stays visually consistent at any size. I will be referring to this panel quite often through the course of this book, but for now, it is most important to know that it is available and allows for greater flexibility and customization for the user.
Contextual menus
An excellent option for quick access to commonly used tasks is the use of contextual menus. By definition, a contextual menu, or shortcut menu, gives you access to frequently-used commands related to the current context. It is generally brought up through a shortcut key or mouse button In Illustrator, after making a selection, you can right-click to see options for the selection:

Figure 1.5 – Contextual menu to an existing dock, but outside a panel group
In the case of the contextual menu shown in Figure 1.5, it highlights the options available to the path with the dashed white stroke. You will notice that it is the selected object due to the visibility of its blue bounding box. After summoning the contextual menu, you can use the Transform command to quickly make adjustments, such as adjusting the scale, and then either change the original selection or make a copy by using the Copy button.
Object attributes
At its simplest, every object can be assigned two attributes: Fill and Stroke. Of course, today, a variety of additional options can also be used to enhance any given object. In fact, an object can have multiple fills and strokes. You can adjust stroke width as well as apply variable stroke widths, brush definitions, and opacities.
Most of the adjustments to a path's attributes can be adjusted in the Control panel, located directly below the Application Bar (except in the default Essentials workspace). To assign more advanced attributes, such as adding multiple strokes to a path, you will need to make your way to the Appearance panel (which can be accessed through the Properties panel):
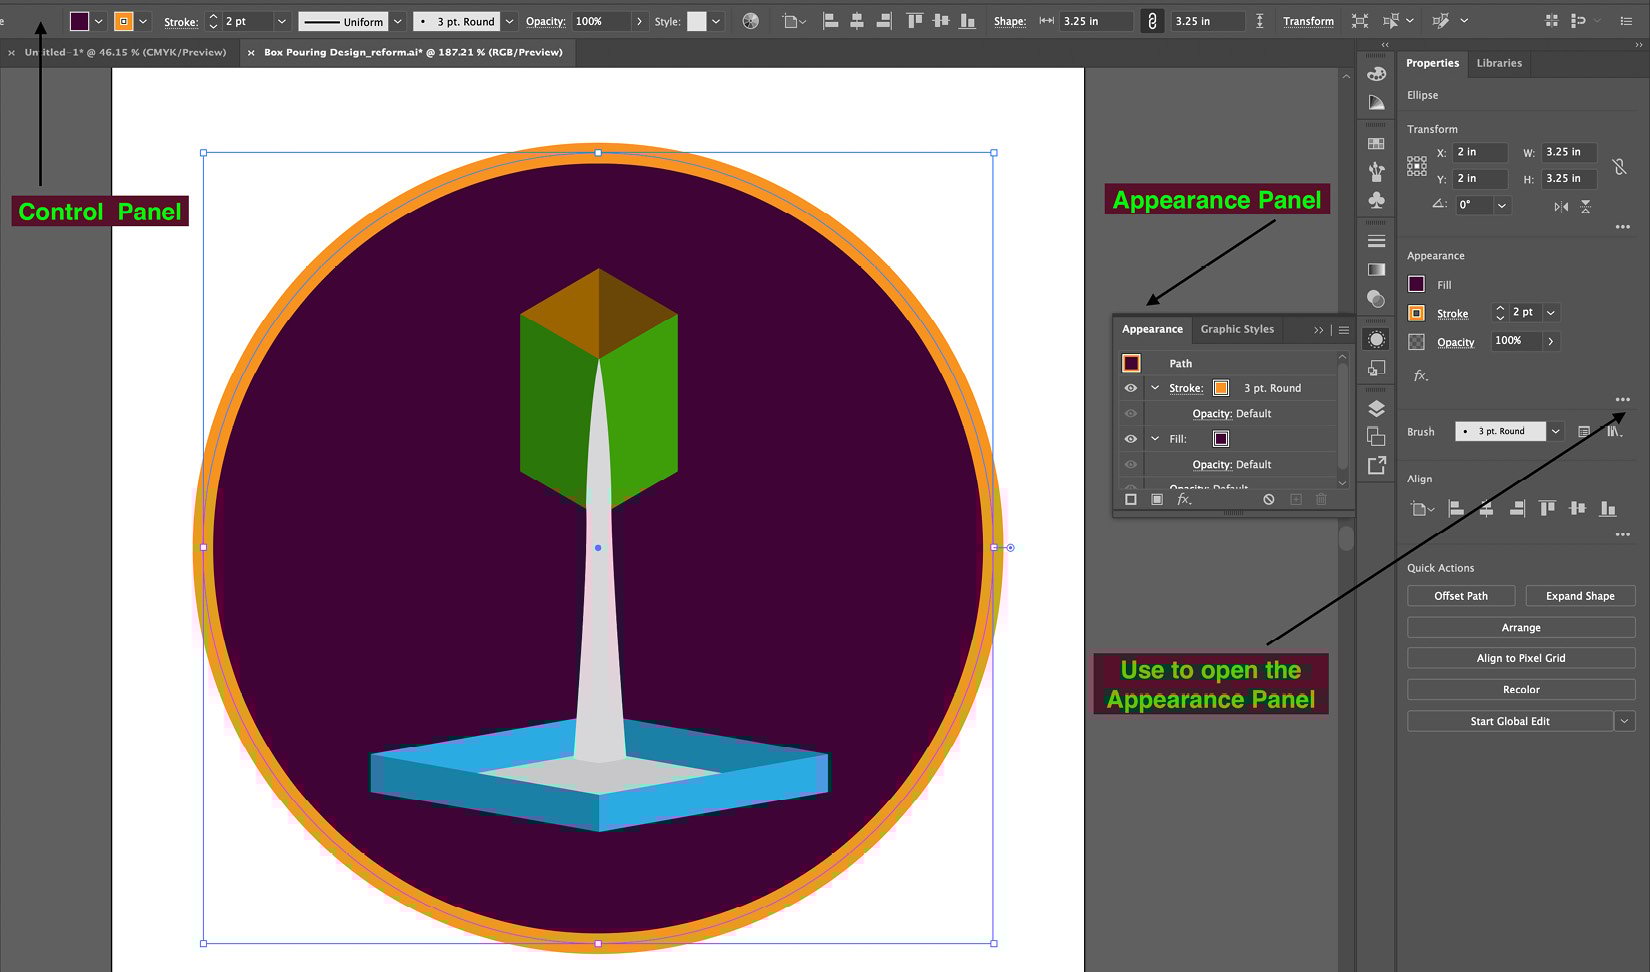
Figure 1.6 – The Control panel offers a lot more than just the Fill and Stroke attributes
As you may already be familiar with, the Fill attribute can be anything that can be a swatch in your swatches library. It can be a solid color, a gradient, or a pattern (None is also a choice). The same three choices of color, gradient, or pattern (plus None) are also available for the Stroke attribute.
Important Note
Setting up Adobe Illustrator is like finding the perfect recipe. You will continue to adjust it over time, and soon find that what was perfect for you at one time is no longer the right "flavor" and must be again adjusted for the specific situation at hand.
Understanding the multitude of ways to customize and utilize the GUI of Adobe Illustrator will help you solidify your success as you work to master your control of software. In extending the earlier analogy of the perfect recipe, consider that as chefs gain greater success, they inevitably also get more accustomed to their cooking tools and even customize them and their uses. Just as chefs hone their skills and the use of their tools over time, you too will find more benefits for the Workspaces and Preferences options over time and use them as your "secret sauce" in creating with Illustrator.
But of course, to successfully create in Illustrator, you must repeatedly use the main tools in Illustrator, while getting to know their specific capabilities (and limitations) over time.