

Learning the basics of the Vi(m) Editor
Vi and Vim are the text editors of choice for many system administrators and engineers. In a nutshell, the difference between them is that vim (vi improved) has many more capabilities than the original vi (visual editor). You can find these editors everywhere – from all the Unixes and Linuxes to the commercial Linux- or Unix-based software of today. For example, VMware's vSphere Hypervisor has a version of the vi editor built in. The rationale for this is simple – you need to have some sort of standardized editor that can be used to edit various text files available on a filesystem. Over the years, you'll surely find some cutdown version of vi or Vim on various network devices such as switches and routers, and even more complex devices like firewalls. It's just the way it is. If something's Unix- or Linux-based, chances are it's using text configuration files, and text configuration files need a text editor. Pretty straightforward logic, isn't it?
Just as an example – the Vim editor has spinoffs that can be used in a variety of different ways, including vim-athena (created with Athena GUI support), vim-gtk, and vim-gtk3 (created with GTK/GTK3 support), vim-tiny (a slimmed-down version of Vim), and vim-nox. But still, most people that we know of prefer using the good old-fashioned vi or Vim in a CLI.
For this first part of our recipe, we're going to explain the way vi and Vim work and use them to do some most common things, such as the following:
- Three
vi(m)modes –insert,command, andexmode - Moving around a text file that we want to edit by moving the cursor
- Deleting text (we could refer to it as cutting and deleting at the same time)
- Inserting additional content into a text file
- Saving and exiting in the vi(m) editors
- Finding content in a text file
- Copying and pasting text (what vi and Vim refer to as yank and paste)
That's going to be enough for this first recipe. We're going to go back to the advanced vim capabilities in the last recipe of this chapter, where we're going to dig much deeper into Vim and learn how to use much more advanced concepts, such as using regular expressions, line marking, buffers, and sorting.
Getting ready
We just need to check whether vi and Vim are installed on our system. The simplest way to do it is to just go brute-force and issue the following command:
sudo apt-get -y install Vim-tiny busybox Vim dictionaries-common wamerican
Ubuntu doesn't have or use the vi editor by default, so we can just install the Vim-tiny package to kind of emulate the same thing. Another way to use the vi editor in Ubuntu would be to use the following command:
busybox vi
Seeing that busybox is a command-line tool that embeds multiple Linux command-line utilities into one, this command is something that we need to be aware of. But also, we need to remember that the intent of busybox is to have a way to embed multiple popular CLI tools into one, which in turn means that none of these tools are completely the same as their standalone versions.
After installation is done (if needed at all), we're going to start using Vim and learn how to use it via examples. Let's issue the following commands as root:
cp /etc/passwd /root
cp /usr/share/dict/words /root
Take note of the fact that between cp, /etc/passwd, and /root (the same thing applies to cp, /usr/share/dict/words, and /root in the second command), we need to hit the spacebar on our keyboard. We're effectively copying the passwd and words files to the /root directory to have some source files to play with.
When we have successfully finished copying these files, we'll start the Vim editor and start editing. First, we're going to use the passwd file. Type in the following:
Vim /root/passwd
Let's start learning!
How to do it…
Now that we have the /root/passwd file opened in our Vim editor, let's play with it a bit. Moving around in normal mode is straightforward. Let's just start by using the arrow keys on our keyboard to move up and down and left and right. After we're done with that, let's just jump to the top of our file by using the gg sequence (by pressing the g key twice).
First, we're going to delete the first line. Vi(m) starts in something called normal mode, and if we press the d key twice, we're going to delete the first line. Let's check the before state:
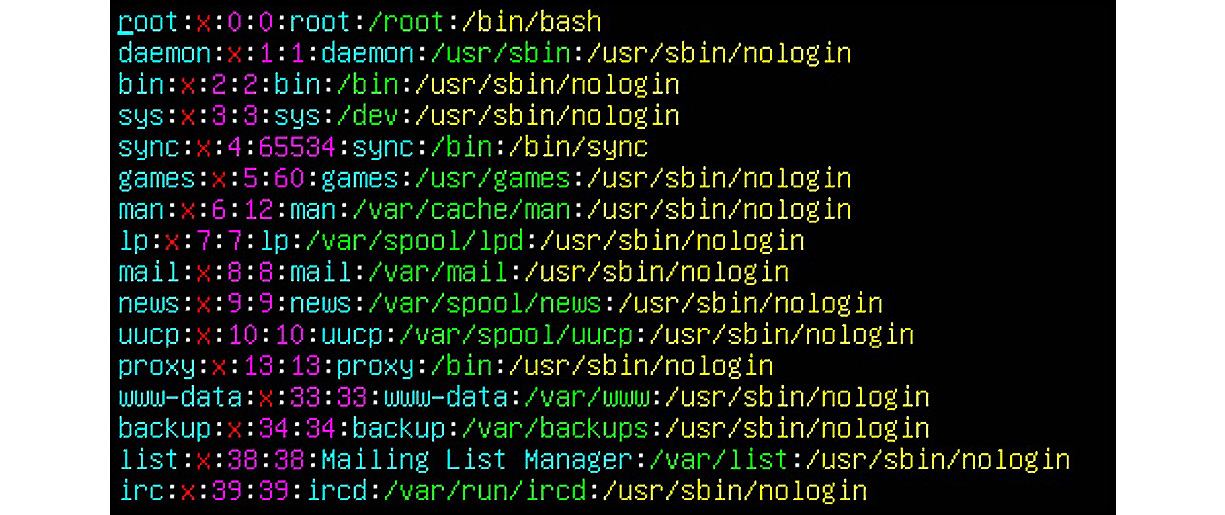
Figure 2.1 – The top section of the /root/passwd file
And now, after we have pressed the d key twice, it should look like this (if we are still positioned at the first line, the root line):
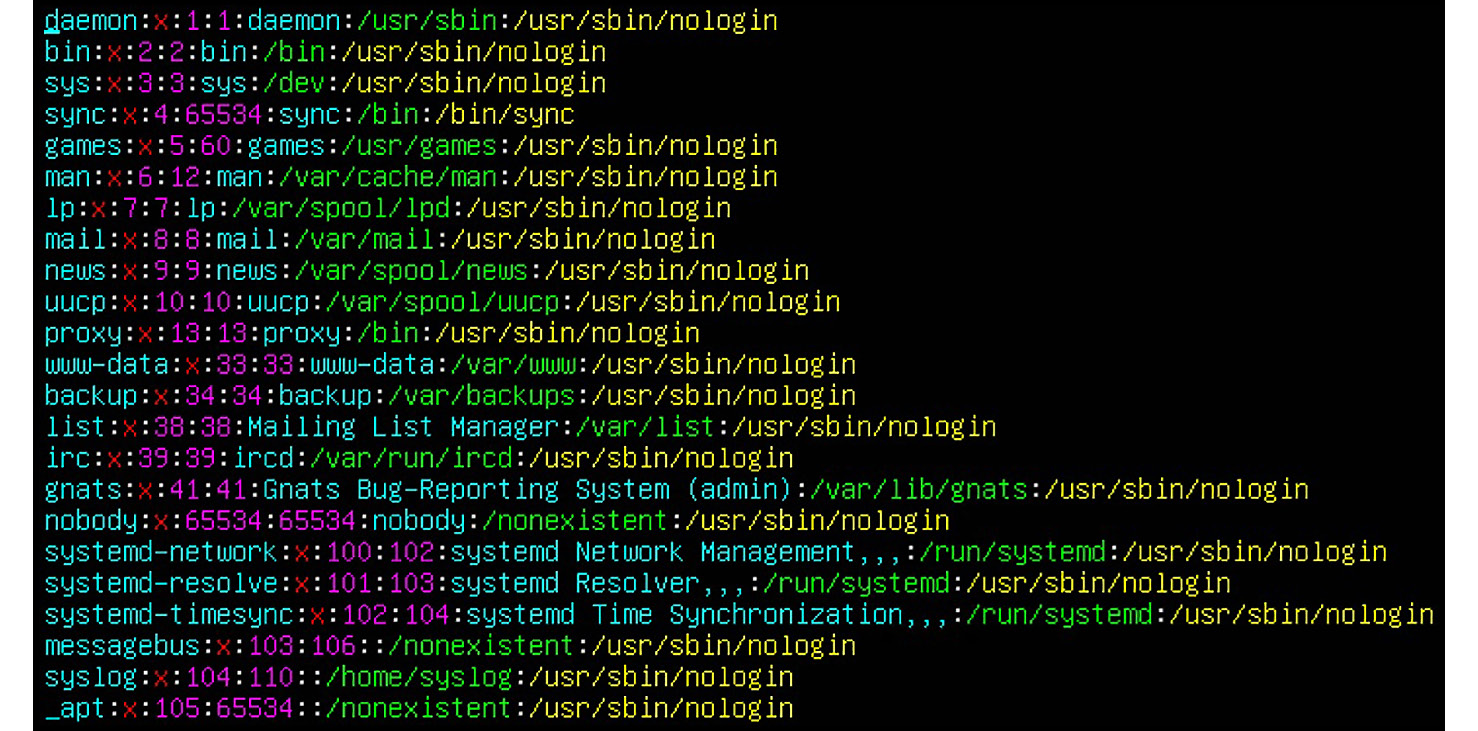
Figure 2.2 – After pressing the d key twice, the first line is gone
Let's now expand this use case further by pressing (just as an example) the 5dd key sequence. The result should look something like this:
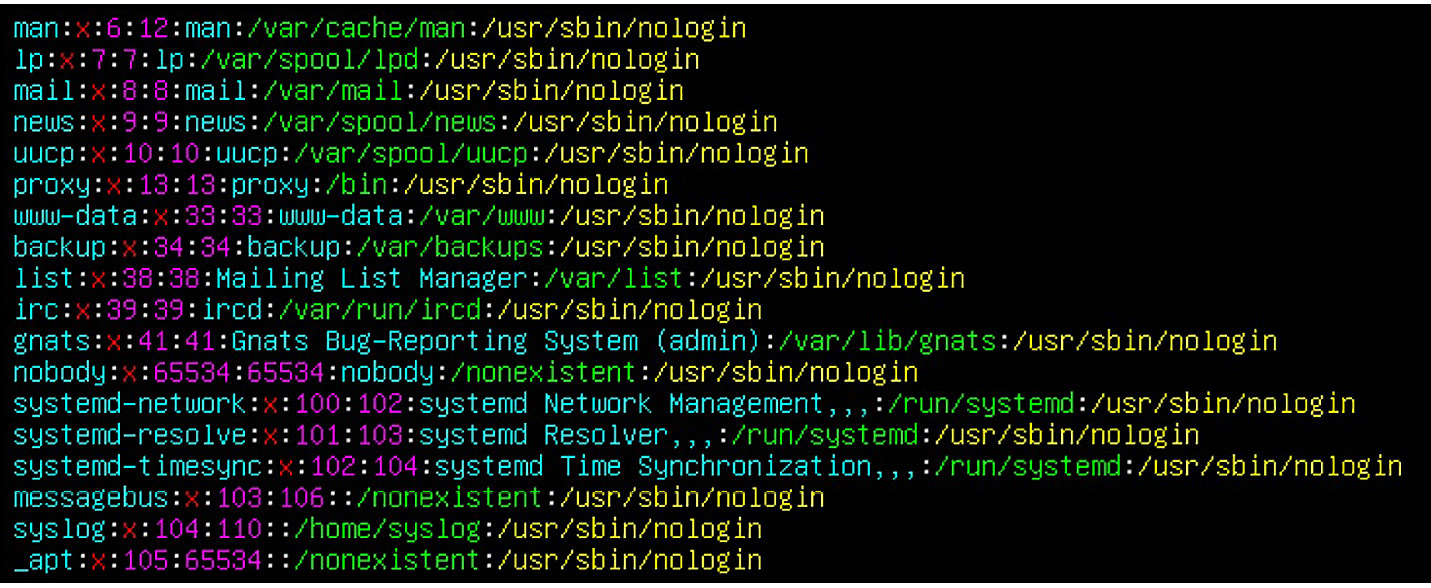
Figure 2.3 – After the 5dd operation (deleting five lines), we deleted five lines after the cursor
As we can see, the first five lines after our cursor (the lines starting with daemon, bin, sys, sync, and games) are gone.
Let's now jump to the last line in our /root/passwd file, and copy and paste it behind the last line. First, we need to go to the end of our file, which can be achieved by using the Shift + g sequence (basically, the capital letter G). After that, if we want to copy the line after the cursor (in effect, complete the last line in the file), we need to first yank it (copy) and then paste it to a correct spot. Yanking can be achieved by using the yy sequence (pressing the y key twice). That puts the line after our cursor in a copy and paste buffer. If we want to paste it after our last line, we need to press the p key. Our copied line will automatically be pasted after the last line. The end result, if we used the same virtual machine as in Chapter 1, Basics of Shell and Text Terminal, should be something like this:
Figure 2.4 – The yank and paste of a single line
Now, let's select three lines beginning with sshd (so, the sshd, systemd-coredump, and student lines) and copy and paste them after the line beginning with joe. First, we're going to use cursor keys to position at the beginning of the sshd line. Then, we're going to type the y3y key sequence. This will start yanking (copying) from the cursor, copy the next three lines in the copy and paste buffer, and then end yanking. If we did that successfully, Vim is going to throw us a message at the bottom of the screen, saying 3 lines yanked.
After we have these lines in the copy and paste buffer, we need to paste them. Let's use the cursor keys to move to the line beginning with joe, and then press the p key. The result should look like this:
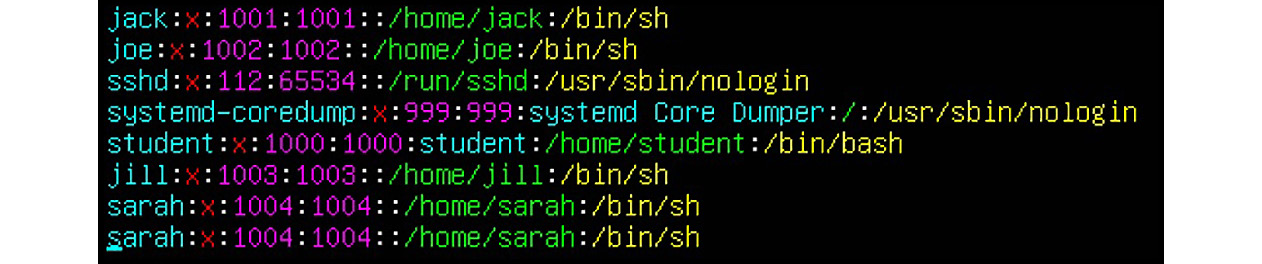
Figure 2.5 – Yank and paste, and multiple lines of text
Now that we have played with yank and paste and delete, it's time to add some content to this file. In order to do that, we need to enter insert mode. That can be achieved by typing the i key. So, let's add a bit of text after our cursor – press the i key and start typing. Let's add the following:
something:x:1400:1400::/home/something:/bin/bash
After we're done with inserting, press the Esc key (to go back to normal mode). The end result should look like this:
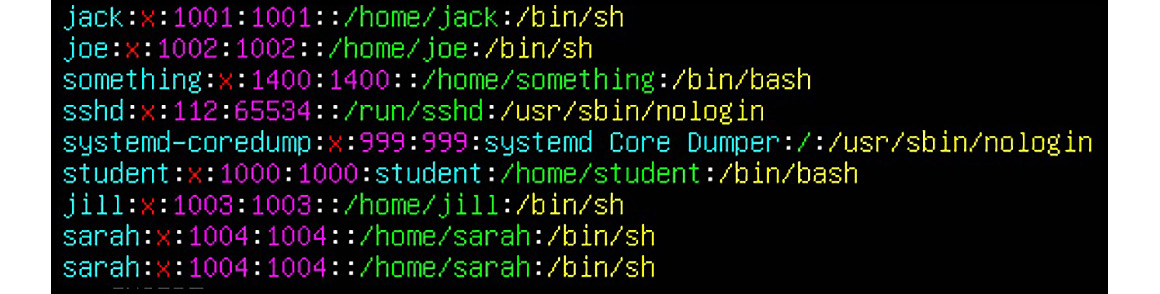
Figure 2.6 – Inserting additional text with insert mode
Now that we've done that successfully, the next logical step will be to save the file if we're happy with its contents. Let's say that we are and we're ready to save the file. In order for us to do that, we need to enter ex mode and tell Vim that we want to exit and save. There are several different key sequences that will make this happen for us. The first one is :wq! (write and quit – don't ask us for confirmation), and the second one is :x. There are other ways, such as using the ZZ key sequence, but let's stick to the more commonly used ones (wq and x). We need to make sure that we type these key sequences with a colon sign (:). As we will explain in a bit, using the colon sign means that we want to enter ex mode and do some final operations with our edited file. If we use this key sequence successfully, we should end up in shell, with our original file saved with all the changes that we made to it.
In truth, Vim has a spectacular number of key sequences that can be used for a variety of operations on text files. Feel free to translate this spectacular as either a very good or very bad thing, as it's all subjective – some of us like it a lot, some of us will hate it. Here are some commonly used key sequences:
- dw – delete a word
- 2dw – delete two words
- yw – yank one word
- u – undo the last change
- U – undo changes made to the current line
- a – append text after the cursor
- A – append text to the end of the current line
- Ctrl + f – scroll the file forward by one screen
- n Ctrl + f – scroll the file forward by n screens
- Shift + m – move the cursor to the middle of the page
- :50 – move the cursor to line 50 of the current file
- $ – move the cursor to the end of the line
- x – delete the character at the cursor
- X – delete the character before the cursor
- ^ – go to the first character of the line
- o – insert a line after the current one
- Ctrl + g – print the file info
There are literally hundreds of other commands, and we deliberately selected only some of them that we feel are useful and commonly used. Let's now do some more complex things by using a built-in Vim teaching tool called Vimtutor. In the command line, start Vimtutor by typing the following:
Vimtutor
After that, Vimtutor is going to ask us about the intended output file for practice, and we can just press the Enter key here. We should have the following content on our screen:
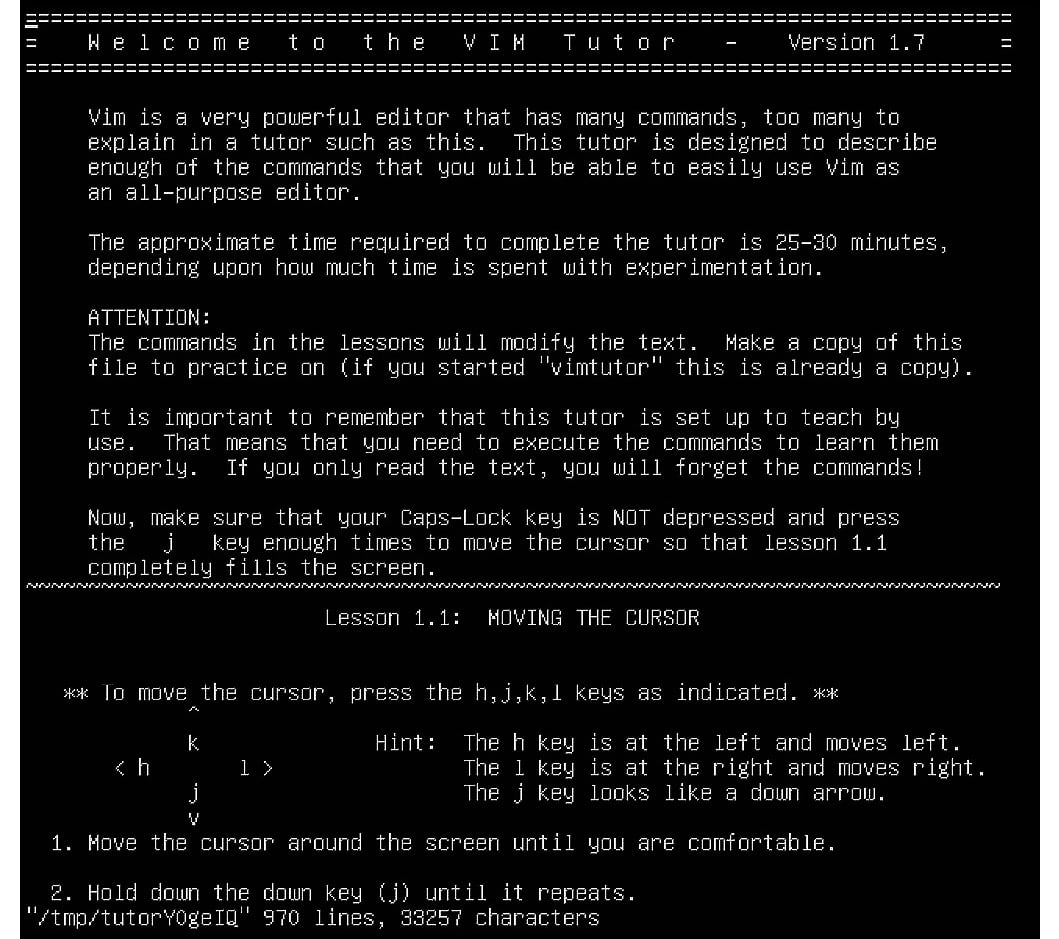
Figure 2.7 – The Vimtutor start page
Let's now use this file to practice a bit. The first thing that we're going to do is copy the first paragraph (starting with Vim and ending with editor.) before the paragraph starting with The approximate time.
Let's position our cursor at the beginning of the Vim line by using the arrow keys. After we have done that, we need to use the y} key sequence to instruct Vim to yank the paragraph starting at the cursor. Then, we need to move to the empty line between the first and second paragraphs by using the cursor keys and pressing the p key to paste the copied paragraph after the cursor. The result should look like this:
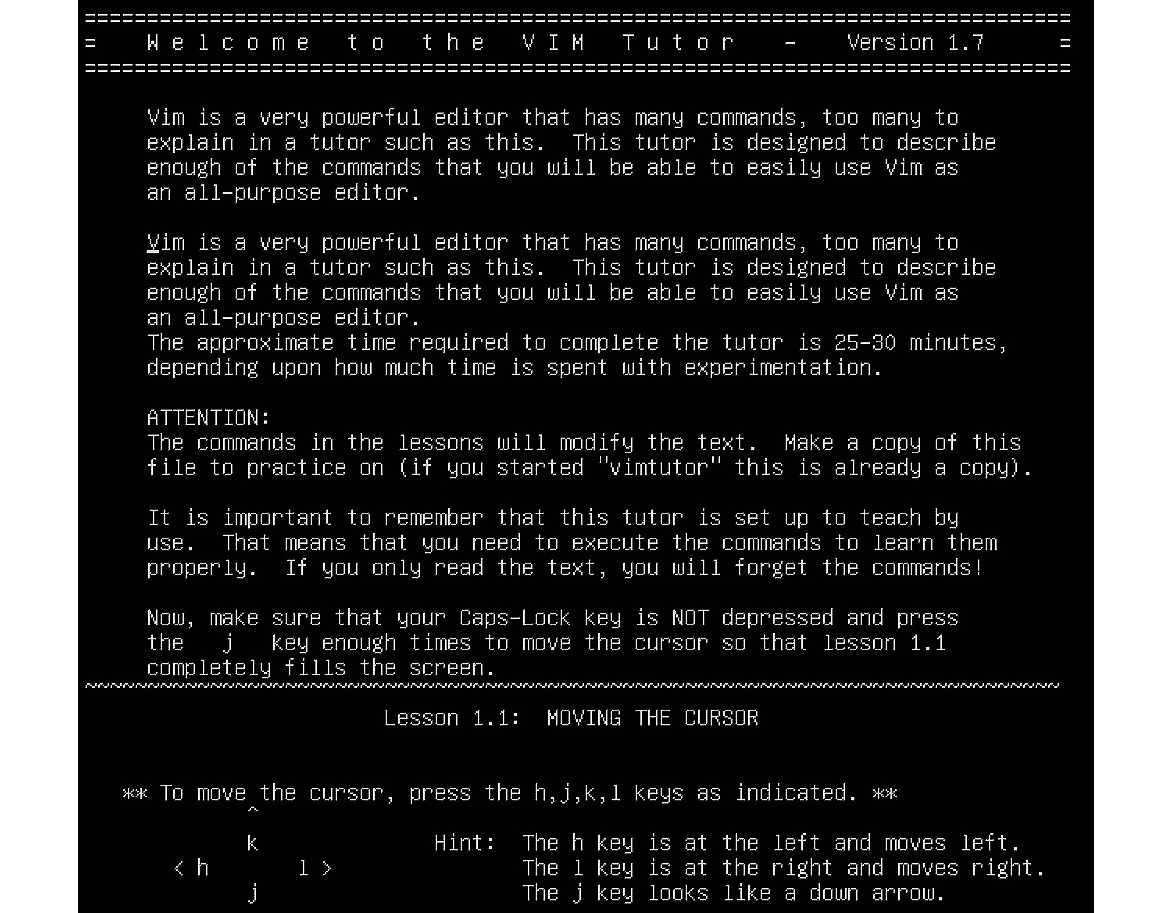
Figure 2.8 – Yanking and pasting a text paragraph
Let's say that we want to convert the complete file to lowercase characters. Of course, this operation involves several other operations:
- We need to move to the beginning of our file (gg).
- We need to turn on visual mode (more about this a bit later), achieved by pressing the Shift + v key sequence (uppercase V).
- We need to mark the text all the way to the end of our file, achieved by pressing the Shift + g key sequence (uppercase G).
- We need to make the text lowercase, achieved by pressing the u key.
So, the key sequence we're looking for is ggVGu. The result of our operation should look like this:
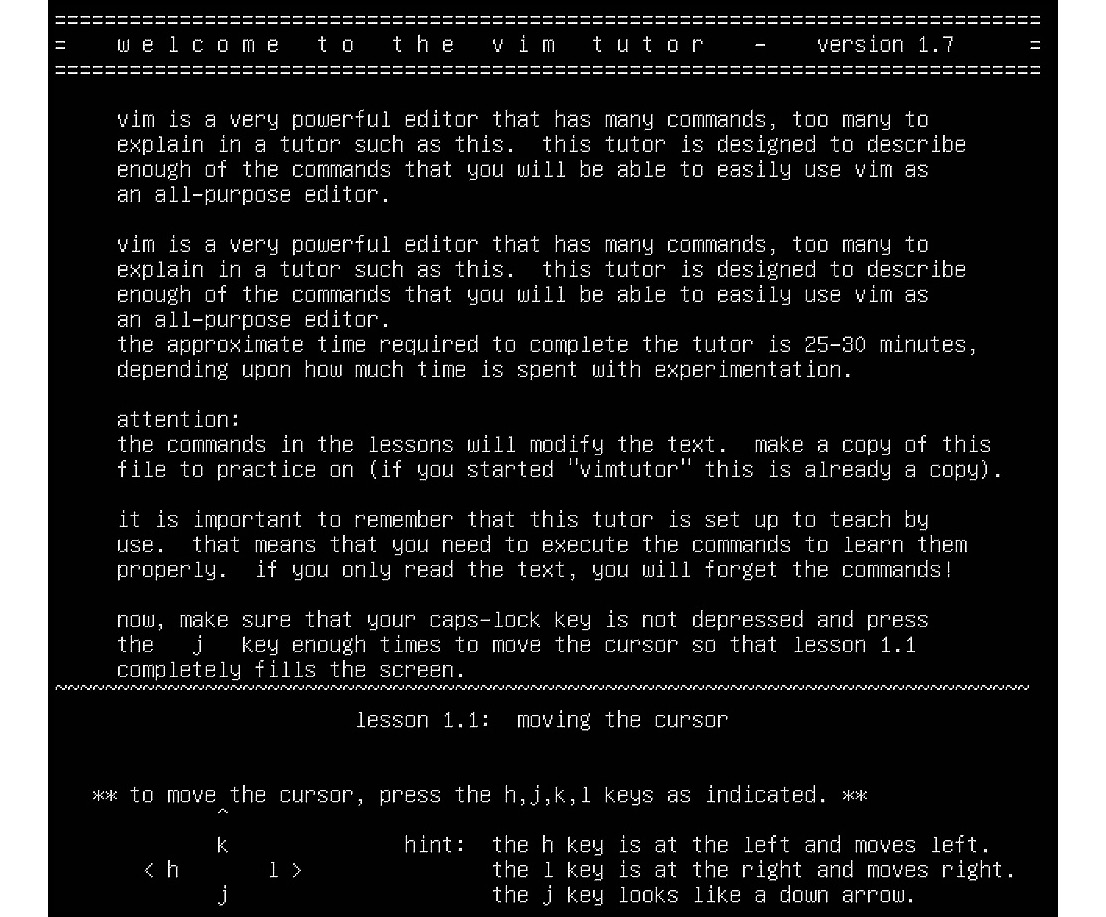
Figure 2.9 – Our Vimtutor file, with all lowercase characters
If we wanted to do the opposite (uppercase all the characters), we'd use the ggVGU key sequence (U is for uppercase and u is for lowercase characters).
We're going to take a short break from all of these key sequences by explaining how Vim works – specifically, we're going to focus on commonly used modes and briefly mention some of the lesser-used ones. Let's start with normal mode and work our way toward visual and replace modes.
How it works…
The Vim editor has more than 10 different modes, which roughly translates into the different ways in which it works. The most used modes are as follows:
- Normal mode
- Insert mode
- Ex mode
- Visual mode
- Replace mode
When we start Vim, we're in normal mode; we can sniff around in it by using the cursor, we can do a bit of yank and paste, and we can delete. So, it's used for general operations such as navigating through an edited file, a bit of rough-cut editing, and that's that.
If we want to add additional content to our text file, we usually switch to insert mode by using the i key. In insert mode, we can easily add a bit of text after our cursor and move around in our edited file. When we're ready to go back to normal mode, we can do that by pressing the Esc key. If, however, we're done with file editing and we just want to save the file and exit, we need to go to normal mode and then to ex mode. This is achieved by pressing the Esc key, followed by the colon (:). That puts us in ex mode, and then we can proceed to do wq!, x, or ZZ.
Visual and replace modes are quite a bit different. Visual mode has sub-modes (character, line, and block), and can be used to select (highlight) parts of the text that we want to work with and manipulate. For example, line and block modes can be useful for modifying YAML files when working with Ansible. Character mode can be used to highlight a part of code. YAML syntax is sensitive to indenting, so by using line mode, we can highlight portions of our playbooks and indent them left or right (by using the > and < keys) so that we don't have to do it manually. Block mode can be used efficiently to check indentation that was created by using line mode. These modes can be entered by using Shift + V (line mode) and Ctrl + v (block mode). Character mode can be entered by using the v key.
Replace mode allows us to type in our content in a text file over existing content. We can use the R key to enter replace mode (from normal mode).
See also
If you need more information about the basics of Vim, we suggest that you check out this content:
- Vim: https://www.Vim.org/
- Mastering Vim: https://www.amazon.com/exec/obidos/ASIN/1789341094/stichtingiccfhol
- An interactive Vim tutorial: https://www.openVim.com/