
In the previous recipe, you were introduced to the cv::Mat data structure. As mentioned, this is a key element of the library. It is used to manipulate images and matrices (in fact, an image is a matrix from a computational and mathematical point of view). Since you will be using this data structure extensively in your application developments, it is imperative that you become familiar with it. Notably, you will learn in this recipe that this data structure incorporates an elegant memory management mechanism, allowing efficient usage.
Exploring the cv::Mat data structure
How to do it...
Let's write the following test program that will allow us to test the different properties of the cv::Mat data structure, as follows:
- Include the opencv headers and a c++ i/o stream utility:
#include <iostream>
#include <opencv2/core/core.hpp>
#include <opencv2/highgui/highgui.hpp>
- We are going to create a function that generates a new gray image with a default value for all its pixels:
cv::Mat function() {
  // create image
  cv::Mat ima(500,500,CV_8U,50);
  // return it
  return ima;
}
- In the main function, we are going to create six windows to show our results:
// define image windows
  cv::namedWindow("Image 1");
  cv::namedWindow("Image 2");
  cv::namedWindow("Image 3");
  cv::namedWindow("Image 4");
  cv::namedWindow("Image 5");
  cv::namedWindow("Image");
- Now, we can start to create different mats (with different sizes, channels, and default values) and wait for the key to be pressed:
// create a new image made of 240 rows and 320 columns
  cv::Mat image1(240,320,CV_8U,100);

  cv::imshow("Image", image1); // show the image
  cv::waitKey(0); // wait for a key pressed

  // re-allocate a new image
  image1.create(200,200,CV_8U);
  image1= 200;

  cv::imshow("Image", image1); // show the image
  cv::waitKey(0); // wait for a key pressed

  // create a red color image
  // channel order is BGR
  cv::Mat image2(240,320,CV_8UC3,cv::Scalar(0,0,255));

  // or:
  // cv::Mat image2(cv::Size(320,240),CV_8UC3);
  // image2= cv::Scalar(0,0,255);

  cv::imshow("Image", image2); // show the image
  cv::waitKey(0); // wait for a key pressed
- We are going to read an image with the imread function and copy it to another mat:
// read an image
  cv::Mat image3= cv::imread("puppy.bmp");

  // all these images point to the same data block
  cv::Mat image4(image3);
  image1= image3;

  // these images are new copies of the source image
  image3.copyTo(image2);
  cv::Mat image5= image3.clone();
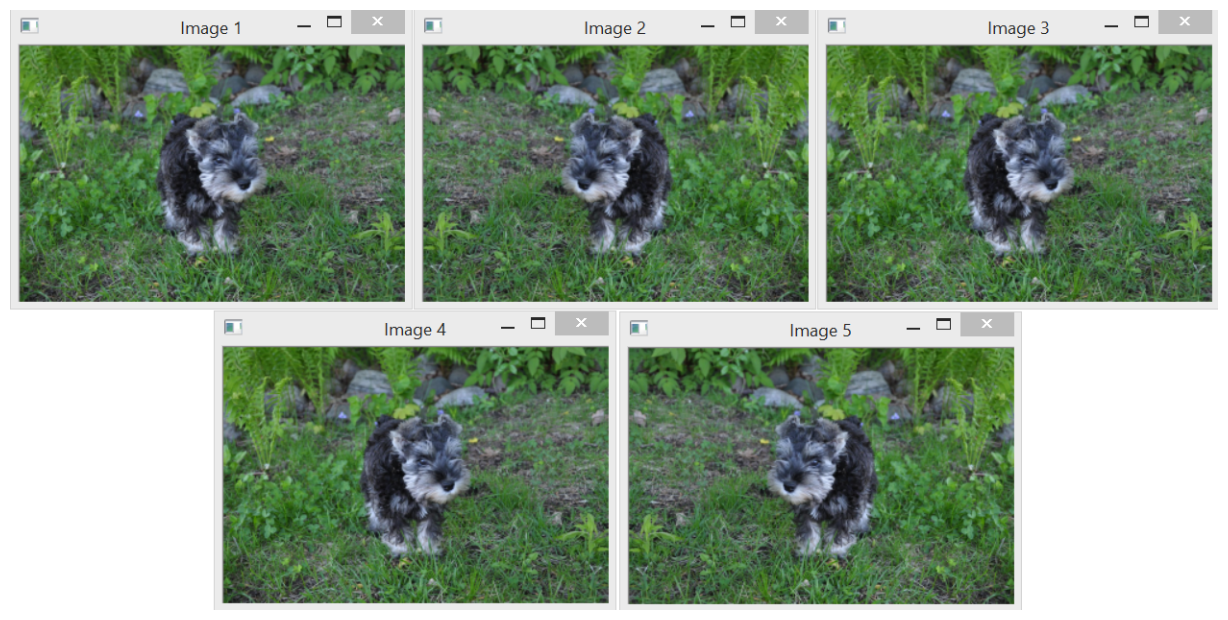
- Now, we are going to apply an image transformation (flip) to a copied image, show all images created, and wait for a keypress:
// transform the image for testing
  cv::flip(image3,image3,1);

  // check which images have been affected by the processing
  cv::imshow("Image 3", image3);
  cv::imshow("Image 1", image1);
  cv::imshow("Image 2", image2);
  cv::imshow("Image 4", image4);
  cv::imshow("Image 5", image5);
  cv::waitKey(0); // wait for a key pressed
- Now, we are going to use the function created before to generate a new gray mat:
// get a gray-level image from a function
  cv::Mat gray= function();

  cv::imshow("Image", gray); // show the image
  cv::waitKey(0); // wait for a key pressed
- Finally, we are going to load a color image but convert it to gray in the loading process. Then, we will convert its values to float mat:
  // read the image in gray scale
  image1= cv::imread("puppy.bmp", IMREAD_GRAYSCALE);
  image1.convertTo(image2,CV_32F,1/255.0,0.0);

  cv::imshow("Image", image2); // show the image
  cv::waitKey(0); // wait for a key pressed
Run this program and take a look at the following images produced:
Now, let's go behind the scenes to understand the code better.
How it works...
The cv::Mat data structure is essentially made up of two parts: a header and a data block. The header contains all the information associated with the matrix (size, number of channels, data type, and so on). The previous recipe showed you how to access some of the attributes of this structure contained in its header (for example, by using cols, rows, or channels). The data block holds all the pixel values of an image. The header contains a pointer variable that points to this data block; it is the data attribute. An important property of the cv::Mat data structure is the fact that the memory block is only copied when it is explicitly requested. Indeed, most operations will simply copy the cv::Mat header such that multiple objects will point to the same data block at the same time. This memory management model makes your applications more efficient while avoiding memory leaks, but its consequences have to be understood. The examples for this recipe illustrate this fact.
By default, the cv::Mat objects have a zero size when they are created, but you can also specify an initial size as follows:
// create a new image made of 240 rows and 320 columns
cv::Mat image1(240,320,CV_8U,100);
In this case, you also need to specify the type of each matrix element; CV_8U here, which corresponds to 1-byte pixel images. The letter U means it is unsigned. You can also declare signed numbers by using the letter S. For a color image, you would specify three channels (CV_8UC3). You can also declare integers (signed or unsigned) of size 16 and 32 (for example, CV_16SC3). You also have access to 32-bit and 64-bit floating-point numbers (for example, CV_32F).
Each element of an image (or a matrix) can be composed of more than one value (for example, the three channels of a color image); therefore, OpenCV has introduced a simple data structure that is used when pixel values are passed to functions. It is the cv::Scalar structure, which is generally used to hold one value or three values. For example, to create a color image initialized with red pixels, you will write the following code:
// create a red color image
// channel order is BGR
cv::Mat image2(240,320,CV_8UC3,cv::Scalar(0,0,255));
Similarly, the initialization of the gray-level image could also have been done using this structure by writing cv::Scalar(100).
The image size also often needs to be passed to functions. We have already mentioned that the cols and rows attributes can be used to get the dimensions of a cv::Mat instance. The size information can also be provided through the cv::Size structure that simply contains the height and width of the matrix. The size() method allows you to obtain the current matrix size. It is the format that is used in many methods where a matrix size must be specified. For example, an image could be created as follows:
// create a non-initialized color image
cv::Mat image2(cv::Size(320,240),CV_8UC3);
The data block of an image can always be allocated or reallocated using the create method. When an image has been previously allocated, its old content is deallocated first. For reasons of efficiency, if the newly proposed size and type match the already existing size and type, then no new memory allocation is performed:
// re-allocate a new image
// (only if size or type are different)
image1.create(200,200,CV_8U);
When no more references point to a given cv::Mat object, the allocated memory is automatically released. This is very convenient because it avoids the common memory leak problems often associated with dynamic memory allocation in C++. This is a key mechanism in OpenCV 2 that is accomplished by having the cv::Mat class implement reference counting and shallow copying. Therefore, when an image is assigned to another one, the image data (that is, the pixels) is not copied; both the images will point to the same memory block. This also applies to images passed by value or returned by value. A reference count is kept, such that the memory will be released only when all the references to the image will be destroyed or assigned to another image:
// all these images point to the same data block
cv::Mat image4(image3);
image1= image3;
Any transformation applied to one of the preceding images will also affect the other images. If you wish to create a deep copy of the content of an image, use the copyTo method. In that case, the create method is called on the destination image. Another method that produces a copy of an image is the clone method, which creates an identical new image as follows:
// these images are new copies of the source image
image3.copyTo(image2);
cv::Mat image5= image3.clone();
If you need to copy an image into another image that does not necessarily have the same data type, you have to use the convertTo method:
// convert the image into a floating point image [0,1]
image1.convertTo(image2,CV_32F,1/255.0,0.0);
In this example, the source image is copied into a floating-point image. The method includes two optional parameters—a scaling factor and an offset. Note that both the images must, however, have the same number of channels.
The allocation model for the cv::Mat objects also allows you safely to write functions (or class methods) that return an image:
cv::Mat function() {
  // create image
  cv::Mat ima(240,320,CV_8U,cv::Scalar(100));
  // return it
  return ima;
}
We also call this function from our main function, as follows:
  // get a gray-level image
  cv::Mat gray= function();
If we do this, then the gray variable will now hold the image created by the function without extra memory allocation. Indeed, as we explained, only a shallow copy of the image will be transferred from the returned cv::Mat instance to the gray image. When the ima local variable goes out of scope, this variable is deallocated, but since the associated reference counter indicates that its internal image data is being referred to by another instance (that is, the gray variable), its memory block is not released.
It's worth noting that in the case of classes, you should be careful and not return image class attributes. Here is an example of an error-prone implementation:
class Test {
  // image attribute
  cv::Mat ima;
  public:
  // constructor creating a gray-level image
 Test() : ima(240,320,CV_8U,cv::Scalar(100)) {}

  // method return a class attribute, not a good idea...
  cv::Mat method() { return ima; }
};
Here, if a function calls the method of this class, it obtains a shallow copy of the image attributes. If later this copy is modified, the class attribute will also be surreptitiously modified, which can affect the subsequent behavior of the class (and vice versa). To avoid these kinds of errors, you should instead return a clone of the attribute.
There's more...
While you are manipulating the cv::Mat class, you will discover that OpenCV also includes several other related classes. It will be important for you to become familiar with them.
The input and output arrays
If you look at the OpenCV documentation, you will see that many methods and functions accept parameters of the cv::InputArray type as the input. This type is a simple proxy class introduced to generalize the concept of arrays in OpenCV, and thus, avoid the duplication of several versions of the same method or function with different input parameter types. It basically means that you can supply a cv::Mat object or other compatible types as an argument. This class is just an interface, so you should never declare it explicitly in your code. It is interesting to know that cv::InputArray can also be constructed from the popular std::vector class. This means that such objects can be used as the input to OpenCV methods and functions (as long as it makes sense to do so). Other compatible types are cv::Scalar and cv::Vec; this later structure will be presented in Chapter 2, Manipulating the Pixels. There is also a cv::OutputArray proxy class that is used to designate the arrays returned by some methods or functions.
See also
- The complete OpenCV documentation can be found at https://docs.opencv.org/.
- Chapter 2, Manipulating the Pixels, will show you how to access and modify the pixel values of an image represented by the cv::Mat class efficiently.
The next recipe will explain how to define a region of interest (ROI) inside an image.