
You already know several ways to create a hop between two job entries or two steps. Now you will learn a new way:
Create a job and drag two job entries to the canvas. Name the entries
AandB.Position the mouse cursor over the entry named
Aand wait until a tiny toolbar shows up below the entry icon as shown:
Click on the output connector (the last icon in the toolbar), and drag toward the entry named
B. A grayed hop is displayed.When the mouse cursor is over the
Bentry, release the mouse button. A hop is created from theAentry to theBentry.
You created a hop between two job entries by using the mouse-over assistance—a feature incorporated in PDI 4.
When you position the mouse cursor over a step in a transformation or a job entry in a job,a tiny toolbar shows up to assist you. The following diagram depicts its options:
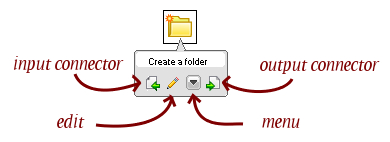
The following table explains each button in this toolbar:
|
Button |
Description |
|---|---|
|
Edit |
Equivalent to double-clicking the job entry/step to edit it. |
|
Menu |
Equivalent to right-clicking the job entry/step to bring up the contextual menu. |
|
Inputconnector |
Assistant for creating hops leaving from this job entry/step. If the job entry/step doesn't accept any input (that is, START entry job or Generate Rows step), the input connector is disabled. |
|
Outputconnector |
Assistant for creating hops directed toward this job entry/step. It's used as shown in the tutorial, but the direction of the created hop is the opposite. |
In the tutorial, you created a simple hop between two job entries. You can create hops between steps in the same way. In this case, depending on the kind of source step, you might be prompted for the kind of hop to create. For example, when leaving a Filter rows step, you will be asked if the destination step is where you'll send the "true" data, or where you will send the "false" data, or if this is the main output of the step.
The sniff-testing feature allows you to see the rows that are coming into or out of a step in real time. While a transformation is running, right-click a step, select Sniff test during execution | Sniff test output rows. A window appears showing you the output data as it is being processed. In the same way, you can select Sniff test during execution | Sniff test input rows to see the incoming rows.
In Chapters 10 and 11, you learned how to nest jobs and transformations. You even learned how to create subtransformations. Whichever the case, when you ran the main job or transformation, there was a single log tab showing the log for the main and all nested jobs and transformations.
In PDI 4.0, when a job entry is running, you can drill-down into that. Drilling down means opening that entry and seeing what's going on inside that job or transformation. In a separate window, you'll see both the step metrics and the log. If there are more nested transformations or jobs, you can continue drilling down. You can go even further into a running subtransformation. In any of these jobs or transformations, you may sniff test as well, as described above.
Drilling down is useful, for example, to understand why your jobs or transformations don't behave as expected or to find out where a performance problem is.
You can see the job drill-down and sniff-testing in action in two videos made by Matt Casters, Kettle chief leader and author of these features at: http://www.ibridge.be/?p=179.
Besides the features that we have just seen, there are some other UI improvements worth mentioning:
Enhanced notes editor: Now you can apply different fonts and colors to the notes you create in Spoon.
Color-coded logs: Now it is easier to read a log, as different colors allow you to quickly identify different kinds of log messages.
Revamped Repository explorer: The Repository explorer has been completely redesigned, making this a major UI improvement in Kettle 4.0.