

Implementing player movement
Now, at this point, we have a great-looking game, but nothing at all happens. Let's change that now using our player. Perform the following steps:
Right-click on the Scripts folder you created earlier, click on Create, and select the C# Script label. Once you click on it, a script will appear in the Scripts folder, and it should already have focus and be asking you to type a name for the script – call it
PlayerBehaviour.Tip
Note that I'm using Behaviour instead of Behavior. Either is fine to use as long as you're consistent, but since Unity's base script is called MonoBehaviour, I use the same spelling to avoid confusion.
Double-click on the script in Unity, and it will open MonoDevelop or Visual Studio Community 2015 depending on how you installed Unity and what OS your computer is running.
Tip
While code can be written in any program that can support text (such as Notepad), both of these pieces of software are integrated development environments (IDEs) that are created to make software development easier and more convenient to work with giving users access to useful features. MonoDevelop is open source, multi-platform, and is included with your Unity installation, but Visual Studio is a very popular tool with programmers and has some nice features that are exclusive to it. However, it can only be used for free by individual developers or for education and open source projects. For this book, we will not be doing anything specific to either IDE, so it's up to you which you'd like to use.
Tip
If you'd like to change which piece of software to use to open script files in Unity, you can go to the Edit | Preferences menu and then go to External Tools and under External Script Editor, click on the drop-down menu and select whichever you'd like to use.
After your IDE has loaded, you will be presented with the C# stub code that was created automatically for you by Unity when you created the C# script.
Let's break down what's currently there before we replace some of it with new code. At the top, you will see two lines:
using UnityEngine;
using System.Collections;
Tip
Detailed steps to download the code bundle are mentioned in the Preface of this book. Please have a look.
The code bundle for the book is also hosted on GitHub at https://github.com/PacktPublishing/Unity-5.x-Game-Development-Blueprints. We also have other code bundles from our rich catalog of books and videos available at https://github.com/PacktPublishing/. Check them out!!
The engine knows that if we refer to a class that isn't located inside this file, then it has to reference the contents within these namespaces for the referenced class before giving an error. We are currently using two namespaces.
The UnityEngine namespace contains interfaces and class definitions that let MonoDevelop know about all the addressable objects inside Unity.
The System.Collections namespace contains interfaces and classes that define various collections of objects, such as lists, queues, bit arrays, hash tables, and dictionaries. But we will not be using it in this file so you can remove that line.
The next line you'll see is:
public class PlayerBehaviour : MonoBehaviour {You can think of a class as a kind of blueprint for creating a new component type that can be attached to GameObjects, the objects inside our scenes that start out with just Transform and then have components added to them. When Unity created our C# stub code, it took care of that; we can see the result, as our file is called PlayerBehaviour and the class is also called PlayerBehaviour. Make sure that your .cs file and the name of the class match, as they must be the same to enable the script component to be attached to a game object. Next up is the: MonoBehaviour section of the code. The : symbol signifies that we inherit from a particular class; in this case, it is set to MonoBehaviour. All behavior scripts must inherit from MonoBehaviour directly or indirectly by being derived from it. This idea of having classes inherit behavior is known as
inheritance.
Inheritance is the idea of having an object to be based on another object or class using the same implementation. With this in mind, all of the functions and variables that exist inside the MonoBehaviour class will also exist in the PlayerBehaviour class, because PlayerBehaviour is a MonoBehaviour with the ability to add more to it.
Tip
Checking Unity's Script Reference can be quite useful when determining what has already been done for you in Unity. For more information on the MonoBehaviour class and all of the functions and properties it has, check out http://docs.unity3d.com/ScriptReference/MonoBehaviour.html.
Directly after this line, we will want to add some variables to help us with the project. Variables are pieces of data that we wish to hold on to for one reason or another, typically because they will change over the course of a program, and we will do different things based on their values.
Add the following code under the class definition:
// Movement modifier applied to directional movement.
public float playerSpeed = 4.0f;

// What the current speed of our player is
private float currentSpeed = 0.0f;

// The last movement that we've made
private Vector3 lastMovement = new Vector3();
Between the variable definitions, you will notice comments to explain what each variable is and how we'll use it. To write a comment, you can simply add a // to the beginning of a line and everything after that is commented upon so that the compiler/interpreter won't see it. If you want to write something that is longer than one line, you can use /* to start a comment, and everything inside will be commented until you write */ to close it. It's always a good idea to do this in your own coding endeavors for anything that doesn't make sense at first glance.
Note
For those of you working on your own projects in teams, there is an additional form of commenting that Unity supports, which may make your life much easier: XML comments. They take up more space than the comments we are using, but also document your code for you. For a nice tutorial about that, check out http://bit.ly/xmlComments.
One of the things you'll notice is the public and private keywords before the variable type. These are access modifiers that dictate who can and cannot use these variables. The public keyword means that any other class can access that property, whereas private means that only this class will be able to access this variable. Here, currentSpeed is private because we want our current speed not to be modified or set anywhere else. But, you'll notice something interesting with the public variable that we've created. Go back into the Unity project and drag and drop the PlayerBehaviour script onto the playerShip object. Before going back to the Unity project though, make sure that you save your PlayerBehaviour script. Not saving is a very common mistake made by people when starting to code. Have a look at the following screenshot:
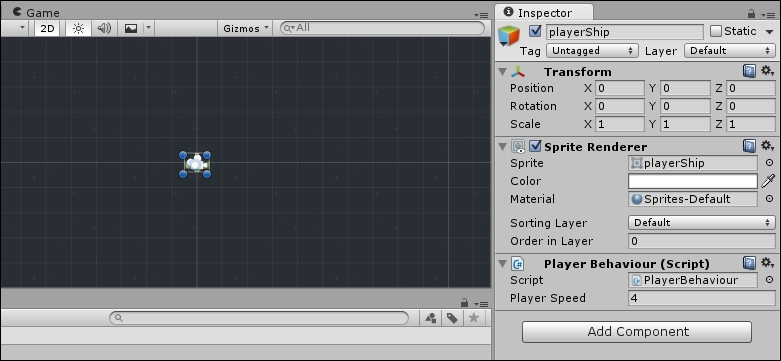
You'll notice now that the public variable that we created are located inside Inspector for the component. This means that we can actually set those variables inside Inspector without having to modify the code, allowing us to tweak values in our code very easily, which is a godsend for many game designers. You may also notice that the name for Player Speed has been changed to be more readable. This is because of the naming convention that we are using where each word starts with a capital letter. This convention is called CamelCase (more specifically headlessCamelCase).
Now that we have our variables set, go back to MonoDevelop for us to work on the script some more.
The line after that is a function definition for a method called Start; it isn't a user method but one that belongs to MonoBehaviour. Where variables are data, functions are the things that modify and/or use that data. Functions are self-contained modules of code (enclosed within braces { and }) that accomplish a certain task. The nice thing about using a function is that once a function is written, it can be used over and over again. Functions can be called from inside of other functions:
void Start () {

}
Start is only called once in the lifetime of the behavior when the game starts and is typically used to initialize data.
Note
If you're used to other programming languages, you may be surprised that initialization of an object is not done using a constructor function. This is because the construction of objects is handled by the editor and does not take place at the start of gameplay as you might expect. If you attempt to define a constructor for a script component, it will interfere with the normal operation of Unity and can cause major problems with the project.
However, for this behavior, we will not need to use the Start function. Perform the following steps:
Delete the
Startfunction and its contents.The next function that we see included is the
Updatefunction. Also inherited fromMonoBehaviour, this function is called for every frame that the component exists in and for each object that it's attached to. We want to update our player ship's rotation and movement every turn.Inside the
Updatefunction (between{and}), put the following lines of code:// Rotate player to face mouse Rotation(); // Move the player's body Movement();
Here, I called two functions, but these functions do not exist because we haven't created them yet (and will possibly show up as red in your IDE because of that). Let's do that now!
Below the
Updatefunction and before the}that closes the class, put the following function to close the class:// Will rotate the ship to face the mouse. void Rotation() { // We need to tell where the mouse is relative to the // player Vector3 worldPos = Input.mousePosition; worldPos = Camera.main.ScreenToWorldPoint(worldPos); /* * Get the differences from each axis (stands for * deltaX and deltaY) */ float dx = this.transform.position.x - worldPos.x; float dy = this.transform.position.y - worldPos.y; // Get the angle between the two objects float angle = Mathf.Atan2(dy, dx) * Mathf.Rad2Deg; /* * The transform's rotation property uses a Quaternion, * so we need to convert the angle in a Vector * (The Z axis is for rotation for 2D). */ Quaternion rot = Quaternion.Euler(new Vector3(0, 0, angle + 90)); // Assign the ship's rotation this.transform.rotation = rot; }In this code, we are changing the rotation of the object we attached this script to (our player) based on where the player has put the mouse. Now, if you comment out the
Movementline (by putting // in front of it) and run the game, you'll notice that the ship will rotate in the direction in which the mouse is. Have a look at the following screenshot:
If you did comment out the line, be sure to remove the // before continuing.
Below the
Rotationfunction, we now need to add the following code in ourMovementfunction:// Will move the player based off of keys pressed void Movement() { // The movement that needs to occur this frame Vector3 movement = new Vector3(); // Check for input movement.x += Input.GetAxis ("Horizontal"); movement.y += Input.GetAxis ("Vertical"); /* * If we pressed multiple buttons, make sure we're only * moving the same length. */ movement.Normalize (); // Check if we pressed anything if(movement.magnitude > 0) { // If we did, move in that direction currentSpeed = playerSpeed; this.transform.Translate(movement * Time.deltaTime * playerSpeed, Space.World); lastMovement = movement; } else { // Otherwise, move in the direction we were going this.transform.Translate(lastMovement * Time.deltaTime * currentSpeed, Space.World); // Slow down over time currentSpeed *= .9f; } }Now, inside this function, we use Unity's built in Input properties in order to set the x and y aspect of our movement vector and then move (or Translate) the ship in that direction. Edit | Project Settings | Input will open up Unity's Input Manager, which will have a list of different Axes that can be used for input.

As you can see here,
leftandaare used in the Negative Button and Alt Negative Button properties respectively, so if we press either of those two it will give you a number between -1 and 1, with positive giving you a value between 0 and 1.Note
For more information on the Input Manager, check out: http://docs.unity3d.com/Manual/class-InputManager.html.
Now, save your file and move back into Unity. Save your current scene as
Chapter_1.unityby going to File | Save Scene. Make sure to save the scene to ourScenesfolder we created earlier.Run the game by pressing the play button on the top toolbar. And you should see something like the following screenshot:

Now, you'll see that we can move using the arrow keys or the W A S D keys, and our ship will rotate to face the mouse. Great!
Tip
If you'd like to make your ship move faster and/or slower, increase or decrease the PlayerBehavior component's Player Speed variable inside the Inspector tab.